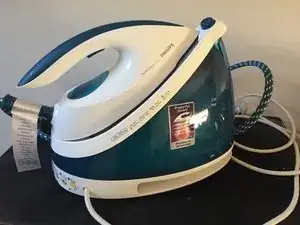
Steam Iron - Step 2: How does it work?
The objective of this guide is to study is to study the various parts and mechanics of this Iron by using photos, diagrams, explanations, and links to tutorials to empower future repairers.
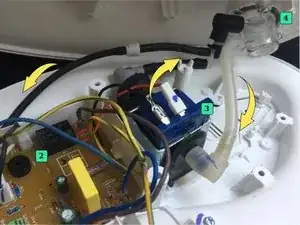
In this guide, we explain what the device is made of, we show the different sub-assemblies, the roles they occupy, an the way they function in an isolated manner as well as once assembled together.
We do not show the disassembly or reassembly of this device since our goal is to study a category of objects. In the same category, no device is alike, from one brand to another or within the same brand. It is therefore impossible to say which tool to use and how to go about it. It will therefore be necessary in case of difficulties, to search on the internet according to the model.
Our goal is to show that you can learn by doing. The advantage is that it allows you to progress "intelligently" by understanding "how it works". When you understand, you can do it again as many times as necessary and on other devices.
Nor is it about repeating what has already been done. We select the already existing quality content, we complete it if necessary to aggregate it around a "methodological" axis specifically to provide solutions in an independent and secure repair process.
Performing a repair is like conducting an investigation. You have to look for testimonies, ask questions, observe, find clues, analyze exhibits, check alibis. Then move on to identifying and apprehending the suspect.
This investigation must be carried out methodically.
It is this method that we suggest you discover.
To start repairing any device, from the simplest to the most sophisticated, even before disassembling anything, we suggest asking 3 questions. This is the information gathering phase.
This first phase is as important as the repair itself, insofar as if the analysis has been carried out correctly, the repair will be that much easier.
The 3 questions to always ask are, in this order:
What are the different device functions?
In the case of simple objects, it may seem pointless to ask this question, but for more complex ones, it is important to understand the origin of the failure. In this way, we can avoid getting sidetracked as much as possible..
What are its instructions?
This is the logical continuation of the first question. When you have understood all the functions of the device, you should understand how to use it. To do this, you can refer to the user manual if it is present, or ask its owner to explain how it works, if he himself knows it, which is not always the case!
What is the problem you are having?
We can finally ask the last question about the malfunction or malfunctions of the device.
It is necessary to determine if the device is totally or partially broken down (hence the importance of the first question) what are the symptoms, if an event caused the failure, everything that can help to identify the origin of the problem.
During this step, it is necessary to test the object, observe what happens (1)*** and confirm with the user the nature of the problem(s), to check what works and what doesn't, to avoid any misunderstandings in the rest of the procedure.
After collecting this initial information, we can likely establish a first diagnosis that will allow us to move on to the next phase, the execution of the repair.
This phase consists of:
At the end of this phase, the device tests should be carried out to check if the device functions properly.
In the workshop, it must be done with the user and confirm with him the success (or not) of the operation.
(1) Repair is an exercise in observation that appeals to (almost all) our senses.
- sight to visualize what's going on
- Hearing to listen to the possible noises produced by the device
- Smell to identify, for example, burnt smells
- touch to feel vibrations, heat, cold etc.
For a successful repair, it is recommended to be in a quiet place, and have enough space with good lighting.
(2) IMPORTANT Since disassembling devices, especially the most recent ones, is often a long and delicate procedure, it is advisable to ensure that you have the necessary time and tools. Be aware that this can damage the appearance of the device, or even render it unusable in the worst case. It is recommended to search the internet for disassembly advice by searching according to the model and brand of the device.
The repair of electrical or electronic devices almost always requires the opening of these devices, which leads to taking certain precautions to avoid risking electrocution or certain other dangers (burns, explosion, fire, etc.) .
It is therefore essential to master the basics of electricity and to know and apply the relevant safety rules when opening a device of this type.
If not, don't do anything yourself.
If you're unsure, just do the inspections making sure the device is powered off.
If you take a measurement with power on, make sure to prepare the measurement with power off by connecting the multimeter, for example, with wire grips. This allows you to do the verification without having to handle potentially dangerous instruments.

This study is brought to you by '''Atelier Soudé'''.
The Atelier Soudé is an association created in December 2015 with the aim of reducing the waste from electrical and electronic equipment WEEE, to reappropriate their objects through co-repair and to raise awareness of environmental issues.