Introduction
If the memory of an ASUS laptop seems to be malfunctioning, the SSD may be at fault. If this is determined to be the case, this guide demonstrates how to replace an inoperable, outdated, or otherwise ineffective SSD on the ASUS T300LA-US51T. This project can take upwards of an hour, but no specialized skills are required to complete the replacement.
-
-
METHOD 2: Access by removing the screen (suggested by Quantum Byte)
-
If like me you are unable to find a gap to detach the aluminium back from the frame so instead I tried accessing by removing the screen using a sharp tool (a metal blade such as a Stanley knife or a flat-ended spudger) as in the video (not my work).
-
Unfortunately, this is not as easy as in the video as the entire outer edge seems to be glued. Furthermore, the screen cracks v. easily. Since my screen was already damaged, I ended up breaking up and tearing the screen off. I am perhaps not best to advise on this method.
-
I suggest using a hair dryer/ heat gun to melt the glue sufficiently to make the screen detach.
-
-
-
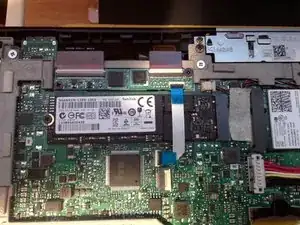
The SSD is a M.2 NGFF style with a size of 80mm. The label states 3.3v 2A. If replaced with a lower power drive battery life might increase.
-
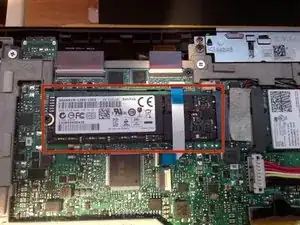
Unscrew the single screw on the end of the drive. Undo the tabs on the ribbon cable above it and take the ribbon out.
-
Remove the drive and replace with a larger new one.
-
To reassemble your device, follow these instructions in reverse order.
Be careful to place everything back the way that you found it.
One comment
Note that this guide does not work for the Asus T300 Chi which has an eMMC solid state drive soldered directly to the motherboard - you will need an eMMC reader and skill in removing soldered components to do this. Recommend taking to a data recovery professional in this case
Hello, can you add some pictures of the operation for opening the cover ?
thanks
Alessandro
Alex -
Sorry I do not own the tablet anymore.
Sasa Macura -
To open the Cover of TransformerBook T300LA start at the hinge on the bottom-side of your Tablet, and open the 2 screws first. Then use a plastic spatula from a Smartphone-Repair-Kit. Be very carefully, the cover should open easily.
On following link you will find a helpfull video for opening: https://youtu.be/WFD_9xalh-g
ChristianR -