Introduction

This repair guide was authored by the iFixit staff and hasn’t been endorsed by Google. Learn more about our repair guides here.

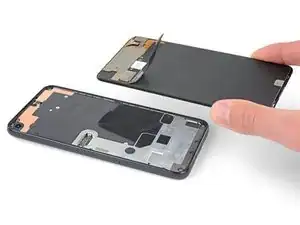
Follow this guide to replace a broken or cracked screen on a Pixel 4a.

The Pixel 4a’s unreinforced display panel is fragile. Pay special attention to the warnings in the opening procedure if you are reusing the screen.

  1. GAtKSCpq6nOLFhJN
    GAtKSCpq6nOLFhJN
    yYyPALgQYGnCFA4X
    qbLJ5OYSRVHREJWu
    • You will need to pry the screen up to remove it from the phone. Read the following notes carefully before proceeding.

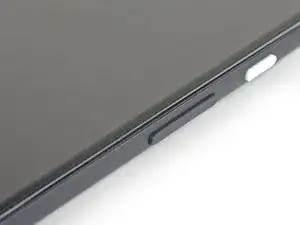
    • Take note of the two seams on the edge of the phone:

    • Screen seam: This seam separates the screen from the rest of the phone. This is where you should pry.

    • Frame seam: This is where the plastic frame meets the back cover. It is held in place by screws. Do not pry at this seam.

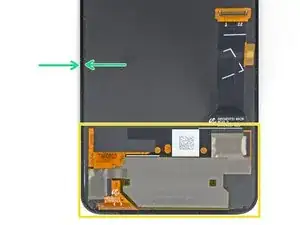
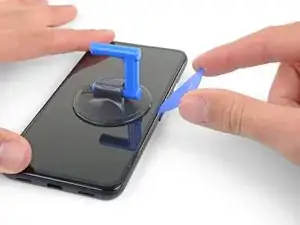
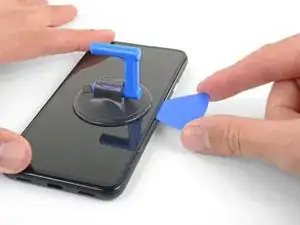
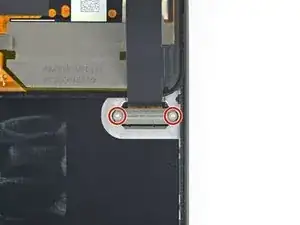
    • Before you begin, note the following areas on the screen:

    • Screen flex cable: Do not insert the opening pick deeper than instructed or you risk damaging this cable.

    • Note the orange ribbon cable under the lower-right corner of the screen, which is susceptible to damage if your opening pick is pressed into it. Only insert your opening pick as little as is necessary to separate the screen adhesive.

    • Adhesive perimeter: Prying beyond this narrow perimeter without angling the pick will damage the OLED panel.

    Coll down guys and gals.

    1) go below the Display and not between the backcover/middle (see the other comments)

    2) just take care about the flex/display cable position (which is iirc about on the middle i.e. 2nd 3rd from the bottom ON THE LEFT side dear OP)

    Everything else is just separting the glued on Display from the Phone.

    See the other comments

    Aleksandar Dejanovic -

    Cool down guys and gals.

    1) go below the Display and not between the backcover/middle (see the other comments)

    2) just take care about the flex/display cable position (which is iirc about on the middle i.e. 2nd 3rd from the bottom ON THE LEFT side dear OP)

    Everything else is just separting the glued on Display from the Phone.

    See the other comments

    Aleksandar Dejanovic -

    I've measured it: The cable starts arround 1.4-1.6 cm from the lower half from the bottom on the left side.

    So You can cut the bottom left corner and of course the upper left one but for safety's sake, watch out for the camera.

    You can go up to 5cm down from the upper left side till You're near the cable.

    Aleksandar Dejanovic -

    When you say left side, is this your left when the phone screen is facing you?

    jaunie -

  2. q2iVFP1DNesqap1L
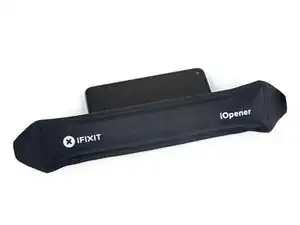
    • Apply a heated iOpener to the right edge of the display for one minute to soften the adhesive.

    • A hair dryer, heat gun, or hot plate may also be used, but be careful not to overheat the phone—the display and internal battery are both susceptible to heat damage.

  3. EJEIf4Z1AEo3AMWC
    EJEIf4Z1AEo3AMWC
    ScoSymvuqCnKNDcG
    QDwEliHCNFRvCaNt
    • If your display is badly cracked, covering it with a layer of clear packing tape may allow the suction cup to adhere. Alternatively, very strong tape may be used instead of the suction cup. If all else fails, you can superglue the suction cup to the broken screen.

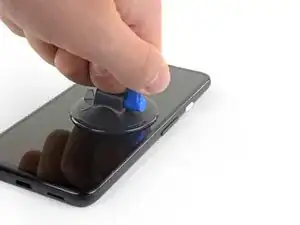
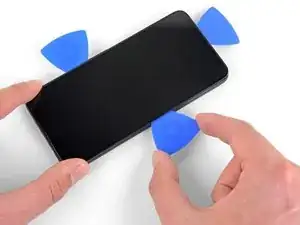
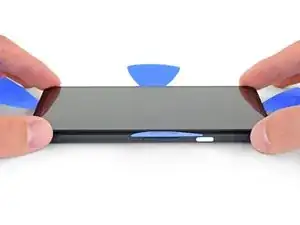
    • Place a suction cup as close to the right edge of the screen as possible.

    • Lift the suction cup with a strong steady force.

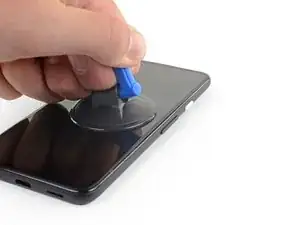
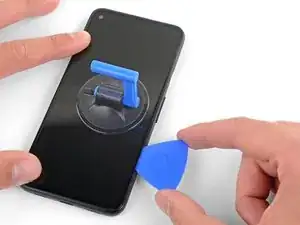
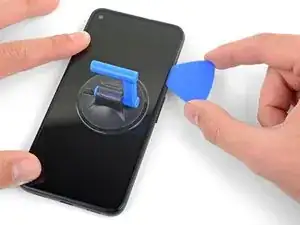
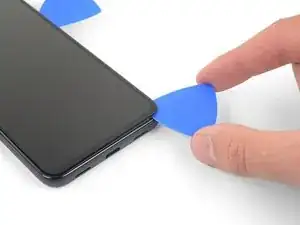
    • Insert the tip of an opening pick into the screen seam no more than 1 mm.

    It's pretty easy. Insert it just below the screen between the Display and the Display “holder” or mold.

    Aleksandar Dejanovic -

  4. xDkhtvTPHTrBtHR6
    xDkhtvTPHTrBtHR6
    AgsUneGcTGB3PV2M
    sPMrxeVQOoANkv3i
    • This step shows how to insert the pick without damaging the OLED panel. Do this before beginning to slice the adhesive.

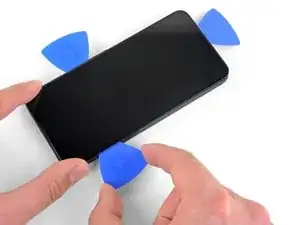
    • With the pick 1 mm into the gap, pivot the pick upwards to a steep angle.

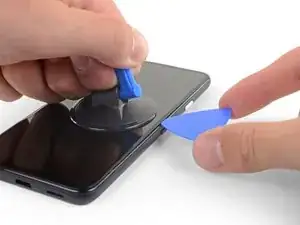
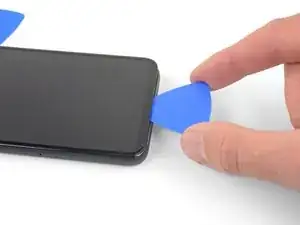
    • At a steep angle, carefully push the pick into the gap about 1/4 inch (6 mm). The pick should slide in below the OLED panel.

    • Stop if you feel the point of the pick hitting a ridge. The pick may be pressing against the edge of the OLED panel. Angle the pick and try again.

    This took me a while, I ended up sharpening the tip of the pick with a razor so I could push it through the seam and slicing a few times, heat->sharpen-> slice until I finally got it to move, and once it slid under carefully heated up areas and sliced with ~2mm of the pick.

    Alan Carlson -

    This sounds also harder than it is. Push it in 1mm and just lift the other end in a wider angle like 70° degree from the horinzontal position. There “shouldn't” be much you can do wrong. Because except for the Data cable (flex) at a certain position, I can't remeber anything important but isolating tapes that I have scratched.

    It's just the Screen glued to the mold. That's it.

    Aleksandar Dejanovic -

    Oh, and I wonder here where do You all get such thins plectrums? I have also the flat plastic version and the thin plastic cards but none of them were thin enough for this!!

    I ended up using the backside i.e. the dull side of a Razorblade. I didn't saw any alternatives to this. Did You hear this OP?

    Any!!

    Aleksandar Dejanovic -

  5. J4QMAiSkZffCSgBV
    J4QMAiSkZffCSgBV
    rCRAZWFOTKgxQUYs
    LeRcwOFGsOG2JHfX
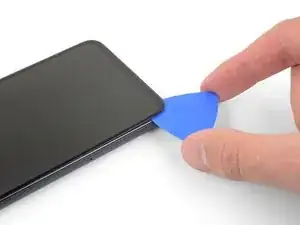
    • Slide the pick along the right edge of the screen to cut the adhesive.

    • Do not insert the pick more than 1/4 inch (6 mm) or you may damage the screen's flex cable.

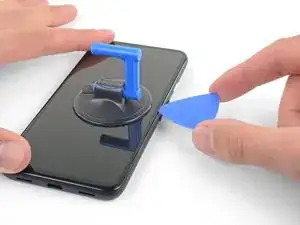
    • Leave the pick in the top right corner to prevent the adhesive from re-sealing.

  6. D42ibC2SikIjDNWv
    D42ibC2SikIjDNWv
    1UDYbsxrgPALt626
    JhcXfCMQ1xAfK4aK
    • The screen adhesive is very weak and you should not need to re-apply heat. If the screen does feel hard to slice, apply heat to the difficult area for one minute and try again.

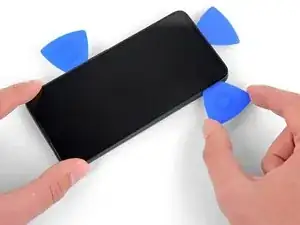
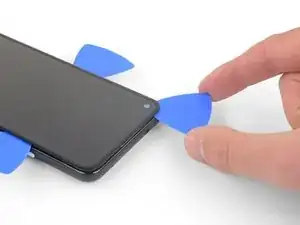
    • Insert another opening pick into the right edge of the phone at an angle where a gap has already formed to prevent damage to the OLED panel.

    • Slide the opening pick around the bottom of the phone to cut the adhesive.

    • There is a delicate cable under the bottom-right corner of the screen. If you feel your opening pick snag on anything, pull it out and try again. Make sure your pick is angled downward and only inserted as little as is necessary to separate the adhesive (no more than 3 mm deep).

    • Leave the pick inserted along the bottom edge to prevent the adhesive from resealing.

    Top and bottom edge adhesive were much stronger than this suggests. Corners were very hard to detach. I killed my screen b/c I cracked it at the top. Worked better with heating around whole perimeter like an iPhone.

    Erik Sorensen -

    WARNING: Be very careful prying the bottom left and right corners! In fact do not insert anything there because there is only a 0.8mm clearance between the screen and the edge, and there's a 0.5mm space between the screen and front glass where if you insert a pick between the screen will crack and break! I had to replace the screen after only doing a battery repair...

    bloc -

    Unfortunately I did not properly read the comments here. So for the unafraid people like me:

    DO NOT insert something into the bottom right! Especially not like it is shown in the image at this location!

    Instead I suggest start releasing the screen from right, then left side, then top and as the last step release the bottom, but start with the left corner. Do not pry too much and use a bit more heat as suggested.

    There is a small image of this critical right corner in Step 16 (the part at the top is the display and the left corner at the top is the critical right corner here). You'll see the orange cable in the corner which is easy to damage...

    Peter -

  7. iEnPlXUXUHTZJnpL
    iEnPlXUXUHTZJnpL
    UNTnxRjUZoDHXT4R
    YScDDT4gpOFJOE6j
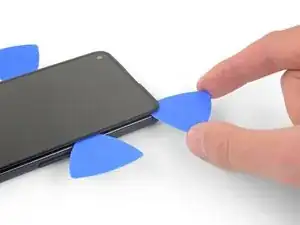
    • Insert another opening pick into the bottom edge of the phone at an angle where a gap has already formed to prevent damage to the OLED panel.

    • Use the pick to slice through the left edge of the phone.

    • If the screen feels hard to slice, heat the left edge for one minute and try again.

    • Leave the pick inserted along the left edge of the phone to prevent the adhesive from re-sealing.

  8. GXSjo5fueaLsoYd5
    GXSjo5fueaLsoYd5
    4mouCGVN3ej3XoXQ
    wLsO4lDvkSNucC6V
    • There's a mesh covering the earpiece speaker on the top edge of the screen. If you don’t have a replacement mesh, take care not to damage or lose this component.

    • Insert another opening pick into the left edge of the phone at an angle where a gap has already formed to prevent damage to the OLED panel.

    • Slide the pick around the top edge of the phone to cut the adhesive.

    • If the screen feels hard to slice, heat the top edge for one minute and try again.

  9. BPFrToKqDD62NEeM
    BPFrToKqDD62NEeM
    GlHaHCFlb2AFZhlL
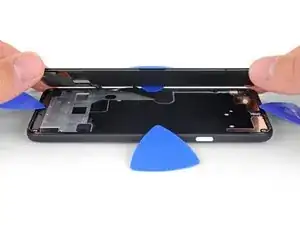
    • Once you have cut around the perimeter of the phone, carefully lift the right edge of the screen, opening the phone like a book.

    • Do not remove the screen yet.

    • Use an opening pick to carefully cut through any remaining adhesive.

  10. oUNIGJd3OLSZrEwr
    oUNIGJd3OLSZrEwr
    mlcnfSNcaxRYbOAl
    5IuM1hZd6gUKkGSC
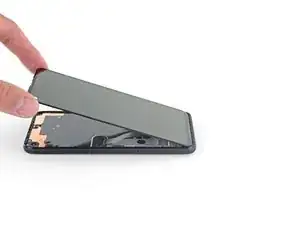
    • Lift from the top edge and swing the screen over the bottom edge until you can rest it glass-side down.

    • Be careful not to put any stress on the attached ribbon cable.

  11. QDuLoSjuQaZgqGZP
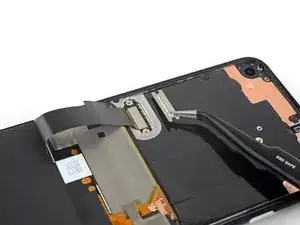
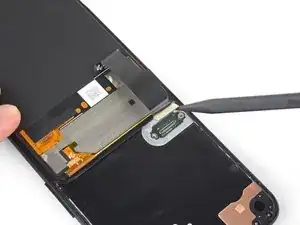
    • Use a pair of tweezers to carefully peel up the black tape covering the screen connector bracket.
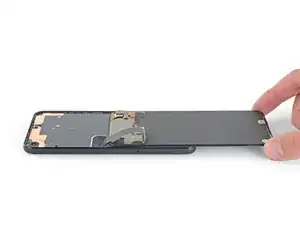
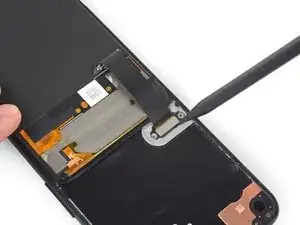
    • If it is in good condition, you can re-use this tape during reassembly. Otherwise, replace it with a piece of electrical tape.

    How critical is the tape that covers this connector? I realized upon sealing back up my device that I forgot to re-install it. I imagine it mostly is there to prevent dust and moisture ingress?

    Alex Cook -

    Interestingly this tape was missing in my phone. Maybe that explains some of the display issues I occasionally had, like a thin green line on the right side of the screen which could be "pushed" away.

    Fabian Seyfried -

  12. 6x5ufTbvB5Q5XCb1
    • Use a T3 Torx driver to remove the two 2.1 mm screws securing the screen connector bracket.

    • Throughout this repair, keep track of each screw and make sure it goes back exactly where it came from.

    A T4 driver worked for me here.

    Gabe Maayan -

    It is definitely a T4.

    Jarl Friis -

    Funny ... For me, it was T3. The screws must vary across different phones

    Helmut Sporgersi -

  13. V1CYECKe4EvEHu1J
    • Use a pair of tweezers to remove the screen connector bracket.

    • Make sure to keep this component to reinstall it during reassembly.

  14. eSlgWVRJgapeowxZ
    eSlgWVRJgapeowxZ
    LtTmQU1tTfjruuhd
    • Use the tip of a spudger to pry up and disconnect the screen flex cable.

    • To re-attach press connectors like this one, carefully align and press down on one side until it clicks into place, then repeat on the other side. Do not press down on the middle. If the connector is misaligned, the pins can bend, causing permanent damage.

    No, why the tip? Use the other flat side that doesn't concetrate all the power on one point and Youre doing a propper job.

    Aleksandar Dejanovic -

  15. tOeTcJhTXCIkF2Q6
    • Remove the screen.

    • Compare your replacement screen with the original. You may need to transfer additional components (such as speaker mesh) to the new part.

    • To install the new screen:

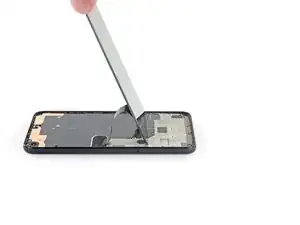
    • Scrape off remaining adhesive from the perimeter of the frame.

    • Follow this guide if you are using custom-cut adhesives.

    • If you are using double-sided tape such as Tesa tape, follow this guide.

    • If you use isopropyl alcohol to clean the adhesive off the display, be sure to not let it splash onto any unintended components, as this can weaken their adhesive bond.

    • During the boot-up process after reassembly, the screen will go through a calibration sequence. Do not touch the screen during this process, as it could result in improper touch calibration and create touch issues.

    This step seems to imply that a screen replacement is necessary when replacing the charging port. Is the charging port replaceable without replacing the screen? I understand great care must be taken not to damage the original screen in the procedure, but can it be reinstalled?

    David-Alexandre Tremblay -

    Yes, it can be reinstalled.

    Sam Omiotek -

    How long does the calibration process typically take? What does this process look like?

    phelpsbc -

    Just a heads up: If you are like me and you have accidentally turned on your Pixel 4a at some point while trying to pry the screen, don't worry too much. I was able to just connect my display with the device on. Nothing will happen until you reboot, and then the screen will initialize.

    Alex Cook -

Conclusion

Compare your new replacement part to the original part—you may need to transfer remaining components or remove adhesive backings from the new part before installing.

To reassemble your device, follow the above steps in reverse order.

Take your e-waste to an R2 or e-Stewards certified recycler.

Repair didn’t go as planned? Try some basic troubleshooting, or ask our Answers community for help.

Sam Omiotek

Member since: 25/02/19

62518 Reputation

25 comments

Really nice repair guide. But no place to buy the screen.

jeffreyjantos -

Yep, still waiting for it to be available.

Paul -

Same, still waiting. I have a broken pixel 4a and I have a right to repair it.

Erik Fry -

Where do you recommend that I purchase the Pixel4a screen replacement from? I found these two with Witrigs being cheaper, but not sure if either are reliable high quality screens.

https://www.witrigs.com/oem-screen-repla...

https://phoneremedies.com/collections/go...

Alejandro Gaytan -

@samomio Where do we install the double-sided tape for the replacement? Any areas we should not cover? I tried UV glue, but it is not holding the display securely.

Paul -

Install the double-sided tape in the space between the outside edge of the glass and the OLED screen, all the way around.

Sam Omiotek -

Question- why does every phone repair shop automatically replace both the glass layer and the lcd layer even if the glass is the only thing that is broken?

T_Thyme -

Good question—because OLED screens are destroyed by the oxygen in the air once their screens are cracked or separated.

Sam Omiotek -

Hey, nice guide!! Do you know if the Pixel 4a and 4a 5G are interchangeable between them? Thanks!!

Eli Pinheiro -

Thank you! The 4a and 4a 5G screens are not interchangeable. The 5G is larger.

Sam Omiotek -

Excellent guide.

I bought this screen from eBay: https://www.ebay.de/itm/402564264411

Already had tools in an iFixit kit.

Also bought some 1mm Tesa Tape from iFixit to glue the screen back on.

Matt Smith -

Got a replacement screen off Amazon, had a major scare tho, I tested it before going deep into the repair process, worked fine, removed all the adhesive, reattached the replacement screen it it was all black. Like dead. Phone was still vibrating, I made sure nothing was covering the proximity sensors or anything, still dead screen. I take a break, come back, dis-attach and reattach and the screen several times and its working again. Weird, but now very scared I delicately put it all back together. Make sure you transfer over the speaker grill on top, it doesn’t come with most replacement screens.

Anthony Ramirez -

Hey guys & Ifixit team… what kit it s better to use for smartphones as a beginner : Essential Electronic or iOpener or Smartphone Repair Kit ?

The big pbl is finding the display…anybody bought form alibaba / alliexpres? Thanks a lot!

Daniel Spatariu -

Water damage all over the screen from about 2 TBs drop of water on it. Picked up the phone and wiped it thinking its nothing . MAN God know I was wrong. The screen literally SIP water from the sides. 3 Days later and the screen is done. WARNING : If ANY water is left for a couple seconds PRAY. Now ALL of the screen is now purple from water stuck inside it. NEVER AGAIN GOOGLE.

Samud 78 -

CAN SOMEONE TELL ME IF IT IS IMPORTANT TO BUY THE CORRECT SCREEN VERSION NUMBER? AS PIXEL 4A 4G G025 /G025N /GA02099.

Because sellers don't specify it, is it really relevant? They just sell as Pixel 4A 4G compatible.

Thanks overall!

Brian Diaz -

Great repair guide, help me a lot! I am totally peaceful now handling my phone open-hearted (with Essentiel Electronics Toolkit). I bought my new screens on piecetelephone.fr, received in 2 weeks. I used B-7000 to glue the new screen back on. Thanks a lot iFixit team :)

Tim -

where do I buy the actual google pixel 4a screen itself? On Amazon? On eBay? Pls answer me

Wei on Huang -

Replacement screens are now available from iFixit here.

Andrew S -

Where do I buy the google pixel 4a screen itself? Which website? And is it cheaper to buy the toolkit bundle or Buy the speelste tools one by one

Wei on Huang -

Phone will not power up after dropping in bowl of water. Can anything be done to recover.

Chris

Chris Lawson -

Be aware that removing a shattered screen will be tedious and you must be patient and careful to remove all of the bits from the glue channel between the screen and the phone body. Removing the old glue is a VERY tedious and time consuming process so be prepared to take considerably longer than the 30-60 minutes shown in the directions. Also be aware that having a magnifiying headset with lights should be a high priority purchase along with this kit. Re-attaching the screen-to-phone connector is also incredibly tedious and frustrating. It took more than 8 hours of work to get ours replaced. At first it all worked fine and 10 minutes later the screen failed. Be prepared to either be delighted that your efforts bring a phone back to life or that it will end in utter failure and frustration... it is NOT as easy as you think. The YouTube videos are all missing this information and make it all look easy...... not so.

D. J. -

If you get the kit that includes the adhesive strips, save yourself the risk and irritation and just get some B-7000 or whatever you see someone using in a YouTube tutorial. They seem to work, but it doesn't seem like they're actually cut for specifically this phone, or in my case none of the shapes really came close to aligning with any cutouts or holes. They only give you exactly what you need, so if you accidentally fail to line it up exactly right, you're stuck trying to maneuver this string of very sticky goop into a precise line or corner.

Otherwise, the tools are exactly what you need in a food way, very little waste and decent packaging. Great value overall, the screen is legit, although now my proximity sensor isn't working for some reason. They're pretty good quality, I'll keep it all around, but will be ordering some better adhesive and maybe redoing it. It really is not fun working with those, and I'd appreciate more for my money in that respect.

Also the picks aren't thin enough, risky using them.

L. T -

That was really useful. Thanks for the info and clear steps. I did end up having to push the middle of the connector when reattaching the screen.

Eanna Ryan -

When the kit is going to be available?

Karna Soneji -