Introduction
Hello and welcome to the HP 255 G2 disassembly guide!
After my partner's laptop basically became unusable, I suggested she upgrade it with a snappy SSD (in this case a Kingston A400 with 480GB) and more RAM (in this case a Crucial DDR3-1600 SO-DIMM with 8GB).
Spoiler alert: The laptop ran like clockwork again after the upgrade and I was able to install Windows 10 without problems.
This guide demonstrates disassembly right down to the hard drive - if you want to do more you're on your own from then on, but swapping out the hard drive is probably the most common reason people open up this laptop.
This guide may apply to earlier or later models of the HP 255, but I cannot guarantee that, nor that your HP 255 G2 will be built exactly like this one.
-
-
Lay the laptop closed face down on a soft surface to avoid scratching the flap.
-
Make sure the laptop is unplugged, no ports are in use, and no disc is inserted.
-
Always work anti-static when messing around with electronics, e.g. with the help of an anti-static wrist strap.
-
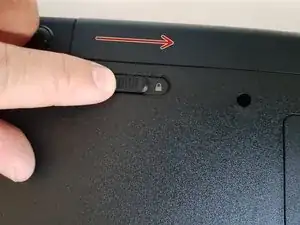
Gently slide the left battery latch to the right.
-
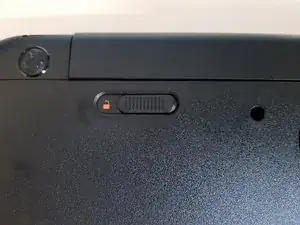
You will now see an orange open padlock.
-
Now slide the right latch of the battery to the right. If the battery doesn't click out now, gently pull on the battery while pressing the right latch.
-
-
-
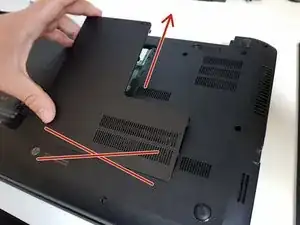
In the first picture you can see the RAM/WLAN cover.
-
Take the PH0 screwdriver and carefully remove the screw.
-
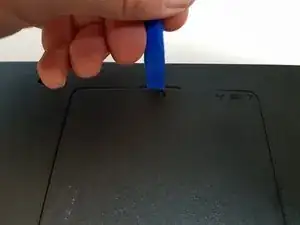
Take the opening tool and carefully slide it into the notch above where the screw was.
-
Gently pry the cover up. Don't be surprised if it pops or clicks slightly.
-
After the first few centimeters have been levered up, you may have to use the opening tool to help around a few corners.
-
To do this, carefully guide the opening tool between the housing and the cover until you can pull the cover away in the direction of the battery.
-
Caution: Do not press the opening tool between the housing and the lower edge of the cover, as there are small lugs here. Instead, pull the cover away towards the battery.
-
Put the cover aside.
-
-
-
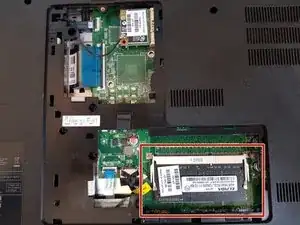
The laptop should now look like this. If you only want to change the RAM stick, follow the steps below. If you want to change the hard drive, go to step 6.
-
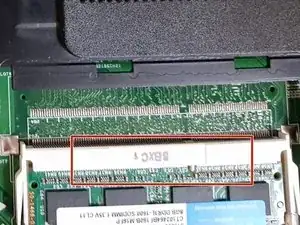
Memory, or RAM, is located on the bottom right of the motherboard.
-
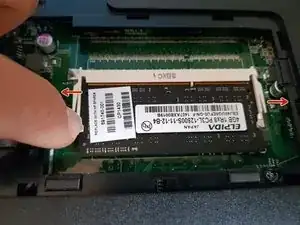
You don't have to loosen any screws to remove the RAM. Just gently pull one of the memory latches and it should slide out of its socket at a 45° angle.
-
-
-
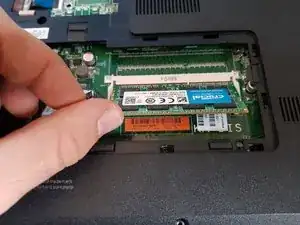
Position the new RAM bar at a 45° angle and carefully slide it into the socket.
-
Using two fingers, gently slide the side latches apart and use another finger to gently push down on the RAM.
-
If it clicks slightly, the RAM seems to be sitting straight in the socket and no contacts can be seen, everything worked.
-
-
-
If you want or have to, you can also change the WLAN card.
-
I don't know if third-party cards are compatible though, as HP has a history of locking their laptops to third-party hardware other than hard drives and RAM.
-
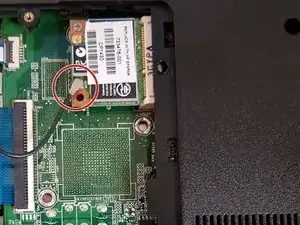
First guide the opening tool under the black antenna cable, where the cable and connector meet.
-
Be very careful with the next step, these coaxial connections are very delicate!
-
Use the opening tool to push up as vertically as possible until the connector releases with a soft click. If necessary, place both hands on either side of the spudger.
-
Now remove the screw(s) with the PH0 screwdriver. The WLAN card comes towards you at a 45° angle.
-
Follow these steps in reverse order to install the new card.
-
-
-
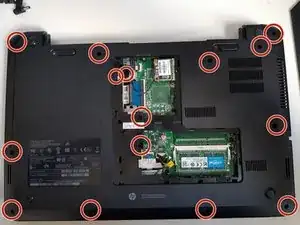
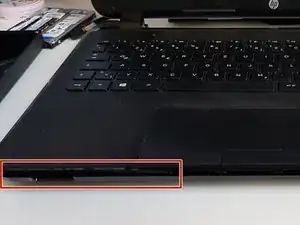
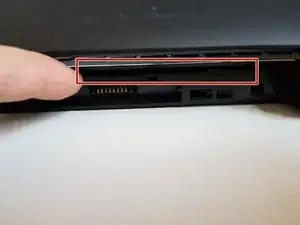
To get to the hard drive, you have to loosen all case screws and detach the two case halves (bottom and keyboard) from each other.
-
Use the PH0 screwdriver to remove the 15 screws, see picture. They're all the same screws, so you don't need to remember which screw went where.
-
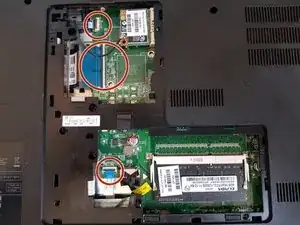
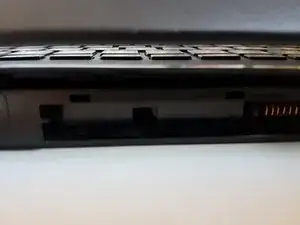
Use the opening tool to carefully fold up the black flaps on the three ZIF connections. The image shows a ZIF connection on a different part of the laptop and is only for illustration of where to place the opening tool.
-
Gently pull the ribbon cables out of the ZIF connectors.
-
-
-
Turn the laptop over and open it.
-
Now, starting with the SD card slot to the left of the touchpad, start working your way around the case with the pick in the gap between the keyboard and the lower half of the case.
-
Refer to the images to see how it should look.
-
-
-
If you've easily separated the case halves on the front and sides, you've done most of the work.
-
The hardest part, however, is separating the case halves at the back of the laptop, where the battery sat and the hinges for the lid are located.
-
In the picture you can see in which gap you have to insert the pick. Again, carefully work your way from left to right, or right to left, depending on whether you're left- or right-handed.
-
Attention: The case is very tight at this point and tends to click together again.
-
In the last picture you can see where you have to put the pick on the hinges (rectangle). If your laptop looks like this, you can gently use your index finger to help where you can't reach with the pick (circle).
-
-
-
If you've successfully separated the halves, you've passed the hardest part.
-
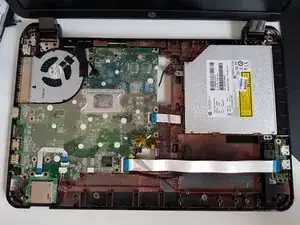
Lift the keyboard up and away. The ribbon cables from which you removed the ZIF connections in step 6 are also connected to the keyboard. So you pull them up with you.
-
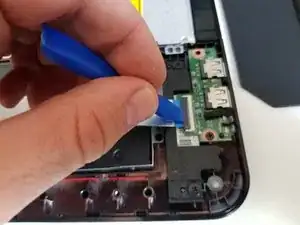
Disconnect the ZIF connection on the right of the two USB ports by carefully inserting the opening tool under the black latch and levering upwards.
-
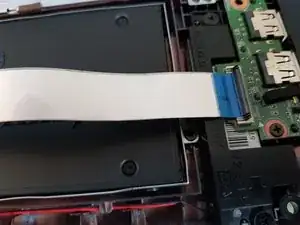
Fold the released ribbon cable to the side to expose the hard drive (image 3).
-
-
-
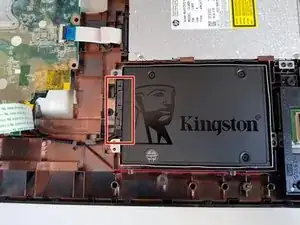
Use the PH0 screwdriver to loosen the three screws that anchor the hard drive frame to the case.
-
Use the opening tool to pry the SATA cable straight out of the hard drive connector.
-
If the cable slips out of the guide, that's no problem at all. Once you've installed the new hard drive, you can slide it back down there.
-
Remove the hard drive bracket with the hard drive.
-
-
-
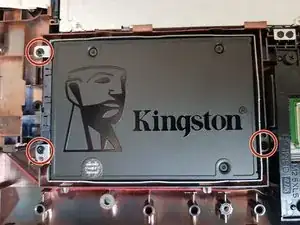
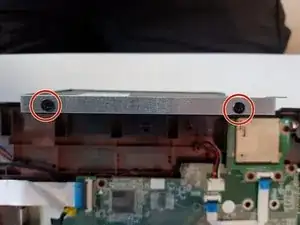
On both sides of the hard drive bracket you will find black screws that hold the hard drive in place.
-
Loosen this with the PH0 screwdriver and remove the old hard drive.
-
Warning: never just throw an old hard drive into electronic waste - if you have stored sensitive data on it (and that can be harmless photos), you should take care of a professional destruction. Formatting is not enough to erase all traces of your data!
-
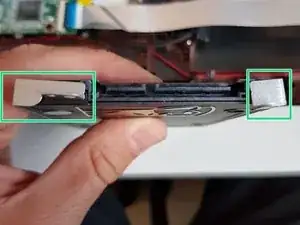
Insert the new hard drive into the bracket. Caution: the bracket is relatively flimsy, so don't bend it!
-
Make sure that you insert the hard disk in the right direction - you can also fix the bracket if you have not inserted the hard disk correctly and then you will notice at the latest when you connect it that the cable is the wrong way round (see figure 2, that's how it is correct).
-
Secure the hard drive with the 4 screws you removed at the beginning of this step.
-
Congratulations, you have upgraded your 255 G2!
-


Complete the steps in reverse order to reassemble your device.
After you have reinstalled the hard disk and reinserted the ribbon cable of the right USB port, you can click the keyboard onto the other half of the housing with a little pressure.