Introduction

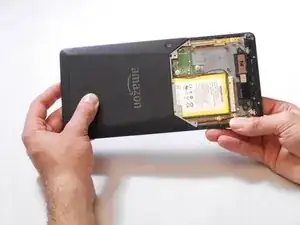
Removing the Kindle Voyage back panel is a necessity for replacing all the other parts of the device.

  1. RKoQ2LrBqnvcGutm
    RKoQ2LrBqnvcGutm
    ZFu5Kojt435bU3Dt
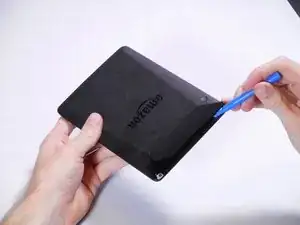
    • Insert a plastic opening tool between the plastic panel shown on the device.

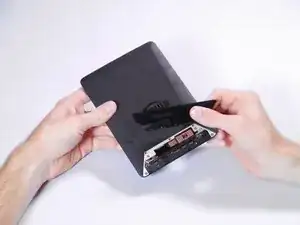
    • Use the tool to pry the plastic away from the device.

    • There will be adhesive holding this piece of plastic to the device. You may have to pull pretty hard to get it separated.

    This is not the best way to do this. The plastic panel snaps in on the lower/center part and slides into notches in the top. When you do as this instructs it breaks the tabs that connect on the top. If you can slide a few of the guitar picks into the lower part and get all the glue disconnected and get it to get past the snaps on the bottom you can then slide it upward and remove it without damaging the panel.

    sam -

    Thank you for a very helpful hint

    baggins -

    Definitely agree with this, and would clarify a bit. If the piece to be removed is at the top of the Kindle, the only purchase for the Opener Tool is the seam along the top edge. Start at either corner, and pry just enough to insert a pick, and repeat the process to work your way along the slanted edge towards the bottom edge; the adhesive releases easily. Continue along the bottom edge, then lift the bottom edge clear of its retainers. The whole piece can then easily be slid off.

    gring40 -

  2. n1bq1QGDVKuMgLtt
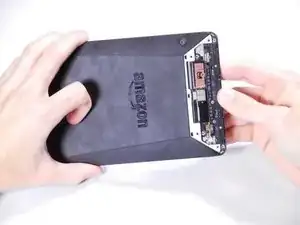
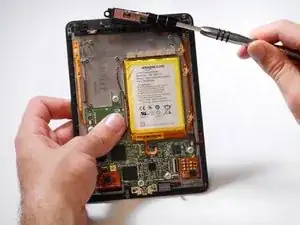
    • Use an aluminum driver attached with a Phillips head size #00 to remove the four 3mm screws shown in the picture. For reassembly, note that the top two and bottom two screws are different sizes.

    The bottom screws in the picture are the longer ones

    Mark -

  3. CwRY6vkJuUYs2krn
    CwRY6vkJuUYs2krn
    uST1pFMSxJwWlK2v
    CBE1DvVDnNAYCiYs
    • Once the screws are removed, the back panel can slide off the device.

    Why is step 4 needed? The magnetic component doesn’t appear to be in the way of the battery replacement. Is the magnetic component just sitting on the posts (without screws attaching)? Will any magnet work to remove it? Is there any electrical connection to this component?

    John -

    There is no electrical connection, it is just sitting there. It should be removed so that it doesn’t fall out during the rest of the repair.

    Merlin04 -

    I’ve tackled apparently more complicated jobs on iMac, MacBook and iPhone, but this one has defeated me! I can’t complete step 3 the panel simply will not slide off.

    Graham Miles -

    Correction, tried some more. After one and a half hours of struggling I finally managed to slide the cover off. Now tht it’s been done once, it slides on and off easily.Just putting this here in case others have the same problem - persevere. In principle the job’s an easy one.

    Graham Miles -

    If the old battery swells, as mine did, the board will not slide out of the case. Too much pressure exerted on the case from the swollen battery.

    I had to separate the two halves of the case.

    Robert Sauve -

    Case hard to slide off for me as well. Found that some double-sticky tape on the magnetic part overlapped the case and had to be carefully sliced. Was able to budge the case enough to give the opening tool purchase near the charge port, and pry that way. The case only needs to slide 1/2” or so and then it lifts off.

    gring40 -

  4. nlvLDTrofi4ltJuL
    nlvLDTrofi4ltJuL
    EFJhHwptAAF1MD6t
    • Remove the magnetic component with the magnetic head of the aluminum driver.

    This instruction confused me. There is a component above the battery. It’s not held there by anything (no adhesive or fasteners), so you can just take it off. They’re saying to use anything magnetic to pick it up, but you can just use your fingers.

    moec -

Conclusion

To reassemble your device, follow these instructions in reverse order.

Sean Yap

Member since: 22/01/15

1196 Reputation

4 comments

I'm having trouble getting the last two clips to snap back together on the top of the device. I'm pinching them together at the top, but nothing happens. It doesn't seem like it should be this difficult. What do you advise? Thanks!

Hannah BP -

I have the same problem. It would be very helpful to get a tip here.

Sylvia Liemer -

I 'm having the same problem with Hanna:

I' having trouble getting the last two clips to snap back together on the top of the device. I'm pinching them together at the top, but nothing happens. It doesn't seem like it should be this difficult. What do you advise? Thanks!

panthalas15 -

Years later, but I just replaced the battery in mine and figured this out. You have to align the top clips first (and may have to lightly pry them open before you do that). Then bow the piece of plastic slightly and get the bottom clips in.

Patrick Cohen (ig88b) -