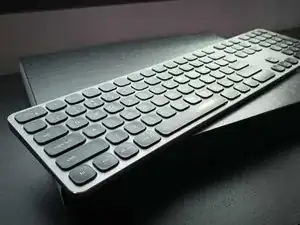
Introduction
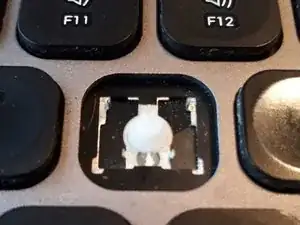
After a few years of use keys often start sticking, failing, or self-activating. This is typically due to gunk (dust, hairs, food particles, etc.) building up under the keys.
Removing the keys on the Satechi keyboards often results in the armature detaching along with the key cap, and if may also separate into parts (making it difficult to know how to reassemble it). The following basic guide will show you how to piece the armature and keycap back together.
ORIENTATION NOTES:
In this guide "Top" is referring to edge furthest away from you if you're sitting at the keyboard with it positioned for use. This is the edge toward the Function (F) keys and number keys. "Bottom" refers to the edge closest to you—the edge of the keyboard with the spacebar.
Tools
-
-
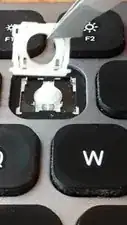
The key cap should be lifted from the top edge. You can use any "tool" that allows you to get under the top edge, and lift the edge away. Something flat and relatively thin will do (like a small flat-head screw driver). In this video I am using some tweezers.
-
Removing the key cap from the top edge should result in the 2-piece key armature remaining attached to the keyboard. This is the ideal situation, because it is easy to then replace the key cap once you blow out any dirt that was under the key.
-
If one or both parts of the armature detach along with the key cap, we'll address that below.
-
-
-
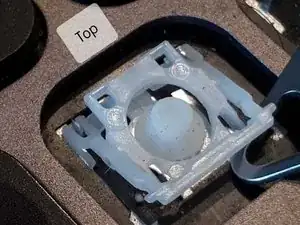
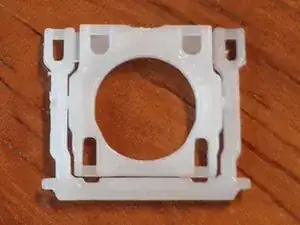
These photos are to give you a reference for what it looks like when the armature is correctly in place. This may be helpful if you removed the armature and need to get it back in correctly.
-
-
-
If you removed the key cap from the top edge first, the armature should have remained attached to the keyboard. This is the ideal situation (unless you need to remove the armature to clear something from it, in which case you'll likely need to remove it).
-
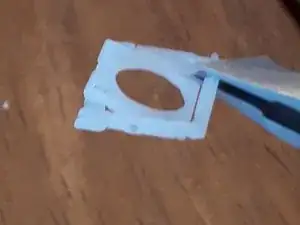
WHAT IF — perhaps like me, you may have attempted removing a key cap without instructions, and you didn't do it from the top edge. In which case, it's quite likely the armature came out, and may have come apart (it has two parts).
-
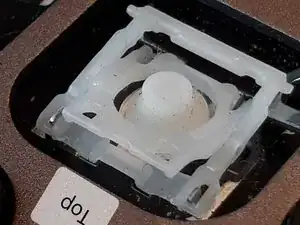
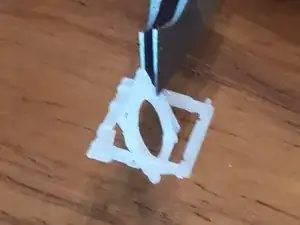
These photos show you what the armature should look like when correctly pieced together as one articulating component.
-
-
-
The armature should be pieced together as one component. See photos in previous step for how it will look when correctly pieced together.
-
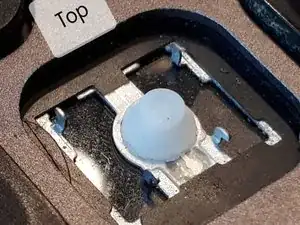
The armature attaches in two locations. At the bottom edge, and at the top edge. You need to install the armature from the bottom edge first. There are tiny metal hooks toward the centre of the bottom edge, and there are two tiny hooks at each corner along the top edge.
-
You need to slide the bottom edge of the armature under the hooks so that the two holes in the armature get hooked onto the keyboard.
-
Then drop the top edge down onto the keyboard, and gently push the top left and top right corners so they click onto the small metal hooks in those locations.
-
The armature should now be reattached. Test it to ensure it's attached.
-
-
-
This video shows how to simply click the key caps back into position.
-
THIRD KEY IN VIDEO: You may be tempted to install the armature under the key cap first, and then try to install the keycap AND armature onto the keyboard at once. This typically doesn't work so well, as shown at the end of the video.
-


Keycap puller is optional. Decent tweezers do the job nicely.

One comment
I have tried to reassemble keys by myself, and while standard keys were relatively easy to figure out, I got stuck at the spacebar. I made a few rookie mistakes, and now I have a perfectly functioning keyboard...without a spacebar. The logic is similar to the spacebar on Apple keyboards, but the armature part is a bit different. Now my spacebar has broken plastic elements used to hook the armature. And Satechi does not offer replacement keys. So I am writing this hoping someone can save themselves the pain of 1 broken key.
Don't be like me and do some research before reassembling your Satechi keyboard.
D_S -