Introduction

In this guide you will be learning how to remove RAM from your Samsung NP5230U4BL laptop. This will enable you to replace damaged or outdated RAM. Before attempting to remove your RAM, be sure to ground yourself with an anti-static wrist strap and have a Philips #00 Screwdriver, as well as a Nylon pry tool on standby. Also carefully follow the given instructions including the cautionary warnings.

  1. ZIDkHYCiHkhemJwg
    • Before disassembling your computer, make sure it is powered off.

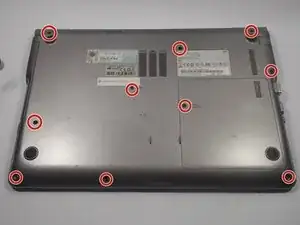
    • Using the Phillips #00 screwdriver, remove all ten 1.5 mm screws from the back cover of the laptop.

    • Removing these screws allows you to take off the panel on the right side of the laptop.

  2. dIsFbAkJJqXssYaj
    dIsFbAkJJqXssYaj
    3nGJQIev3EWSx4Gc
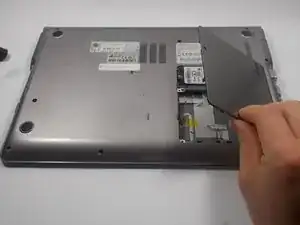
    • Using your dominant hand, pinch the tab on the back panel to the right and remove it.

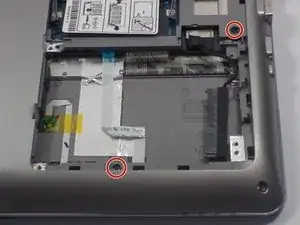
    • Using the Phillips #00 screwdriver, remove the two 1.5 mm screws that are under the panel.

    • You are now able to detach the entire back cover of the laptop. You can store these screws in the same area as the others because they are all 1.5 mm, identical parts.

  3. 1tORlaLtkFCsX4jU
    • Be sure that you are looking at the laptop so that the spine connecting the base to the screen is at the top.

    • When using the plastic opening tool, be careful not to rip or pull too hard to disengage the prongs connecting the back cover to the base. Moving slowly will make this task easier and less likely to cause damage to your machine.

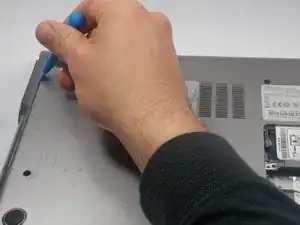
    • Using the plastic opening tool, start in the upper-left hand corner of the laptop and pry horizontally to the upper right-hand corner.

  4. dtpwETZdMFXxE6UV
    • Again starting in the upper left-hand corner, pry down vertically towards the bottom left-hand corner of the laptop.

    • You have now disengaged two of the four sides holding the back cover onto the base.

  5. FEWPvx1CdnMB1H2u
    FEWPvx1CdnMB1H2u
    2nTPAVCWG2s5XbeG
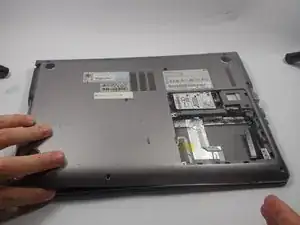
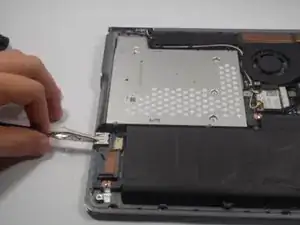
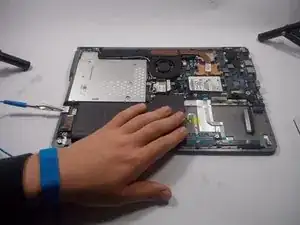
    • Using your dominant hand, grasp the left side of the back cover and gently pull it up. This should disengage the prongs on the bottom and right edge of the base.

    • The right side of the cover has openings that go around the USB ports, the HDMI port, the Ethernet port, the VGA port, and the headphone jack. Use caution when disengaging the prongs around these parts.

    • After completing this step the entire back cover should be separated from the base, and the inside of the laptop should be revealed.

  6. CnQAlLLdcuSqFnUJ
    CnQAlLLdcuSqFnUJ
    ipSvulQLWSwiTBcZ
    • All steps following the removal of the back cover should be completed while wearing an Anti static bracelet. This prevents ESD (electrostatic discharge). ESD can damage nearly every part on the inside of your computer.

    Short of an ESB what else can be used to cut the static? A damp table cloth, sleeveless shirt, freshly washed hands, static guard sprayed on clothing?

    Debra Johnson -

  7. hXfCJdNGgZP2xx2I
    hXfCJdNGgZP2xx2I
    Gemp13rLjNefbCiI
    bxLi4bVNVUJtD2wr
    • When working on the inside of the laptop, it is very easy to damage small pins and other parts of the machine. Keep your hands on the edges of the laptop unless instructed otherwise.

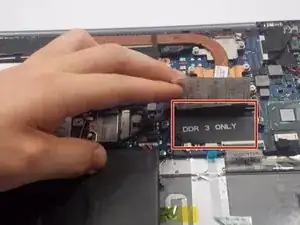
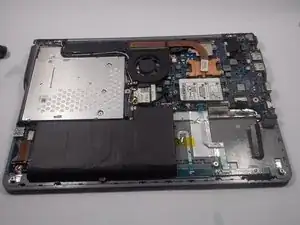
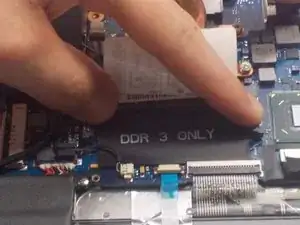
    • The RAM is kept in place by two silver tabs. To disengage these tabs, push them outwards at the same time, releasing the lock on the RAM.

    • RAM (the actual RAM is not pictured)

    • Using your dominant hand's index finger and thumb, squeeze the RAM gently on the two sides that were not held down by the pins and lift it horizontally from the base.

Conclusion

To reassemble your device, follow these instructions in reverse order.

Kayla Loycano

Member since: 03/03/16

847 Reputation

0 comments