Introduction

Use this guide to replace the Apple custom blade SSD (NVMe/PCIe x4).

This guide is intended for iMac Intel 21.5" EMC 2545 models that are equipped with an SSD (Fusion Drive or blade SSD configurations).

If your system does not already have a blade SSD installed you won’t be able to install it later as the connector and the support components are not present on the logic board.

  1. bKJMGPZdOUDLNefO
    • With the hinge free to move, the iMac will be unbalanced and hard to work on. Repairs can be completed as shown, but are faster and easier with an iMac service wedge.

    • If you are using the iFixit cardboard service wedge, follow these assembly directions to put it together.

    • Before beginning any work on your iMac: Unplug the computer and press and hold the power button for ten seconds to discharge the power supply's capacitors.

    • Be very careful not to touch the capacitor leads or any exposed solder joints on the back of the power supply. Only handle the board by the edges.

  2. lLXyIR2flmAoZYtJ
    lLXyIR2flmAoZYtJ
    1VjZxwDRxkZGHBei
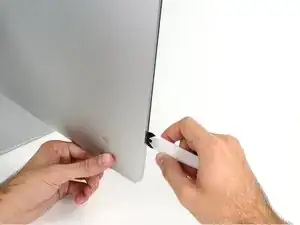
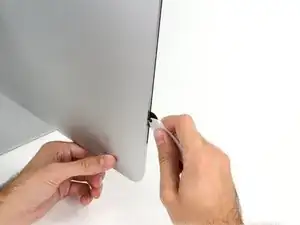
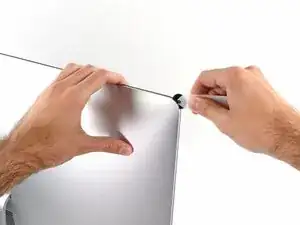
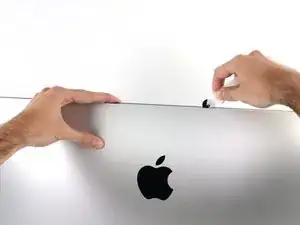
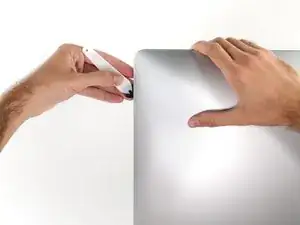
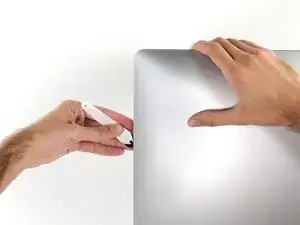
    • Starting on the left of the display, near the power button, insert the iMac Opening Tool into the gap between the glass panel and the rear enclosure.

    • The hub on the iMac Opening Tool will keep you from pushing the wheel in too far. If using a different tool, insert no more than 3/8" into the display. Otherwise, you risk severing antenna cables and causing serious damage.

    • Be gentle! The glass may crack if pried too much. Use a hairdryer to heat the edges and loosen the tape if the room temperatures are low.

  3. q3DRspiqEjuFxgCN
    q3DRspiqEjuFxgCN
    iCIN52QoBl3OSb6Z
    XxXjXdcFgFKcwebo
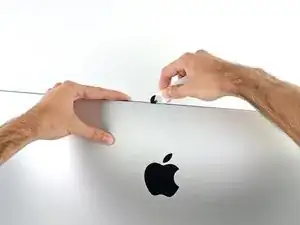
    • Use the tool like a pizza cutter—roll it along through the gap, and it will cut the foam adhesive through the center.

    • Be sure to always push with the handle behind the cutting wheel. If you pull, the wheel might get pulled out of the handle.

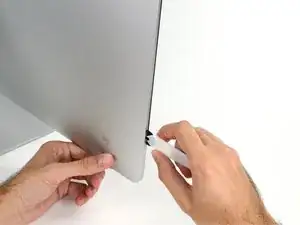
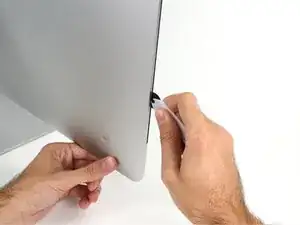
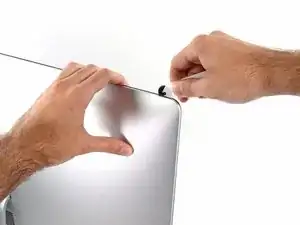
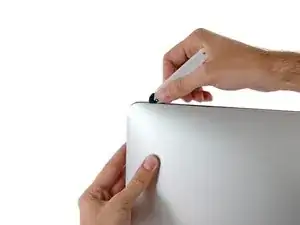
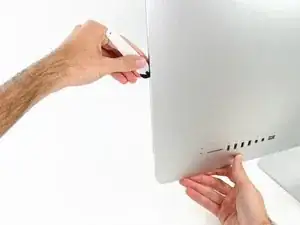
    • Run the tool up along the left side of the display.

  4. vxDgcmqUtQlSsP2J
    vxDgcmqUtQlSsP2J
    DclVW5XnhQLHXKLH
    yEeTWsNVKZWwY4wC
    • Continue running the tool up around the top left corner.

  5. IGjiVeV2qMlPFjxo
    IGjiVeV2qMlPFjxo
    q2QGyKWGiqL4KJI1
    • Cut the adhesive along the top left of the display.

  6. XADEwykRUWgZNaKi
    XADEwykRUWgZNaKi
    Gy2L2NEQNABHTJKk
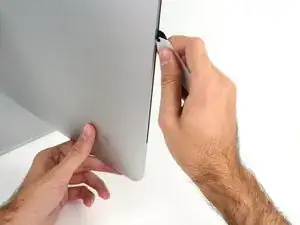
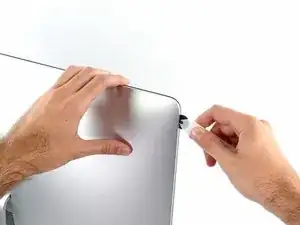
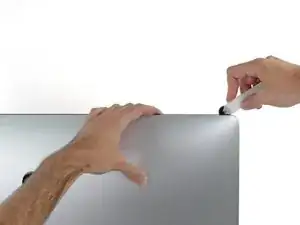
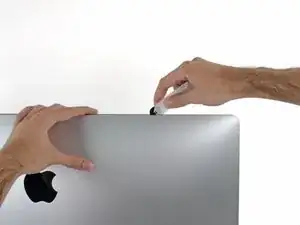
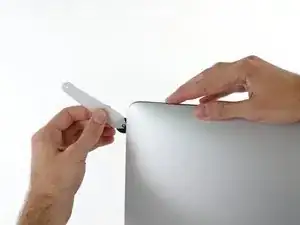
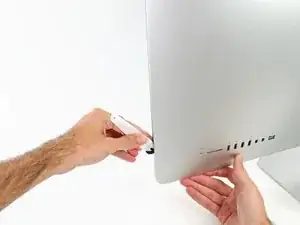
    • Continue along the top of the display.

    • You may want to run the tool back and forth through what you've already cut a few times, to ensure you get as much of the adhesive separated as possible.

  7. VIOSQOTIDCMkBXCd
    VIOSQOTIDCMkBXCd
    G6WL6LwKnmU4iroY
    QYGjK5rCFLbXb3Qg
    • Push the tool around the top right corner of the display.

  8. sbN34h2LCe1hAMgV
    sbN34h2LCe1hAMgV
    4jyREp3qpSKjKIIg
    • Wheel the tool down along the right side of the display.

  9. sTI1wGwtH1grQmgO
    sTI1wGwtH1grQmgO
    HS5XEQmVYcECrOaG
    • Finish pushing the opening tool to the bottom of the right side of the display.

    • At this point, you'll want to run the tool back around the entire display, to ensure you cut as much adhesive as possible.

  10. RTJ4GtGmMD5uIEJh
    RTJ4GtGmMD5uIEJh
    kt1O3uj3QfiSMPoV
    3LsFsjkUGlXdNkXp
    • While the opening tool cut most of the adhesive, the display will still be slightly adhered to the case. A plastic card will be necessary to free up the last of this adhesive.

    • Set the iMac face-up on a table.

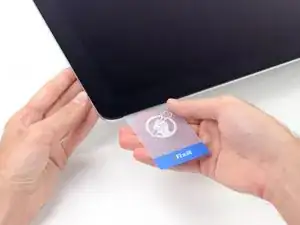
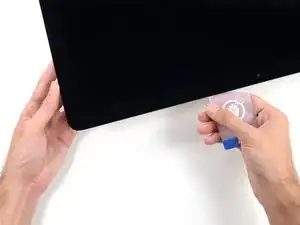
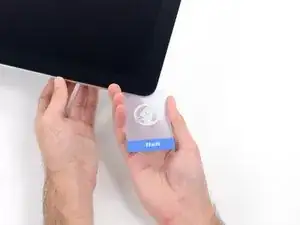
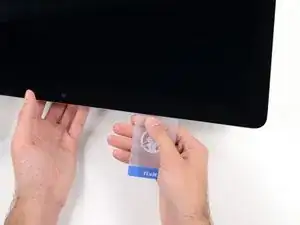
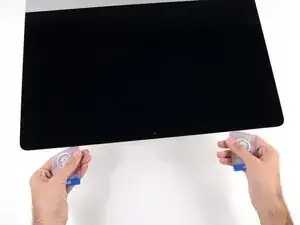
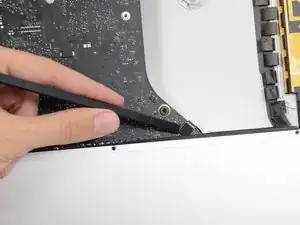
    • Starting from the top right corner of the iMac, wedge a plastic card between the display and frame.

    • Be careful not to insert the plastic card more than 3/8", or you may damage internal components.

  11. CAOhMNI4p5JGUSxH
    CAOhMNI4p5JGUSxH
    DcZsndbhPJvQEXcN
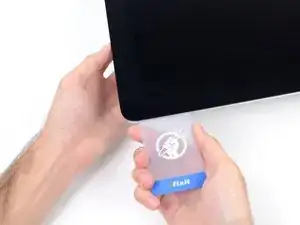
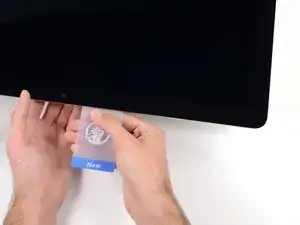
    • Gently twist the plastic card sideways to create a gap between the display and frame.

    • Move slowly and be careful not to stress the display glass too much—you only need to make a gap of about 1/4".

  12. 2i6VCJEZEQJjRAe4
    2i6VCJEZEQJjRAe4
    EKq3qJ4K11BdEByb
    T3tacDNMqHrTGNWg
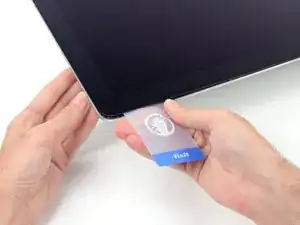
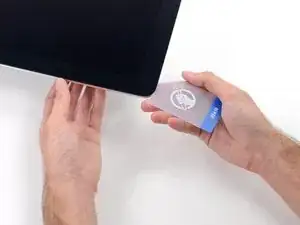
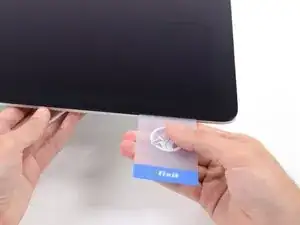
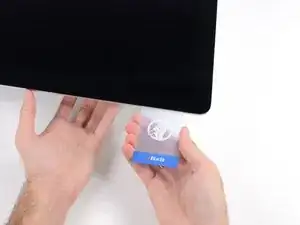
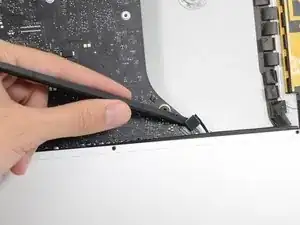
    • Slide the card toward the center of the display to cut any of the remaining adhesive along the top right corner of the iMac.

    • Be sure to stop before the iSight camera, or you may damage it.

  13. wQERHWdpfWs1XOgE
    wQERHWdpfWs1XOgE
    5UWkeELY6pQH3NFW
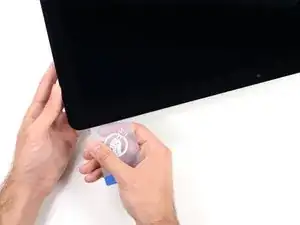
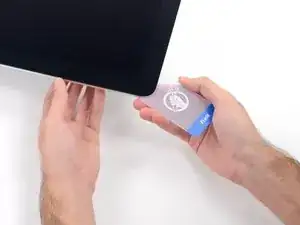
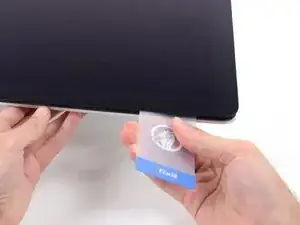
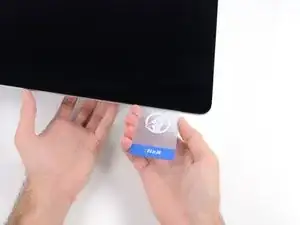
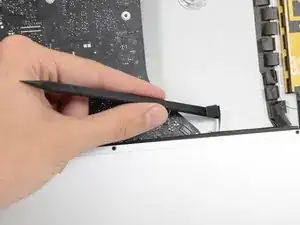
    • Wedge the plastic card into the top right corner once again and let it stay there to keep the adhesive from resettling.

  14. EZXvkfwJOBpSYIGk
    EZXvkfwJOBpSYIGk
    GSZKR1lbwrWhLwOU
    dOKjiA5VvyekxdI2
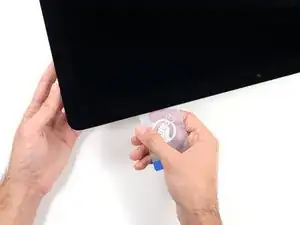
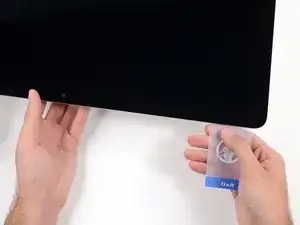
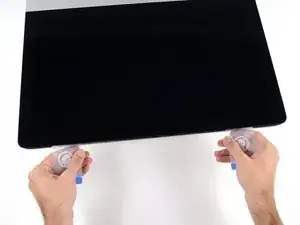
    • Insert a second plastic card into the gap between the display and frame located at the top left corner of the iMac.

  15. qX1qFvFNr6TFKwG4
    qX1qFvFNr6TFKwG4
    FXVtoJOGxtCAlVoQ
    • Gently twist the card upward, slightly increasing the space between the display and frame.

    • As with the other side, twist slowly to allow the adhesive time to separate, and be careful not to over-stress the display glass.

  16. c6X1bJH5UoyVj3JX
    c6X1bJH5UoyVj3JX
    LoDCrDsP2qvnxNSA
    iI6qGV3hZ5mfJmfY
    • Slide the plastic card toward the center, again stopping just before the iSight camera.

  17. NtIc2CuYM4tYdfVl
    NtIc2CuYM4tYdfVl
    DYKiZ46YtHUNBJpB
    • Wedge the plastic card back into the top left corner.

  18. mabnnjap5BGBwNCw
    mabnnjap5BGBwNCw
    2iYBEleZtKBCSqD4
    I2ivlTNZbwtjcNNT
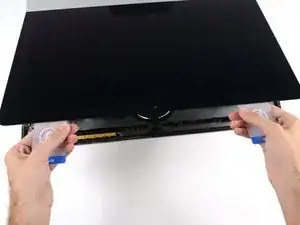
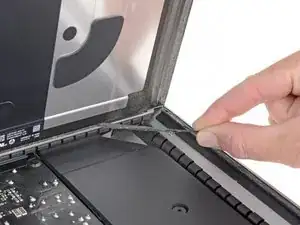
    • With both plastic cards inserted as shown near the corners, gently twist the cards sideways to increase the gap between display and case.

    • If there are any sections that seem to stick and won't separate, stop twisting and use one of the cards to cut the remaining adhesive.

    • Begin to lift the top of the display up from the frame.

    • Only lift the display a few inches—the display data and power cables are still connected to the logic board.

  19. Lq3NWNyJjC6ivpoe
    Lq3NWNyJjC6ivpoe
    YW6sgdgvnCF2BTt6
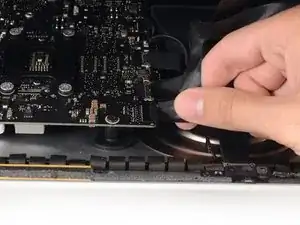
    • While holding the display up with one hand, use the other hand to unplug the display power cable. Make sure that you pull the cable out from the plastic tab, and not by pulling on the color wires.

    • Lift the display up enough to have easy access to the connector, but not so much that you stretch the cables and stress their connections (about 8").

  20. PDABAgqTKP5Sfm6D
    PDABAgqTKP5Sfm6D
    R6ouHGmTXkOGDImj
    LntmZHgb1OOmYq3s
    • Use the tip of a spudger to flip up the metal retaining bracket on the display data cable.

    • Carefully pull the display data cable from its socket on the logic board.

    • Be sure to pull the display data cable connector straight out of its socket.

  21. 22yPwf2Vt6ac6vgN
    22yPwf2Vt6ac6vgN
    hiCUZB1J4KJDVbed
    • Lift the display up to a near-vertical position.

    • At this point there is still a strip of adhesive along the bottom of the display, that will hold the display to the frame like a hinge. You can loosen this adhesive by working the display up and down a few times.

  22. 6A4EHvapeoMdolHS
    6A4EHvapeoMdolHS
    U2m5h1GFWVElYlqZ
    MbYvBcby3LvdmdUa
    • Be very careful not to touch the capacitor leads or any exposed solder joints on the back of the power supply (boxed in red).

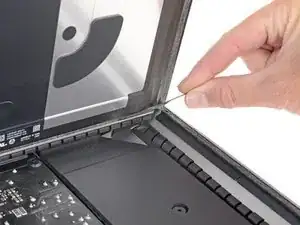
    • Grasp the small tab at the end of one of the bottom edge display adhesive strips and pull the adhesive toward the top of the iMac to remove it.

    • Repeat this step with the other adhesive strip and remove it.

    • If either adhesive strip breaks before it's removed, use a plastic card to slice through the remaining adhesive.

  23. NZoUcXcRjHHrjqib
    NZoUcXcRjHHrjqib
    GyD3PrjUqBoNiCEp
    lU5PpvNXQBkB1Oyk
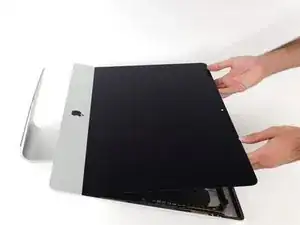
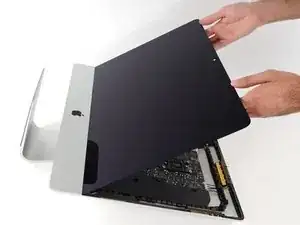
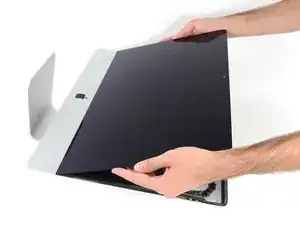
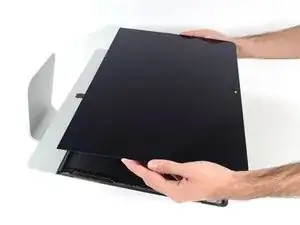
    • Lift the display up from the frame and remove it from the iMac.

    • It may be necessary to slowly lift from one side, to peel against the remaining adhesive.

    • Be very careful handling the display—it's big, heavy, and made of glass.

    • During reassembly, head over to our display adhesive guide to install the new adhesive.

  24. QMqfyRTWUxyD6PaN
    QMqfyRTWUxyD6PaN
    mphdji2lKIR3CwWS
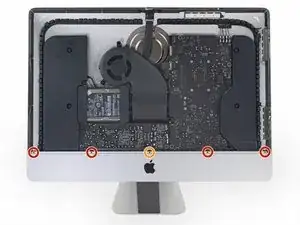
    • Remove the following five Phillips screws holding the lower support bracket in place:

    • Four 3.2 mm screws

    • One 1.7 mm screw

    • On at least some EMC 2544 machines, all five screws are the same size.

    • You may need to peel up the display adhesive lining the bottom edge of the iMac enclosure to access the screws.

  25. NUQ4YmOm2RlEEAAO
    • Remove the lower support bracket from the iMac enclosure.

  26. bpB3vigPkDEJaODx
    bpB3vigPkDEJaODx
    UHTtExuT2rlyLtDU
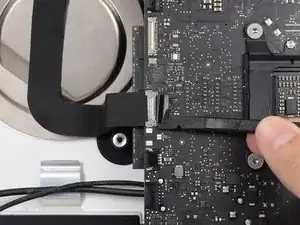
    • Use a spudger to loosen the right speaker cable's connector from its socket on the logic board.

    • It is useful to push downward on both short sides of the connector to "walk" it out of its socket. Be careful with the corners of the connectors, they can be easily broken off.

    • Pull the connector downwards to remove it from its socket.

  27. eCECFTFAxFIpXI2B
    • Remove the two 10.0 mm T10 screws securing the right speaker to the rear enclosure.

  28. ZZqU2JxJYESWeUCM
    ZZqU2JxJYESWeUCM
    VVVam54h3KT1T4jP
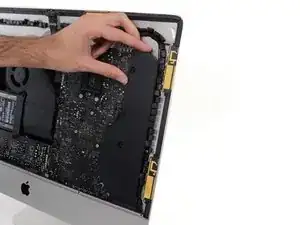
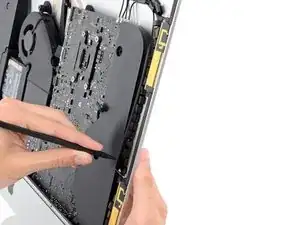
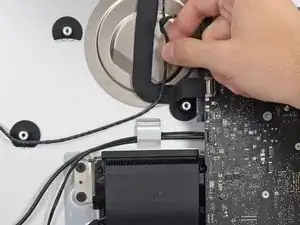
    • Pull the top of the right speaker away from the rear enclosure, about half an inch, to expose the antenna cable running down its right side.

  29. 6QcZ5VEKCJgmeRCT
    6QcZ5VEKCJgmeRCT
    ZaV2LVgFyHTlDiiE
    5EQPXsfOcYVgq1pW
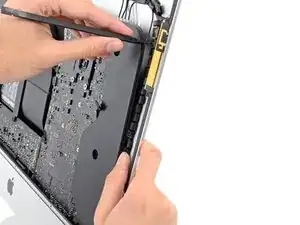
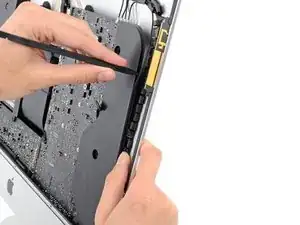
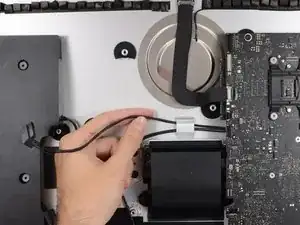
    • Insert the tip of a spudger between the right speaker and the antenna cable that is routed into the speaker's right side.

    • Run the spudger down along the right side of the speaker to pry the antenna cable from its channel in the right speaker.

  30. SUeeAI2YcIEFbu5C
    SUeeAI2YcIEFbu5C
    EIiSYybDS5fUSvRq
    VTDXemYXPxyIVaBw
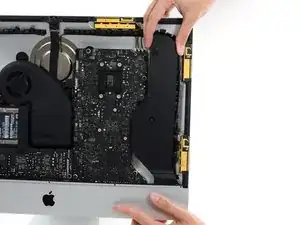
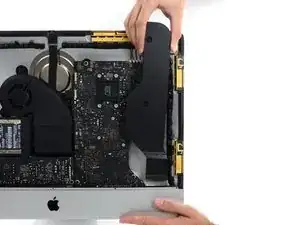
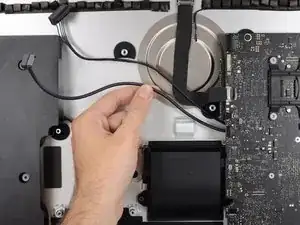
    • Pull the right speaker straight up about an inch, toward the top of the iMac.

    • Lift the right speaker straight up and remove it from the iMac. This may take some force, both hands and rocking the speaker right and left to get it out.

  31. eJkD4BRQM4pFSEkg
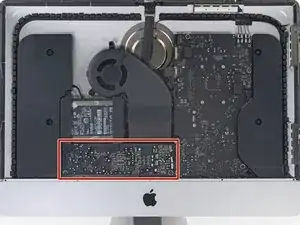
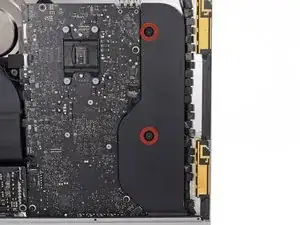
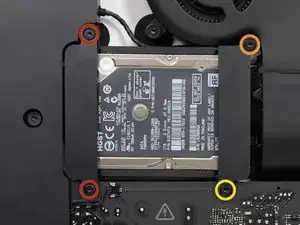
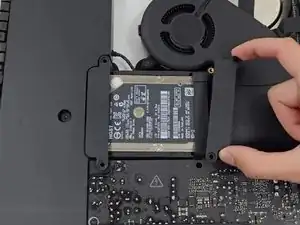
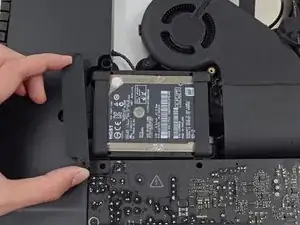
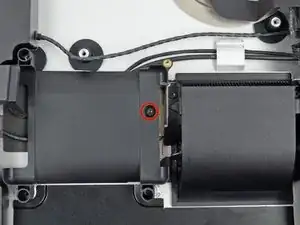
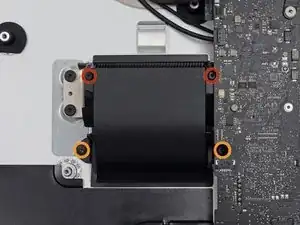
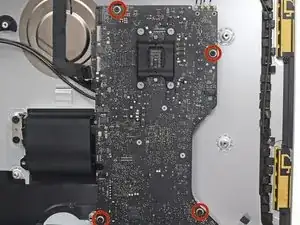
    • Remove the following screws securing the hard drive bracket to the rear enclosure:

    • Two 21 mm T10 Torx screws from the left-hand hard drive bracket.

    • One 9 mm T10 Torx screw.

    • One 27 mm T10 Torx screw.

  32. jjmgaJBQQ3GCBXAJ
    jjmgaJBQQ3GCBXAJ
    OYaQKvCeXcNJ5pXZ
    • Remove the left and right hard drive brackets from the iMac.

  33. ZUXdAYsboViNN3LP
    ZUXdAYsboViNN3LP
    2B4ULK3qyBRHyCjA
    rjaYEgxfA6XedhVp
    • The next few steps bring your hands close to the exposed face of the power supply. Do not touch the face of the power supply to avoid a high voltage shock from the many large capacitors attached to the board.

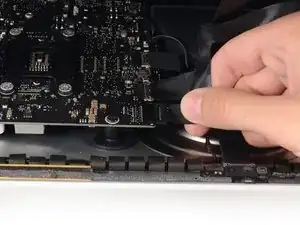
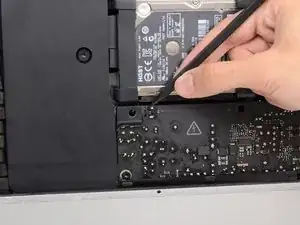
    • Use the tip of a spudger to push each side of the power button cable connector and gently "walk" it out of its socket.

  34. nDL1ZXuaLdV51GA5
    nDL1ZXuaLdV51GA5
    6hAjlFateirPRtNq
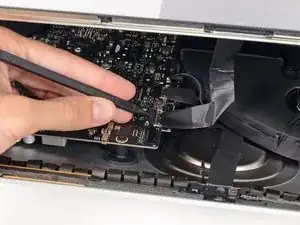
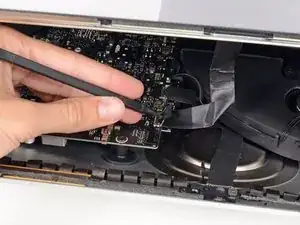
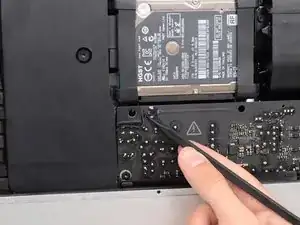
    • Gently push upward on each side of the power supply control cable connector with the tip of a spudger to gently "walk" it out of its socket.

  35. 6SRtDZMjfIshtcEC
    • Remove the two 7.2 mm T10 screws securing the power supply to the rear enclosure.

  36. DZGfKeTNNZRF5rIY
    DZGfKeTNNZRF5rIY
    XZToZZtKeCxR24Or
    • When working on the power supply, be very careful not to touch the capacitor leads or any exposed solder joints on the back of the power supply. Only handle the board by the edges.

    • Tilt the power supply forward.

  37. PnVpN4P5Q41LIcjX
    PnVpN4P5Q41LIcjX
    KYXTDvFWXOOKGo4w
    KotmGxZn3Tbp5oDl
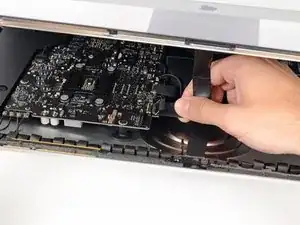
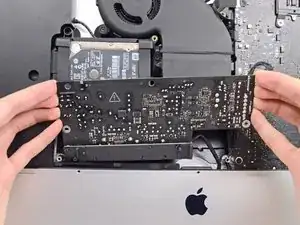
    • Pull the power supply slightly up and out from the rear enclosure.

    • Rotate the power supply counterclockwise, lifting the right side up about an inch higher than the left.

  38. dWkMC3KPAiJZ2BYA
    dWkMC3KPAiJZ2BYA
    VdKRfPUme1WjaaxJ
    • Slide the power supply to the right to clear the screw posts on the rear enclosure.

  39. atXqqTlMIcRfaLqZ
    atXqqTlMIcRfaLqZ
    pCEqH332pgmfCpr1
    hgPesfBdCbjpNkCx
    • Rock the power supply forward and remove it from its recess in the rear enclosure.

    • Do not try to completely remove the power supply from the iMac yet—it is still connected to the logic board.

  40. wNJxtUCC3jTRJDMO
    wNJxtUCC3jTRJDMO
    NQOgcUB1WXOVvdIi
    • Be very careful not to touch the capacitor leads or any exposed solder joints on the back of the power supply. Only handle the board by the edges.

    • Flip the top of the power supply towards you to access the DC power cable connection behind the logic board.

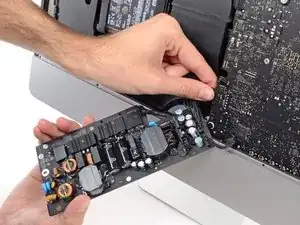
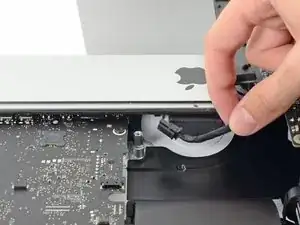
    • Squeeze the DC power cable connector tab and pull it straight out of its socket on the back of the logic board.

  41. EyLJWWk2OFr5HCye
    EyLJWWk2OFr5HCye
    AlMArQO33R1TWQ6T
    DMjNbUXoMgsocggq
    • You may find it helpful to set the iMac down on its back on the table for the next couple of steps.

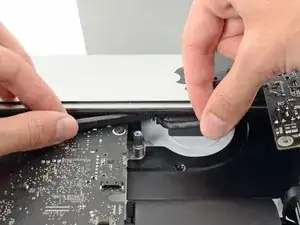
    • Use the flat end of a spudger to push the clip on the side of the AC inlet cable connector inward.

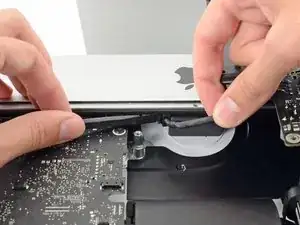
    • While holding on the release clip with the spudger, grasp the AC inlet cable, and pull the connector straight out of its socket.

  42. WBIpQxLH3fEByo23
    • Remove the power supply from the iMac.

  43. KceINyPjQiQDjfoZ
    KceINyPjQiQDjfoZ
    ngKJySbkFQwLlq6w
    • Gently pull the fan cable connector straight away from its socket on the logic board.

  44. 1PLJEbleesQUVGR3
    • Remove the three 12.3 mm T10 shoulder screws securing the fan to the rear enclosure.

  45. 4tLv2VGQeJSNgTP1
    4tLv2VGQeJSNgTP1
    vNhgCQACpS5UShZl
    • Remove the fan from the iMac.

  46. 36DsTBiHTPsP5aVU
    36DsTBiHTPsP5aVU
    gTU24uLBYOIv4Mhy
    KNinFGbODGTjoQq1
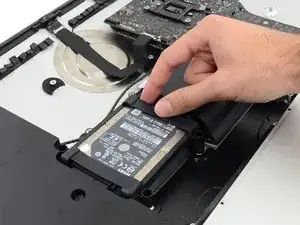
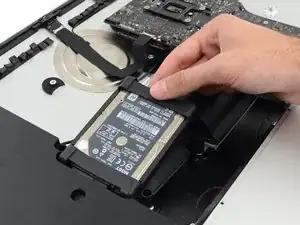
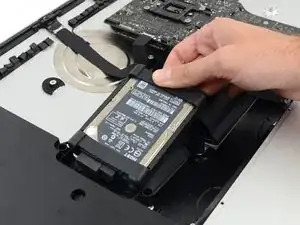
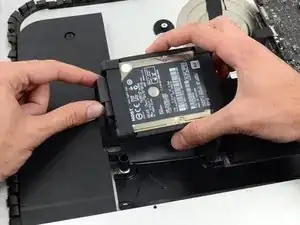
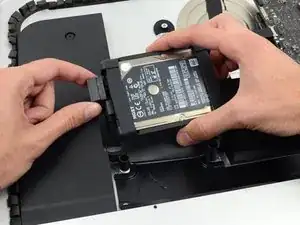
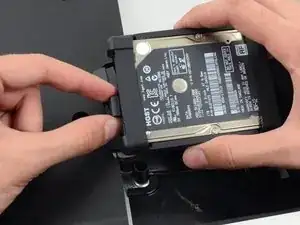
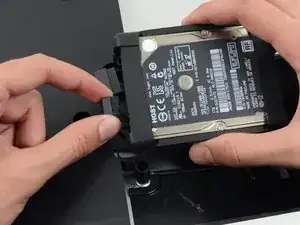
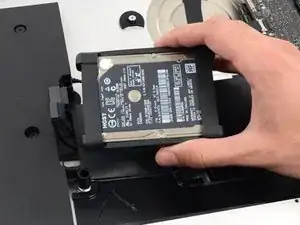
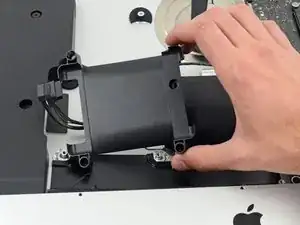
    • Lift the hard drive from the edge nearest the logic board and pull it slightly out of its recess.

    • The hard drive is attached by two cables, do not attempt to fully remove it from the iMac.

  47. ZxnqxTBEoc4w2LRN
    ZxnqxTBEoc4w2LRN
    ZlayYFLKmfxikbiA
    • Disconnect the SATA power cable.

  48. W1BnV1ZiStMgG441
    W1BnV1ZiStMgG441
    QSE3SSpfyUcdRarK
    • Unplug the SATA data cable from the hard drive.

  49. JCpSSKHxwDXCIdI2
    • Remove the hard drive from the iMac.

  50. KhMofSoJJlhXl1jA
    • Remove the single 7.2 mm T10 screw securing the hard drive tray to the rear enclosure.

  51. NwKSthHKJNo4gHC3
    • Remove the hard drive tray from the rear enclosure.

  52. bpUJduIptxtCQTrJ
    bpUJduIptxtCQTrJ
    NY3U2MjTCPHSNjfv
    • Push on each side of the left speaker cable connector with the tip of a spudger and gently "walk" it out of its socket.

  53. nIBOyJbEX5Sl4Or2
    nIBOyJbEX5Sl4Or2
    pAPeO3l2vihSiYDM
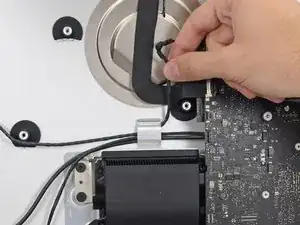
    • De-route the left speaker cable by pulling it straight up out of the retaining clip in the back of the rear enclosure.

  54. aPduYkOrm1ijEuIm
    aPduYkOrm1ijEuIm
    J3l5W2gyvQbjlT4W
    nPMIkqvYZHIUCEXb
    • In a similar fashion as the previous step, de-route the SATA data and power cables up out of the retaining clip.

  55. Oi1uPFeAgU4d4B1V
    Oi1uPFeAgU4d4B1V
    UQYT31FILKH2XlFo
    deVi3sgpTG6ko3ev
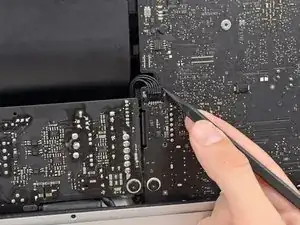
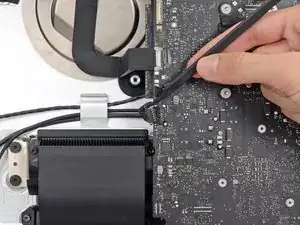
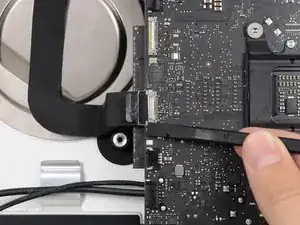
    • Use the flat edge of a spudger to flip up the metal retaining bracket on the iSight camera cable connector.

    • Pull the iSight camera cable straight out of its socket on the logic board.

    • This is a delicate connector that can be easily damaged.

  56. ChWlT2nybGpoDtrw
    ChWlT2nybGpoDtrw
    2LQdOvIdwuPacACY
    52lBdh3y1pIxgFri
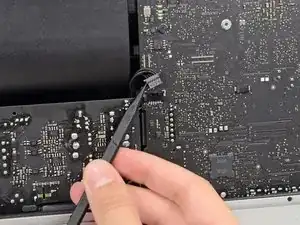
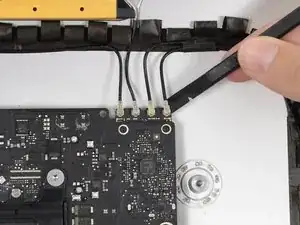
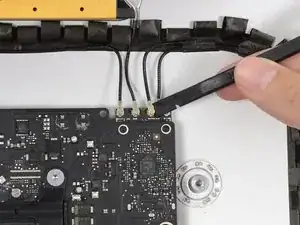
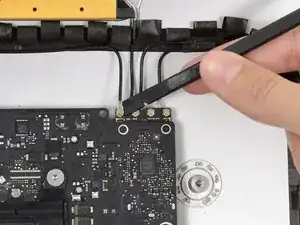
    • Use the flat edge of a spudger to disconnect each of the four antenna connectors from the AirPort/Bluetooth card.

    • Note the original positions for each connector when reconnecting the cables.

  57. PVF2eFHOcWUlH6ov
    PVF2eFHOcWUlH6ov
    qbxXCqIthxynZ525
    tjH4h6FyAyucQGqX
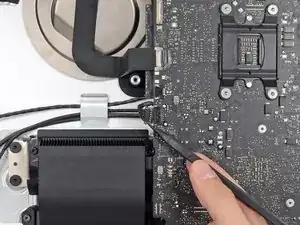
    • Use the flat edge of a spudger to pry the headphone jack cable connector from its socket on the logic board.

    • Push the cable slightly to the right.

  58. QJIoRvsnlHELAikU
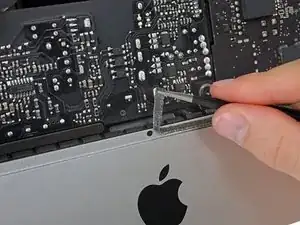
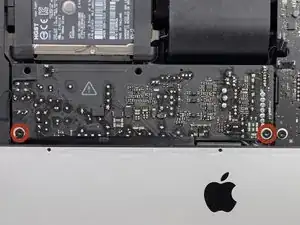
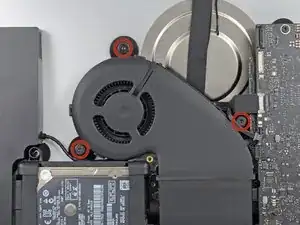
    • Remove the following screws securing the exhaust duct to the rear enclosure:

    • Two 6.3 mm T8 screws

    • Two 4.7 mm T8 screws

  59. vTFjxoQJVL1LjsGU
    • Remove the four 7.2 mm T10 screws securing the logic board to the rear enclosure.

  60. CbhcbTbVVbCDOdVR
    CbhcbTbVVbCDOdVR
    3ZWTvdymBERwUaSS
    kWgY5CCYya3SJRcj
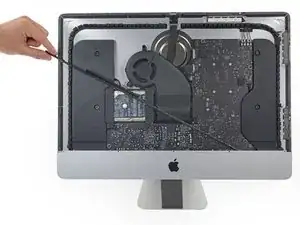
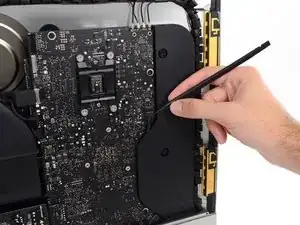
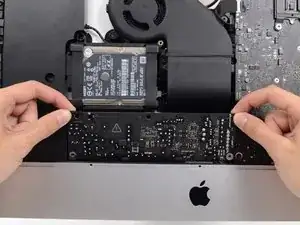
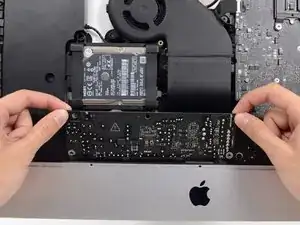
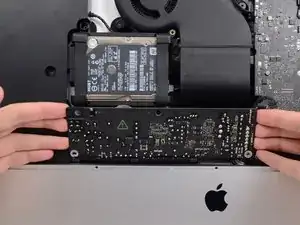
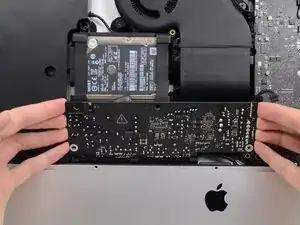
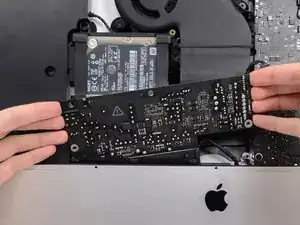
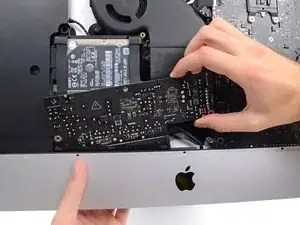
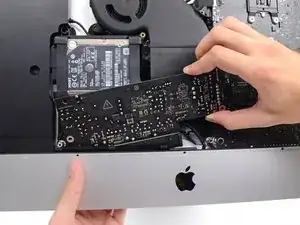
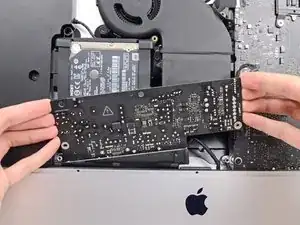
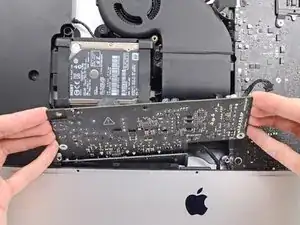
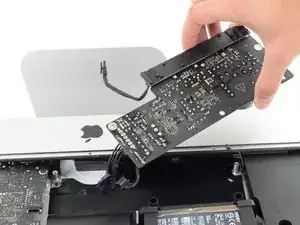
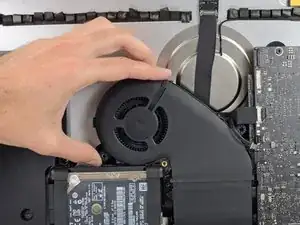
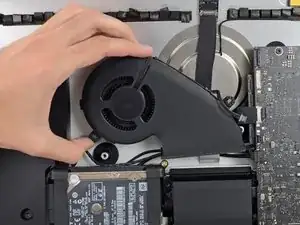
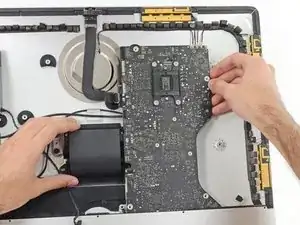
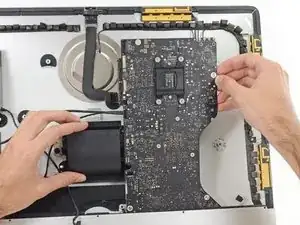
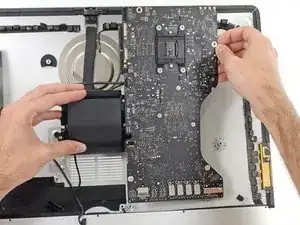
    • Tilt the top of the logic board away from the rear enclosure.

    • Lift the logic board straight up and out of the iMac.

    • Be careful not to snag the board on any of the rear case's screw posts.

    • The I/O boards at the bottom of the logic board will be the greatest challenge. It is recommended to pull gently to avoid any damage.

    • During reassembly of the logic board, pay attention to the position of the I/O connectors. When the board is back in the case, insert a USB or Thunderbolt cable into one of the connectors to align it perfectly.

  61. jvt5qFIeQtALTwRY
    • Remove the single Torx screw securing the SSD to the logic board.

  62. NZJAWxn1JCKpKDOd
    NZJAWxn1JCKpKDOd
    rXQYrqG3JSQCh6P5
    YquXbZ4t1M4vphMg
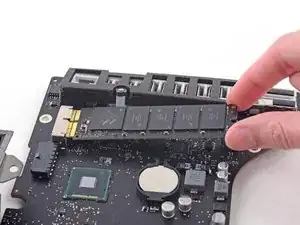
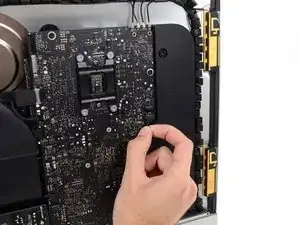
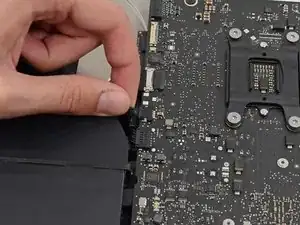
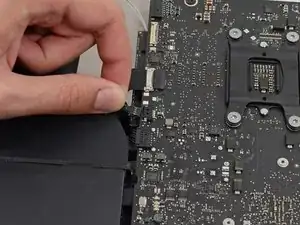
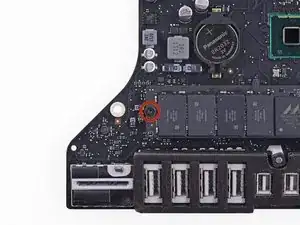
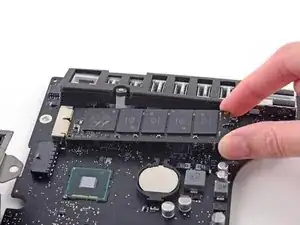
    • Slightly lift the rightmost side of the SSD and firmly slide it straight away out of its socket on the logic board.

Conclusion

To reassemble your device, follow these instructions in reverse order.

Dan

Member since: 02/02/12

465519 Reputation

46 comments

Many thanks for the tutorial? Very detailed and helpful. Now, my question is, can I replace the existing SSD PCIe blade by ANY PCIe blade?

I mean, the 2017 4K iMacs have a PCIe v3 with 4 channels. Will it admit an older PCIe version (such as v2)?

Aleix -

Apple uses a different interface than the M.2 blades as such you ned to use theirs or either of the two 3rd party drive makers OWC or Transcend

- BeetsTech - The Ultimate Guide to Apple’s Proprietary SSD’s (Apples SSD’s)

- OWC - Aura Pro SSD

- Transcend - JetDrive 820

Dan -

Hello Dan! Many thanks for your answer, but none of the webpages you mention has a blade PCIe SSD compatible with the iMac 4K 2017… :(

Aleix -

I’ve put in few of the BeetsTech blades in with no issues. Are you trying to install the SATA drive?

Dan -

Hi Dan! The initial intention was to replace the current 28GB blade PCIe SSD by a bigger one, 225 or 500GB, and keep the current sATA 1TB drive. This way, I could have a decent and fast FusionDrive, as the current configuration is pretty slow…

Finally, I’ve decided to replace the current 1TB sATA 5400rpm drive by a 1TB sATA SSD, as the total cost is arround the same as replacing the blade PCIe drive. In adittion, I am not 100% sure which blade PCIe drive will work on my iMac… the support guys from OWC say that they don’t have a compatible drive yet :(

Aleix -

Can I use that original SSD from my rMBP 2012 (256gb) to this iMac 4k? Thanks!

RD Rubio -

RD Rubio - Review the BeetsTech guide above (Blue URL Link) find your MacBook Pro and compare it to your iMac you have.

Dan -

Hi Dan, how can I be sure that my imac’s logic board has a socket for a blade ssd? As I’ve found on web some of 21.5 imacs doesn’t have it.

Gleb Aksenov -

Apple sold the 21’5 models in three configs HDD only (no SSD connecter), SSD only or a Fusion drive which has both HDD & SSD (has SSD connector).

Dan -

Hi Dan, are you positive the JetDrive 820 (https://us.transcend-info.com/Products/N...) will work with the 21.5 4K iMac that's the 3.4Ghz 1TB Fusion Drive model? What about the Aura Pro X2 (https://eshop.macsales.com/item/OWC/S3DA...)?

g.nobre -

The difference in price between these and the used original parts from beetstech is pretty beefy in my opinion.

g.nobre -

OWC & Transcend offer s few different drives for the different series Apple has produced. Here’s a good reference on the Apple custom SSD’s: The Ultimate Guide to Apple’s Proprietary SSDs. Cody has it updated it with the newest models but they are using the same drives as the last listed.

Dan -

hi if the logic board has the slot for ssd does that mean it's the 2017 model?

also great tutorial thank you

steve

steve daniels -

The SSD blade slot in the 21.5” 2017 model is not consistently present! Apple did not populate some of the logic boards when the system was only a SATA drive’d system. The Fusion Drive’d and blade SSD models both have the connector.

Best to look up your system here: EveryMac - Index of all iMac’s

Dan -

Please can you confirm where I can order a 2TB blade SSD compatible with 2017 4K iMac model identifier iMac18,2 ?

Please can you confirm the pin layout used on the SSD ?

Many thanks.

Darrell Haslam -

Your systems specs: 21.5” iMac 4K Retina (Mid-2017)

As noted: This model has a Serial ATA (6 Gb/s) connector for a 2.5" hard drive. If configured with a "Fusion" Drive or an SSD at the initial time of system purchase, it also has a PCIe connector, but this connector is not present if the system only is configured with a hard drive. >> Your system may not have the needed connector! <<

You need a custom Apple SSD or either an OWC or Transcend 3rd party SSD’s

Dan -

Does anyone know if anybody ever upgraded the “none-ssd-board” by soldering the connector to the board? Is there anything else missing than the connector? Is there a special efi-version on the “none-blade” board to prevent to do so? Would be an interesting project…..

7of99 -

There’s more to it than the connector, there is a bit of logic also needed.

Dan -

como saber si mi iMac tiene el puerto para ssd sin desarmarlo

wilder_tools -

Si tiene un modelo solo HDD, entonces no tiene el conector blade SSD y su lógica de soporte.

Una unidad Fusion o un sistema con un SSD instalado de fábrica lo tendrá

Dan -

if i have the standard hdd of my mac 21.5, 4k 2017. Can i add with an ssd name m2 of 500 gb ?.. it’s my doubt

Matteo Cozzolino -

Sorry It is not M.2, the custom Apple blade SSD connector is not present.

Dan -

Hi, if i clone my HDD, all my Files, pictures, documents will be copyed to the New ssd? What about Windows partition? It will be clone too? I have a Fusion drive in thia moment.Thanks

Florin Ferezan -

No you do’t want to use cloning software what was possible years ago it not possible with Apples new APFS file system. If you drive is not clean (unfragmented) or has any errors even Mac cloning won’t work reliably! Because of this I haven’t used it in over 15 years now I only use Apples Migration Assistant tool as well as TimeMachine.

When you have a Windows partition you need to use the proper backup and restore tools under it.

Dan -

Let me reformulate. I have an imac 21.5 inch (4k) 2017 with 1 TB fusiondrive and I want to upgrade to 32 gb ram and a new ssd (samsung Evo 860 Sata3 1 tb) and I don't know how to keep all my documents and pictures. I have read that i can make a copy (clone) with the TimeMachine. The problem is that I also have a windows partition that I would like to keep. The question was whether the windows partition should be reinstalled again after copying the old hdd or it will be done automatic with TimeMachine. Will the new ssd automatically be recognize as part of the fusiondrive or should something extra be done? Or what is your recommendation for this move? Thank you so much.

Florin Ferezan -

Very easy! Get a big enough external drive for your mac partition and just plug it in! Magically macOS will ask you what to do. tell it you want to use it as a TimeMachine backup and let it rip! It will asked you a few questions and backup your macOS partition.

Now you’ll need to get a backup program for your Windows partition and a second drive for it. Depending on what you get you’ll follow the instructions it offers.

Done!

Now setup a USB thumb drive as a bootable OS installer (make sure it works)

Next install your new drive. Restart your system off of the USB thumb drive to install a fresh copy of your macOS. Now restore your stuff from the TimeMachine backup again magically when you connect it macOS will ask you if you want to restore! Again answer the questions as needed and let it go. Enjoy your coffee come back in a hour or so depending how much you have.

Now re-setup BootCamp and your Windows partition. run the restore function of your Windows backup, done!

Again don’t use cloning software!

Dan -

If I use a 2 TB for instance the Samsung EVO 970 plus, can I remove the SATA drive? Does the system work without the sata HD?

Horst Messerschmidt -

There is no requirement to use one drive interface than another. So yes, you can swtichout your SATA drive with a faster PCI/NVMe SSD drive.

But you may not be able to! Apple only shipped the PCIe/NVMe SSD drive’d and Fusion Drive models with the needed blade connector on the logic board. The bottom line here is you may not have the option to use the PCIe/NVMe blade SSD drive if you got a straight SATA HDD model.

Last important point is Apple did their own thing! The connector is custom! So a M.2 SSD will not directly fit and I don’t recommend using them. Here’s more on the Apple SSD’s The Ultimate Guide to Apple’s Proprietary SSDs

Dan -

Hello. I have the 2017 21.5” iMac, 16GB, 512GB SSD, 3.6 GHz i7. I am almost out of room on the SSD. Can I just add a SATA 1TB or 2TB SSD where a SATA HDD would have been if I had a Fusion drive, or, do I need to replace the NVMExpress blade SSD?

Don Zvareck -

Sure you can add in a second SATA drive if your system already has a blade PCIe/NVMe SSD. It won’t be as fast as your 512GB blade SSD. So to maximize your blade SSD after you install your second drive and format the drive to GUID with a journaled file system (not APFS) copy off your media and data files to the new drive. Ideally, you’ll want at least a 1/4 of the blade SSD free (if you can free up more than do that) The reason is your boot drive (blade SSD) uses the space for virtual RAM, caching and depending on your apps scratch space. So other than your OS and Apps keep your content on the slower SATA drive.

If you are doing music or video work you can use the blade drive to speed things up but given the size you have here you may hit issues.

Dan -

Thanks, Dan. I already replaced a failed HDD in an older Mac with an SSD (using all iFixit know-how and tools!) so I am comfortable going in as far to the space where the SATA drive would be. Sounds like there should be a connector there. Understand completely moving the data files, not the OS over to the SATA drive; that would have been my intent. I have no knowledge of GUID so I need to research that. So the only new things I need to purchase besides the 1 or 2 TB drive are the adhesive strips to re-seal the screen? Thanks so much!—Don

Don Zvareck -

You’ll need the Adhesive kit with the special pizza cutter tool. Four credit cards or iFixit plastic cards. If the system didn’t have the SATA drive you’ll need the cable and the rubber mounts to mount it to the drive in.

iMac 21.5" (Late 2013-2017) SATA Cable

21.5” iMac Hard Drive Rubber Frame v2

iMac Intel 21.5" (2012-2019) Adhesive Strips

Plastic Cards

Dan -

Great. I have the cards and 2 pizza cutters from my previous operation and the iFixit kit my wife bought me. So I guess I need the frame, cable and strips. Is there a brand of SSD you have found works best? I see Samsung, WD and Mercury 6G units popping up.

Don Zvareck -

I used Samsung drives 860 EVO is the current series.

Dan -

Hi Dan. Will the 870 series from Samsung also work? They appear to be newer and lower in price than the 860 but I wanted to confirm compatibility. I have purchased an 860 but can return it if the 870 is preferred. Thanks!

Don Zvareck -

Sometimes newer is not necessary better! The construct of the NAND chips need to be investigated. The 860 uses MLC (Multi Level Cell) whereas the 870 uses TLC (Triple Level Cell). While TLC is cheaper it is slower and may not last as long as the MLC. To improve the speed Samsung uses a MLC buffer area but the depth of this space is limited so large data moves slow down once you exceed it. In addition we also face the same issues all NAND flash chips hit the total number of rewrites.

The bottom line here is stick with the 860 as that’s better drive.

Reference: EVERYTHING YOU NEED TO KNOW ABOUT SLC, MLC, & TLC NAND FLASH

Dan -

Roger! Thanks for the explanation. I will hold tight with what I have. Much appreciated.—Don

Don Zvareck -

I have an iMac 21,5” retina 4k 2017 model A1468 and EMC 3069 with a Fusion drive that seeking to upgrade. Does my iMac have a blade drive installed? If no, would be the port available to install one and have the Osx boot up from the blade drive?

Thanks a lot

christos -

A Fusion Drive is leveraging both drive ports your system offers! Basically you have a 2.5” SATA based HDD and a PCIe/NVMe blast SSD.

So depending on what your direction is deeper storage and/or faster storage! As an example you could replace your HDD with a much larger HDD and re-enable the Fusion Drive setup (depending on the SSD units size this might not offer much)

You could just replace the HDD with a SSD but I would not bother with the blade SSD leaving it unused. The performance will be better but you are then limited to the limits of the SATA III (6.0 Gb/s) interface.

You could replace the blade SSD with a much larger unit (500 GB/1 or 2TB depending on your work flow needs) making it your OS boot drive and holding your applications. Ideally, leaving the rest unused for virtual RAM, scratch space. If you are into video production then using the space to hold your current project, and using your current HDD as your data drive. This is the best performance setup!

Dan -

Hi Dan,

I successfully added the Samsung EVO 860 today. Thanks for all your support. Long (3.5-4 hours) but straightforward thanks to the guides and your assistance. There was one TINY connector on the logic board near the frame that I did not see covered and getting it back on was a son of a gun. The real concern was the adhesive package…a couple of the pieces tore prematurely and I had to be creative to try and pull out the remainder. I think I will mention that to customer service as the last time I removed a screen I did not have that problem. Thanks again!

Don

Don Zvareck -

Is it needed to disable the Fusion HDD in the terminal, when removing and upgrade to aa NVME SSD?

How do you do that?

Marco -

Yes, that is needed as the HD has the expectation the caching SSD is present. Different versions of macOS use different methods. The newer OS's require reformatting the HD, so you'll need to back up any data first.

Dan -

Can I use a 1TB Samsung 980 M.2 2280 with an adapter?

toeyoe -

You do realize this systems blade I/O is custom to Apple while it does offer a PCIe/NVMe interface there are other lines used for housekeeping. So while a M.2 3.0 spec’ed drive will fit they don’t last as long as a real Apple or even OWC’s drive.

Now you want to install the newest M.2 version 4.0 into a system which can’t interface with it? It won’t play well if at all and you won’t get the benefits of the newer standard.

Dan -

Also, after I install the drive, will the iMac recognize it as part of the fusion drive (as it did with the current 32 GB blade)? Or will it be a separate drive?

toeyoe -

I guess I wasn’t clear 😞This SSD won’t work in your system as the I/O in the system is based on an older standard even if it worked, you won’t get the performance the newer standard this SSD offers, basically you’re over buying! Then the dual interface you are forcing the data to travel is not ideal using an M.2 drive. I wouldn’t even attempt it as it’s a lot of work only to find out it wasn’t worth it.

As far as the Fusion Drive… Apple loves to confuse! Different MacOS versions worked a bit differently as far as breaking the Fusion Set which you will want to do as you don’t want to setup the blade drive that is quite large (128 or larger) as a Fusion Drive cache drive.

A dual drive setup is much more effective where the blade drive is the boot and app drive with a sizable amount of free space for Virtual RAM, OS caching and depending on your apps scratch space. Then using the slower SATA drive as your data drive!

Dan -