Introduction

Prereq-only guide to remove the entire display assembly.

  1. faYLZCcUqNgfLImh
    faYLZCcUqNgfLImh
    fTsCL5NUphoD5vbV
    • Lift the display up to a near-vertical position.

    • At this point there is still a strip of adhesive along the bottom of the display that will hold the display to the frame like a hinge. You can loosen this adhesive by working the display up and down a few times.

    The best way to remove the chin adhesive is to use the tabs at either end (there are two strips that run from each outside corner to near the centre). Carefully pull the tabs up and the strips should peel off.

    Advance Technical Service -

  2. EyrkeRmWKhVr6PQL
    EyrkeRmWKhVr6PQL
    V3KWORppGRpxkZl5
    EEJDoH3W6oKg6nHd
    • Be very careful not to touch the capacitor leads or any exposed solder joints on the back of the power supply (boxed in red).

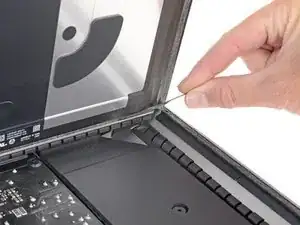
    • Grasp the small tab at the end of one of the bottom edge display adhesive strips and pull the adhesive toward the top of the iMac to remove it.

    • Repeat this step with the other adhesive strip and remove it.

    • If either adhesive strip breaks before it's removed, use a plastic card to slice through the remaining adhesive.

    At step 21-22, releasing the adhesive strips from the bottom of the display, I noticed a tab on the outer end of each strip. Pull the tab to remove the whole strip, no need to mess around with the plastic cards!

    roberttrevellyan -

    Instead of the plastic cards, use the flat end of a spudger. Use it as scraper. Be careful as there are antennas mounted on the inside edge of the frame on the right side (facing you), and the top right (facing you). The original adhesive strips are on those as well. - ECJ

    ECJohansen -

    A little bit of hot air (eg. hair dryer) will help soften the adhesive. Use a piece of cardboard or equivalent if you want to avoid blowing hot air towards the electronics.

    Be careful to remove absolutely everything - any remainder will create a bump and prevent your screen from sticking back to the frame when reassembling.

    Froggy Manny -

  3. W11PURO2LYnqVMEL
    W11PURO2LYnqVMEL
    4x45fNhvlBjfqU3f
    WstuEbNDdOlFKIns
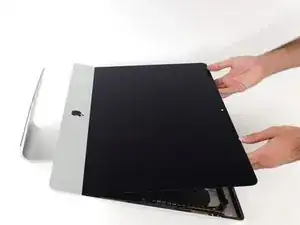
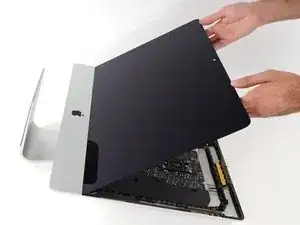
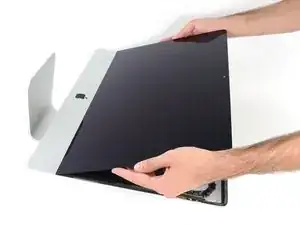
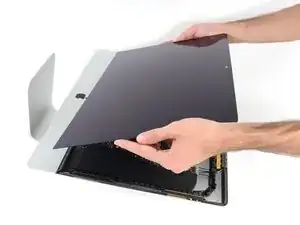
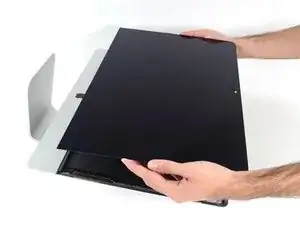
    • Lift the display up from the frame and remove it from the iMac.

    • It may be necessary to slowly lift from one side to peel against the remaining adhesive.

    • Be very careful handling the display—it's big, heavy, and made of glass.

    • After the adhesive is cut, it cannot be used to re-seal the display in place. Follow this guide to replace the adhesive strips that secure the display to the rear enclosure.

    Après l'étape 23, j'ai suivi les instructions de la vidéo intitulée: Upgrade RAM in a mid-2017 21-inch iMac without complete disassembly.

    Lien: https://www.youtube.com/watch?v=_k9I7N9B...

    J'ai pu upgrader la RAM en enlevant juste le ventilateur.

    Koala -

Conclusion

To reassemble your device, follow these instructions in reverse order.
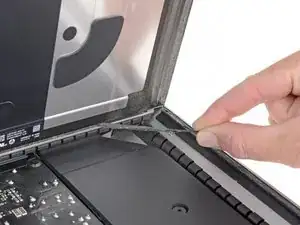
Adam O'Camb

Member since: 11/04/15

183214 Reputation

0 comments