Introduzione

If the hard drive has broken or if you are planning on putting in an SSD hard drive, this guide will show you how.

  1. egcIou3kYwAFUPZk
    • Make sure the laptop is shut down.

    • Flip the laptop upside down. Rotate it so the battery faces you.

  2. COUKEIVGtWjQMEIJ
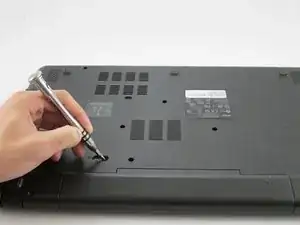
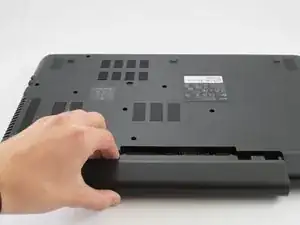
    • Place the pointed end of a spudger into the battery lock. Slide the battery lock to the left using the spudger. A "click" sound will accompany the release of the battery.

    On the E-572P the hdd and memory is accessed from the removable flap on the bottom of the laptop - do not try to take the keyboard off!

    Peter -

  3. BwNIwKy4WyIU3iiS
    • Pull the battery towards you to remove it from the laptop.

  4. swqedRTwTuHOUIdu
    • Remove all eighteen 8 mm screws with a Phillips #0 screwdriver.

  5. QvuJrPpaBYQp5bpx
    QvuJrPpaBYQp5bpx
    KqkMZTFasSEUbpdH
    V14aoWeYHpehGYPL
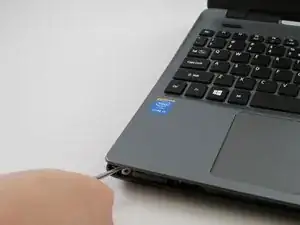
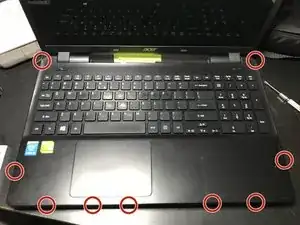
    • Carefully pry apart the clips holding the keyboard in place by moving a metal spudger along the seam.

    • Be careful not to break the plastic clips. Do not remove the keyboard until told to do so.

  6. kNdpqkMnqZZB1RdD
    kNdpqkMnqZZB1RdD
    WaKMhRIPBurnARCY
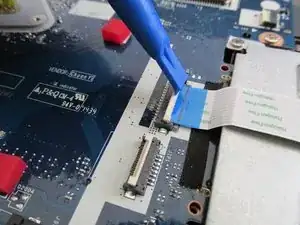
    • Carefully flip up the white hinge. Then, detach the three ZIF ribbons connected to the motherboard.

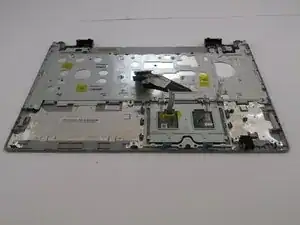
    • Remove the panel with the keyboard and the touchpad.

    not a complete guide, there is more steps to disassembly keyboard

    darkman.lv -

  7. VbLsCH2fBdUDVKOS
    • Locate the hard drive in the metal casing.

  8. GmEfJUZ3MjskXXHU
    • Remove these two 4 mm Phillips #1 screws.

  9. gcxPWvmNSlv5cXCZ
    gcxPWvmNSlv5cXCZ
    knTZxslCFktOxJ2t
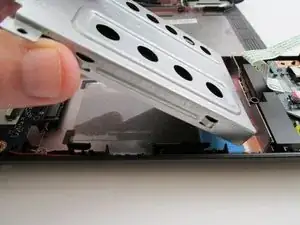
    • Locate this ZIF ribbon and carefully flip the white top hinge up and bend the ribbon over to the right side.

  10. PLnrGYg553HrWOYg
    PLnrGYg553HrWOYg
    Cy4nR3mLnCA5UpVe
    • Slide the hard drive to the right and gently lift it off of the laptop.

  11. JLsBiJds1VfZyFGX
    JLsBiJds1VfZyFGX
    4NfVOFGe54nCRpb1
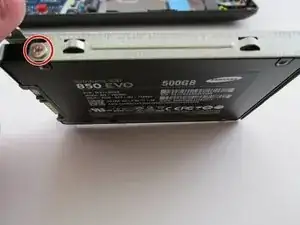
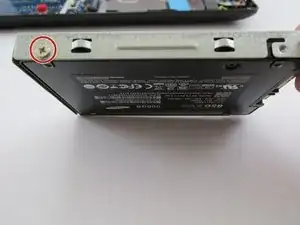
    • There is one screw on each side of the metal hard drive casing you remove.

    • Slide the hard drive out of the metal casing.

Conclusione

To reassemble your device, follow these instructions in reverse order.

daniel sawyer

Membro da: 23/08/15

2566 Reputazione

8 commenti

You can't beat the internet when it comes to sorting out a problem.

Many thanks to the author of this guide, it really helped me out

Michael Lee -

These are excellent clear instructions, well done and thank you

David Waterhouse -

Great directions. With visual ades too...nice.

Thanks

Jackie Abbott -

Thank you for the clear instructions, this is an excellent guide.

Toni-Marie Catchpaw -

Very helpful guide. Thanks for that! Only thing missing was a warning about where the plastic clips were around the body to make it easier to pop those without breaking the plastic tabs on some of them. Even that isn’t all that important really.

Michael King -

Agreed, that would be very helpful

Techulon Technology Services -

I just updated the steps to show plastic clip locations

Techulon Technology Services -

ACER ... every time I open ACER notebooks I get angry on those %#*@ ZIF ribbons. I hate them!

Alessandro Rota -