Introduzione

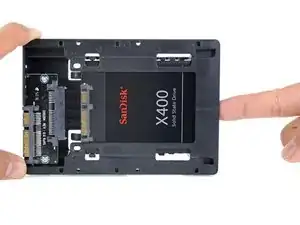
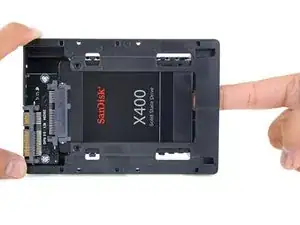
Segui questa guida per aggiornare l'hard drive del tuo iMac con un SSD. Include i passi sull'installazione del sensore di temperatura dell'SSD, così che le ventole del Mac funzionino alla velocità corretta.

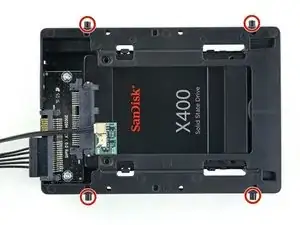
Guida solo prerequisita. Aggiornamento SSD con sensore della temperatura per iMac del 2012-2017.

  1. yw5L1XBSIoaFP2lJ
    yw5L1XBSIoaFP2lJ
    IfEYLXa1PVVgeHNR
    EGASiwaQRDU6G5sH
    • Segui i prossimi 8 passi solo se stai sostituendo il tuo hard drive con un kit SSD.

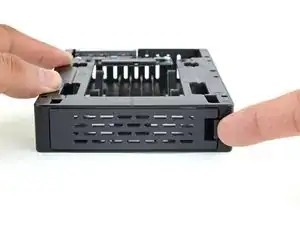
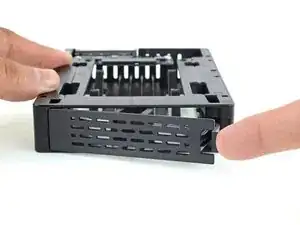
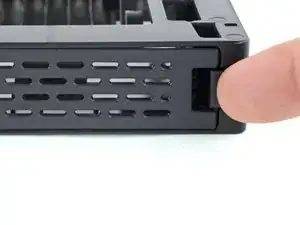
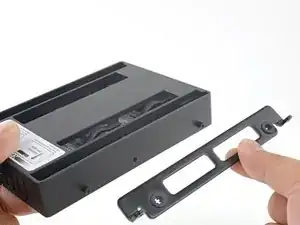
    • Premi con un dito la linguetta della copertura anteriore della struttura. Mentre tieni premuta la linguetta, apri la copertura.

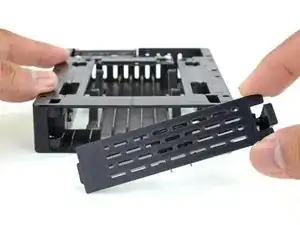
    • Rimuovi la copertura anteriore.

    Ich denke die Frontplatte hätte anschliessend auch wieder eingesetzt gehört - bin die Anleitung Schritt für Schritt durch gegangen, und mir ist leider gar nicht aufgefallen, dass dieser Schritt fehlt. Nun ist der iMac bereits wieder verklebt und beim Aufräumen ist mir die übrig gebliebene Frontplatte untergekommen.

    Aber halb so schlimm, die SSD ist angeschraubt, kann sich also eh nicht bewegen.

    Gerhard Dietrichsteiner -

    My enclosure doesn’t look like this. All I received was a black back plate. Where is the rest of it? Oh boy

    Selwyn Arnold -

  2. pUBuOR5jObRKcgTb
    pUBuOR5jObRKcgTb
    UOsa4yARWVQWPRf3
    wh1n1HnGSGhYLwfL
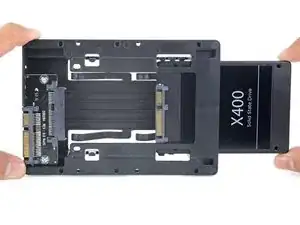
    • Allinea il piccolo connettore SATA così che il lato corto sul connettore dell'SSD corrisponda al lato corto sul connettore della struttura.

    • Fai scorrere il disco attraverso la parte anteriore della struttura finché il connettore SATA non è completamente inserito.

    • L'SSD si connette alla struttura in un solo modo. Se i connettori non sono allineati, ruota l'SSD e riprova.

  3. JZJDQW2yqV5NdNB1
    JZJDQW2yqV5NdNB1
    ugGHOwjdoAZnhTMZ
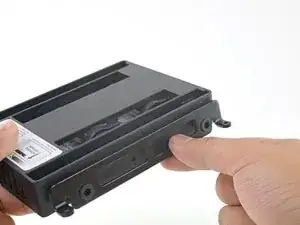
    • Puoi anche installare (facoltativamente) le due viti a croce Phillips #1 incluse con il kit della struttura per fermare l'SSD al suo interno.

    • Riposiziona la copertura anteriore.

  4. sK321sGtAvPlTSVE
    sK321sGtAvPlTSVE
    WKuofhqWsLjCdAop
    • Collega il cavo SATA con sensore incluso alla porta della struttura.

    • Allinea il lato stretto del connettore del cavo con il lato stretto del connettore della struttura. Il cavo è fatto per connettersi in un solo modo. Se non riesci a connettere il cavo, ruotalo di 180° e riprova.

  5. Ru3qyqBMjGB6UWVZ
    Ru3qyqBMjGB6UWVZ
    IS51nDDgPwe4d6RK
    25pcyMtAlWLR5k5u
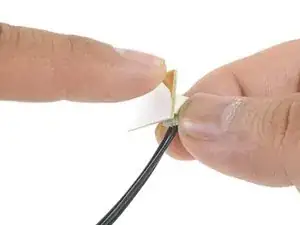
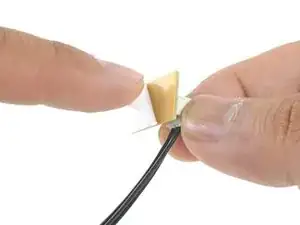
    • Rimuovi la pellicola dell'adesivo sul retro della scheda del sensore della temperatura.

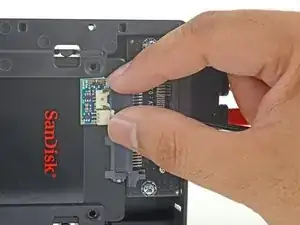
    • Fai aderire la scheda del sensore della temperatura a un'area metallica esposta dell'SSD, il più vicino possibile al connettore SATA.

    • Piega i cavi in eccesso del sensore della temperatura, in modo che non siano d'intralcio mentre installi la struttura.

    Does the small temperature sensor board have to be purchased separately for a 2015 iMac or is there one already attached to the HDD?

    Richard Lee -

    Hi Richard, our upgrade kit does come with a temperature sensor, but a hard drive bought by itself will not come with one.

    Adam O'Camb -

    The enclosure that came with my kit is all plastic, does the sensor have to be connected to metal? If yes, where would it go given the all-plastic enclosure?

    Lynne Mitchell -

    Hi Lynne,

    It does not have to be connected to metal. However, the sensor should be stuck on the drive and not on the enclosure so that it can sense the drive’s temperature.

    Arthur Shi -

    My iMac (27-inch, Late 2013) (Model Identifier: iMac14,2) (EMC: 2639), had a Seagate Barracuda 1.0TB HDD installed. There was no temperature sensor on the HDD. I have the Fan Controller that is pictured in this manual on Steps 39, 40 and 41. The photos do not show a small two-conductor cable connected from the Fan Controller circuit board to the logic board. There is usually a cable that connects the small circuit board, where the drive’s temperature is measured, to a connector on the logic board, but not in this iMac. For now, I have installed the Samsung 860 EVO 500GB SSD without a fan controller and it has been running for over two hours without a hint of the fan ramping up. Should I still install the Fan Controller and not worry about connecting the controller sensor to the logic board? Thank you for creating an excellent manual!

    David Higgins -

    Hello, what if I don’t buy the temperature sensor? Could I break my computer or the SSD? Thank you in advance for your answer.

    kurdonet -

    You can use Mac Fan Control as a software solution. You won’t break your computer as it will slow down and throttle itself to protect it. More than anything, your SSD will run warmer than usual, which could shorten its lifespan.

    Arthur Shi -

    I just did this procedure with an A1419 (EMC # 2806) and didn’t buy the temperature sensor. I didn’t experience any loud fans afterwards. The machine was originally ordered with 3TB Fusion Drive. After installing the new 2TB SSD (WD Blue WDS200T2B0A) the Disk Utility showed an original 128GB PCI drive in addition to the new SSD. I ignored this PCI SSD and reinstalled OS X on the SATA SSD. All is good here! Oh, also I didn’t use any fancy 3.5” to 2.5” drive adapter, but a simple 3-dollar eBay adapter (can be found with this title, “2.5" to 3.5" Bay SSD Metal Hard Drive HDD Mounting Bracket Adapter”). I keep these laying around just in case. I did have to re-thread the screw holes to re-use the iMac’s HDD screw-posts (used tap & drill set, size 6-32 NC).

    Andy Blakely -

    I just upgraded my late 2015 iMac with a 1TB Samsung 860 EVO and did not use a sensor. No fan or heat issues over the last week of use. Please note this Samsung drive is not the primary workhorse on the machine as I also upgraded my PCI ssd and use that as the primary drive. I have read on other sites that this model iMac does not need the sensor but I am not 100% on that.

    Chip T -

    une fois la sonde collé sur le ssd ou est ce que celle ci ce branche ? sur la carte mere ?

    Charly Dewost -

  6. MieR2EENoSvidD3M
    • Installa i perni di montaggio del vecchio hard drive sui lati della struttura.

    • I fori sulla struttura potrebbero non essere filettati, quindi avvitarci i perni di montaggio potrebbe richiedere uno sforzo aggiuntivo. Prenditi tempo e avvitali lentamente, accertandoti che entrino dritti.

    This was an understatement for my drive adapter. The adapter had threads that I believe were M3 threaded whereas the mounting pins are what I believer are 6-32 screws. The mounting pins are not threaded well for self-tapping, so I recommend finding an old screw that used to be used for mounting optical drives into PC cases and using those to thread the holes. You can make sure you have the correct size by screwing the sacrificial screws into the old hard drive where they should fit easily before using them to cut new threads into your 2.5” drive adapter. After that, the mounting pins went into the adapter with very little effort.

    Jakegub -

  7. QnSve6WeaRQkwyue
    QnSve6WeaRQkwyue
    EtOM5EyuBSSKY6pj
    • Attacca sulla struttura tutte le staffe che sono state rimosse dal vecchio hard drive.

  8. hrSaJ1qa3QaQgQAC
    hrSaJ1qa3QaQgQAC
    ndYUhaGJSp3WRWca
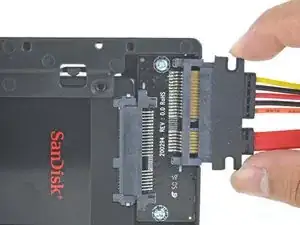
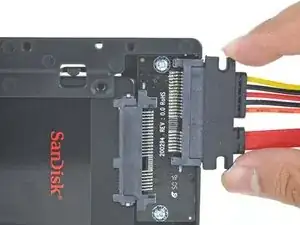
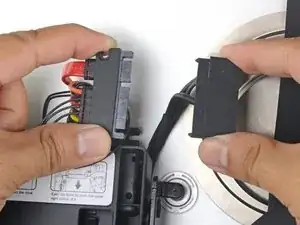
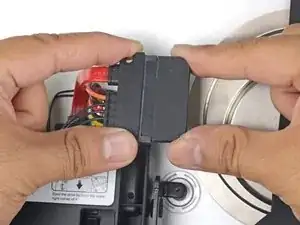
    • Collega il cavo SATA combinato al nuovo cavo SATA combinato con il sensore della temperatura.

    • Dirigi i cavi SATA dove non interferiscono con altri componenti.

    • Prova a evitare che i cavi vengano piegati eccessivamente o pizzicati.

    How much time after gluing the screen can we use it?

    Maurya Gajjar -

    A few hours should be fine. I suggest checking the screen after a week and after a month to make sure the adhesive is still fully bonded.

    Arthur Shi -

    Ensure the glass lines up with the edge of the iMac

    After replacing the adhesive strips with new ones and the screen connectors have been reconnected, place the lower edge of the screen on the bottom shelf” to take the weight, but don’t press it back in the shelf too much.

    At this point if you’re careful you still have the ability to ensure the edges of the glass line up with the aluminium edges. As soon as the adhesive strips make contact with the glass you will quickly lose the ability to adjust this to line up.

    pohutukawa -

    What position should the iMac be in before doing this final comment related to setting the display on the “shelf”?

    joseph sis -

Conclusione

Per rimontare il dispositivo, segui queste istruzioni in ordine inverso.

Arthur Shi

Membro da: 03/01/18

248236 Reputazione

3 commenti

I love the guide~ it is super easy to follow. My computer is not recognizing the disk and I can’t figure out why. I feel like I missed something in reassembly. Any suggestions? Common errors?

Julie Cain -

Hi Julie!

Was the new drive formatted before you installed it? You can try to boot the iMac in recovery mode and reinstall the OS from there. If that doesn’t work, please post your question on our Answers forum and someone may be able to help you out!

Arthur Shi -

when doing internet recovery First run the disk utility and Format it using mac journal, then continue to install the new disk will be visible.

SreckoVuka -