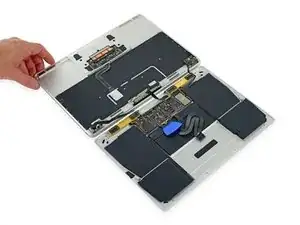
Introduzione

Guida solo prerequisita per aprire il MacBook senza scollegare del tutto la copertura inferiore.

  1. WTpjAPhBML2eX4Z1
    • Prima di procedere, scollega e spegni il tuo MacBook. Chiudi il display e appoggialo su una superficie morbida, con il lato superiore rivolto verso il basso.

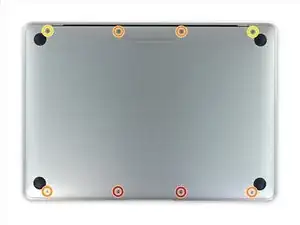
    • Rimuovi le seguenti otto viti che fissano il case inferiore:

    • Due viti pentalobe P5 da 1,8 mm

    • Quattro viti pentalobe P5 da 2,9 mm

    • Due viti pentalobe P5 da 6,1 mm

    • Prendi nota dell'orientamento delle viti mentre le rimuovi: devono essere reinstallate con una leggera angolazione.

    • Durante questa riparazione, tieni traccia di ogni vite e assicurati che torni nel posto esatto per evitare di danneggiare il tuo dispositivo.

    IMPORTANT. You’re not removing the bottom, yet. This step is solely to separate the panel from its clips, permitting inside access.

    Chris Leeds -

    The screws go in tangent to the curve of the case. If you aren’t used to handling small hardware try turning the screw counterclockwise while you feel for the hole until you feel it drop, that means the threads have aligned. It takes only light finger torque when they are threaded correctly

    abscate -

  2. oFRbloAsCqR4kMZO
    oFRbloAsCqR4kMZO
    o5lecdLOaMSsveUP
    OjOkolyUJbLFruoW
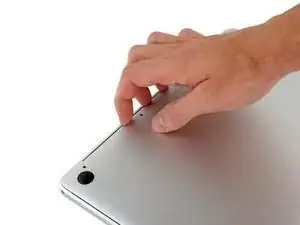
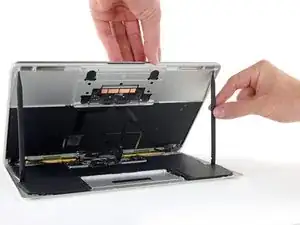
    • Inserisci le dita tra i due case partendo dal retro del MacBook, tra la cerniera dei due case.

    • Solleva leggermente il case inferiore per evitare di danneggiare i cavi che lo collegano al case superiore.

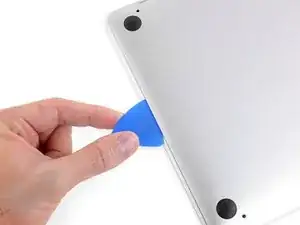
    • Mantenendo una presa salda, solleva costantemente finché i due case non si separano.

    • Potresti riscontrare molta resistenza nel sollevare il case inferiore. Se necessario, fai scorrere un plettro di apertura o un altro attrezzo di leva con sicurezza ESD lungo i bordi laterali del case inferiore per liberare le due clip di fissaggio nascoste.

    • Durante il rimontaggio, per riattaccare le clip premi saldamente vicino a entrambi i bordi laterali del case (vicino al punto in cui è inserito il plettro nella terza immagine) finché non senti le clip scattare in posizione.

  3. v2ajYWLVaPyfdKBp
    • Tenendo il case inferiore in posizione, capovolgi con cautela il MacBook in modo che il logo Apple sia rivolto verso l'alto.

  4. pYEJCQSeMGAEyFJM
    pYEJCQSeMGAEyFJM
    VjPKdFrhi2OEvgks
    • Solleva il case e il display insieme dal bordo anteriore e solleva il tutto fino a un angolo di circa 45 °.

    • Può essere utile mantenere il MacBook aperto in questa posizione per il prossimo passo.

    This displays two black pics to prop up the MacBook, but the kit only includes one black pic.

    Kyle Swafford -

  5. EXWTgtXS2vPBhGKP
    EXWTgtXS2vPBhGKP
    1JKIDRDVVFDBjMCr
    rUDUCKRgWBKStQAM
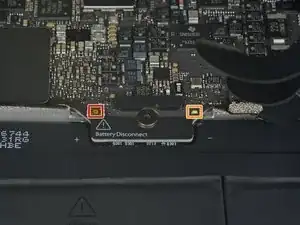
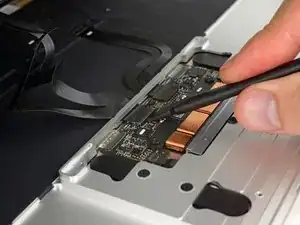
    • Usa l'estremità piatta di un spudger per premere e tenere premuto il piccolo pulsante dorato 'disconnessione batteria'.

    • Se il LED di alimentazione è acceso, continuare a tenere premuto il pulsante fino a quando il LED si spegne, quindi rilasciare. Questo può richiedere fino a 10 secondi.

    • Se il LED non si accende, rilasciare il pulsante dopo 5-10 secondi. Premere e tenere premuto nuovamente per 5-10 secondi e rilasciare. Infine, premere e tenerlo premuto una terza volta per 5-10 secondi e rilasciare.

    • Questo passaggio assicura che il MacBook sia completamente spento e quindi ci si può lavorare con sicurezza.

    cannot turn on the led after replacing the new screen, even after following the turn on instructions upper…

    Laurent Pierre -

    on reassembly, I had to plug my laptop in to reactivate the LED light

    aaron_vandyke2003 -

    Does anyone know how to turn it back on..? I plugged the laptop in and saw the LED Light, but it won’t turn on

    mmcsorley -

    After reassembly I could not restart my MacBook using the power button or after SMC reset (shift-ctrl-option-pwr). I had to connect my MacBook to its charging cable to get the battery LED to re-illuminate. After that it was all normal.

    Richard Lovatt -

    It took a few minutes on the power adapter for my computer to turn on after it was reassembled.

    Luk Chl -

    mine doesnt turn on w anything, i forgot to click the buton to disconnect :_/

    cristian.campuzano -

    Same issue as above peeps. Followed ifixit directions verbatim and wasn't getting anything after screwing everything back in. Plugged in original 45W power block and waited, after few minutes battery LED came on and a min. or two after that, was able to get screen to turn on. Hope this helps somebody else.

    Brandon Elliott -

    May I ask how to get screen to turn on. I cannot get it work..

    Xiubo Zhang -

    For those whose Mac won't turn on.

    See step 16

    To reconnect this cable, first line up the metal bracket over the screw holes, then "PRESS DOWN" on the middle of the bracket.

    There is a connector under the bracket, which you can't see if you don't see under.

    Not having it in mind, you will not PRESS DOWN the middle of the bracket and there is no connect.

    hls2005 -

    Thank you @Xiubo Zhang - This solved my problem! Please everyone check this connector if you have trouble turning your Macbook on after replacing the battery.

    Miksu -

    There needs to be mention of procedure for getting the repaired MacBook to power up again after the repair is completed.

    I also am running into the issue described by others. MB will not come on again, even after being plugged into power and performing an SMC reset.

    Kinda stuck….

    Carlos Perez -

    Hi, I tried everything and my MacBook will not start up after replacing the bottom case with a battery installed. I decided to put back on the old case with the battery that needs servicing and it still will not power on. I am fairly experienced taking apart laptops I was an Apple service tech for 15 years. this has me baffalled. Any hints BTY the logic board does not show any power coming from the AC charger the power LED is not lit up

    eestern -

    I had trouble with this as well. What worked for me is to plug in power using the stock 29W USB C power brick that originally came with this Macbook. Trying other, lower powered, power adapters did not work. Use this advice with caution as there are multiple (i.e substantiated) comments that indicate that first power up should only be with a 5W adapter! So perhaps try this strict sequence: try with a 5W adapter, then and only then try with the 29W adapter. Or even slightly better, if everything else has completely failed, only then try full power 29W adapter.

    LexxOne -

    How long did you wait to get it power back on? I replaced my logic board and tried to connect the power charger but it doesnt still turn on.

    Herb -

    The easiest error to make when working on this motherboard if applying full voltage after re-assembly. According to the big A, the motherboard on these Macbooks need to be “woken up” with a 5 watt (phone size) charger. Applying the normal 29 watts may render your system unusable.

    Noah - Feb 18, 2021

    Hello Noah,

    It seems your remark is only valid for the 2015 and not the 2016 edition.

    David - Mar 3, 2021

    While it’s true that the internal documentation specifies this for a 2015, after frying 2 motherboards with a normal charger, I spoke with the engineers and they told me that this also applies to 2016 and 2017 macbook main logic boards. I say- It can’t hurt to try to wake them up with a 5 watt charger first! Please take 5 minutes to save your motherboard.

    Noah - Mar 4, 2021

    Noah -

    I plugged in my charger and the LED came on. The computer gets warm but the screen is not turning on. The keyboards doesn’t seem to respond to recovery options. Any suggestions?

    J'Trel Sapp -

    Hello in muy case the power LED does not go dark (off) . Holding more than 10 sec and nothing. Somebody?

    Flavio -

    The led light doesn’t turn off on mine either. Held for 10 sec 3 times and still on. How do I turn it off now? And will it damage the computer if I work on it with the light on?

    sfalba -

    Also, which way should the track pad flex cable face when reinstalling it?

    sfalba -

    When I try to restart, I see the battery symbol flash on the screen. It shows 100% (hooray?) but then never boots up.

    paul0 -

  6. 1xlLw6pjiuElshkZ
    • Chiudi il MacBook e capovolgilo con cautela.

  7. 2GYsPBbAwkEqs2xq
    • Sollevandolo dal bordo anteriore, apri il case ad un angolo di circa 45 °.

    • Fai attenzione a non danneggiare i cavi a nastro che fissano ancora il case inferiore al MacBook.

  8. lGBQcICtFaslxUHu
    lGBQcICtFaslxUHu
    uhunJJRpxlkLAvhl
    • Usa delle pinzette per staccare il nastro che copre il connettore ZIF del cavo trackpad.

    Where can I find a replacement cable?

    John Comix -

    Just worked on one that was missing the tape from the factory, so yours may not have it either.

    maccentric -

    that cable got damaged, and now my macbook won't turn on anymore. Does this cable prevent the macbook from working?

    ITZ CRONOMO -

    I have the same issue. Th trackpad cable snapped while I was replacing the LCD screen. I have ordered a new cable from Amazon but I am not sure if that would cause the laptop to not power up (it's not power related)

    Raj Venkat -

  9. iImRKXAcEWwgyePw
    iImRKXAcEWwgyePw
    b3YwfdgUUlOCsXSy
    LMjS3bqlbWDB4ieE
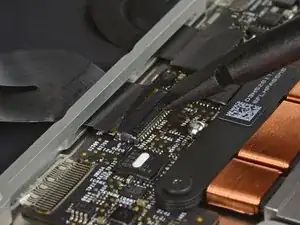
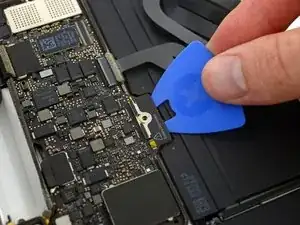
    • Usa un spudger per sollevare delicatamente l'aletta di fissaggio sul connettore ZIF del cavo trackpad.

    The small retainer flips up about 90 degrees from locked position

    abscate -

    The keyboard and trackpad don't work after the repair, what can I do? They don't even show up in System Report.

    bredelet -

    I found that the connector was not pushed enough in. Works now.

    bredelet -

    I flipped up the small retainer -- but when I tried to flip it down, it flew off. The tabs that mount the retainer are very small, and I couldn't get it back on. Left it out, taped down the cable.... and so far the computer, battery, and trackpad are working.

    Bessel Sphere -

  10. WeOX4JZDcQrqklNd
    WeOX4JZDcQrqklNd
    qtXyAcpgiAVCBmVC
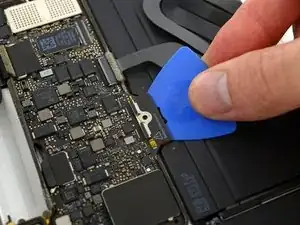
    • Scollega il cavo a nastro del trackpad dal trackpad tirandolo delicatamente attraverso la sua fessura nel telaio.

  11. CDaHMX5h1aFsjtL2
    CDaHMX5h1aFsjtL2
    iLYAVQ2N3yLQFkvC
    XbPR6F5Pfwam2NkO
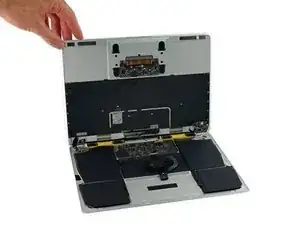
    • Chiudi con cura il MacBook e capovolgilo ancora una volta, in modo che il logo Apple sia rivolto verso l'alto.

    • Sollevando dal bordo anteriore, solleva il case superiore / display fino a un angolo di circa 90 ° e disponilo contro qualcosa di solido in modo da non doverlo tenere.

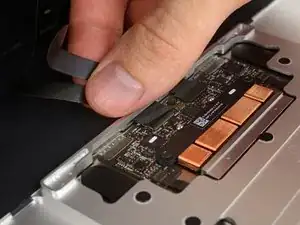
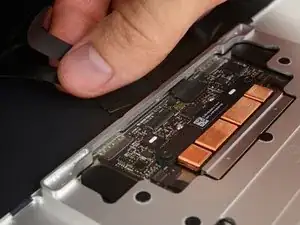
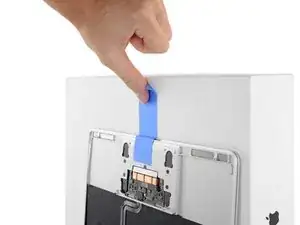
    • Aggiungi un pezzo di nastro vicino al trackpad per fissare la parte del case per prevenire movimenti accidentali.

    • È possibile aprire completamente il MacBook e appoggiare entrambi i lati in orizzontale, ma ciò potrebbe danneggiare i cavi flessibili e non è consigliato.

  12. KhNCZTtfaGxFvwMu
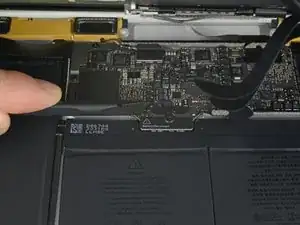
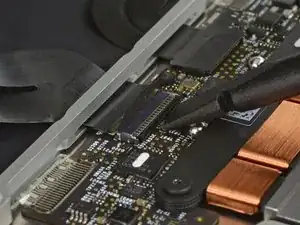
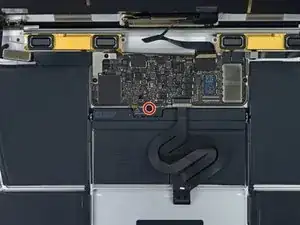
    • Rimuovi la singola vite Torx T5 da 2.9 mm che fissa il connettore della batteria alla scheda madre.

    From my experience it’s important to carefully press and hold the small button above left of the Battery Discharge label. Use a plastic spudger or finger tip. The illuminated yellow LED to the right will go off. I believe this discharges remaining electricity from logic board protecting it during repair.

    * I cannot find any documentation to support this, but I have damaged boards by not including this step.

    Chris Leeds -

    I don't know what guide your on, but step 6 of the guide to replacing the USB-C cable has you press this button (3 times even).

    maccentric -

    What is with the all plastic end of this cable that appears to just be glued right on top of its connector?

    Does the new one just stick back right on top?

    (In this photo it is the bottom side of the cable below the white water indicator sticker)

    Elizabeth Erkelens -

  13. pTJmavEfBv2DXgVU
    pTJmavEfBv2DXgVU
    VUebfHZqvKTpapBB
    • Come ulteriore precauzione, è possibile scollegare fisicamente la batteria inserendo unplettro di isolamento batteria tra la scheda madre e il connettore della batteria.

    What happen if you don’t disconnect the battery? I didn’t and I saw smoke coming out when I connected the pad flex cable and the computer still started up

    DSANTIAGOSOY -

    If you don’t disconnect the battery you might accidentally short something on the logic board since power is still running through everything while you’re working on it. You can complete the repair without disconnecting the battery, but you risk accidentally breaking your logic board. It’s much safer to keep the battery disconnected while you’re working.

    Adam O'Camb -

Conclusione

Per rimontare il dispositivo, segui le istruzioni in ordine inverso.

Adam O'Camb

Membro da: 11/04/15

195052 Reputazione

0 commenti