Introduzione

If the display on your camera has stopped working or is cracked and otherwise not functional, it will need to be replaced. This guide will show you how.

  1. JZpuhYn5aNx2a5k5
    • Lay the camera on its back so that the card/battery door is facing you.

    • Using your fingernail, slide the tab on the battery door up to release the battery door latch.

  2. ImYNPluw4SOitEDE
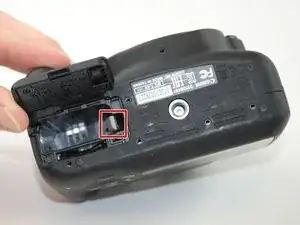
    • Lift the now free card/battery door to reveal the battery compartment.

    • Push the gray lever to the right side so that the battery can be removed and replaced with a new one.

  3. pL6vROgghEGJB2p2
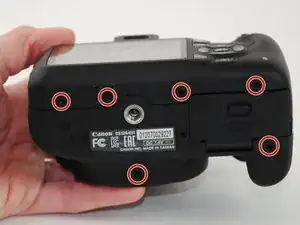
    • Turn the camera so that the back is facing to your right.

    • Remove the 5mm Phillips #000 screw above the rubber USB port cover.

    2 more screws behind rubber cover.

    Michael Gill -

  4. QCLgfQBmWFJQQwmh
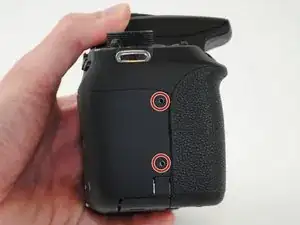
    • Remove the rubber piece.

    • Unscrew the two screws under the rubber cover to completely remove the rubber cover piece.

    • It is held in place by a notched tether, but can be easily manipulated to slide out.

  5. rInTocWZnrQMjULP
    • Turn your camera so that the bottom is facing you.

    • Remove the 5mm Phillips #000 screws.

    There is a 6th screw next to the battery door.

    Michael Gill -

  6. ISEoqXlHElNZTyxX
    • Now turn the camera so that the front is facing towards your right.

    • Remove the two remaining 5mm Phillips #000 screws.

    Instructions are forgetting the two screws on either side of the viewfinder…. Viewfinder slides up to reveal two screws.

    Hugh Morand -

  7. MsAeFqtNGjb34bSj
    MsAeFqtNGjb34bSj
    f64UqWVwpAtPgpEo
    A33ZdIWoKkStvY3V
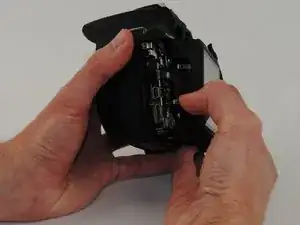
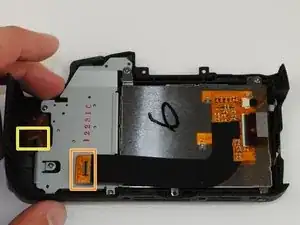
    • Now that all of the exterior screws have been removed, grip the camera firmly on both sides.

    • Gently pry the back panel from the main body of the camera.

    • There are two ribbon cables that need to be removed in order for the back panel to come free from the camera body, as indicated.

    • This back panel contains various control components of the camera as well as the LCD screen.

    Do NOT pry until you’ve removed the eye gasket, and the 2 screws behind this! You will break the camera.

    Michael Gill -

  8. A3slMXZGSjJNvfgS
    A3slMXZGSjJNvfgS
    PxEt3OLOxKq6Gupv
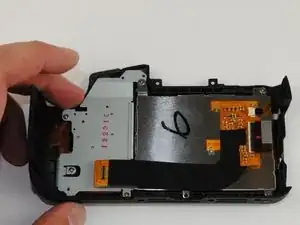
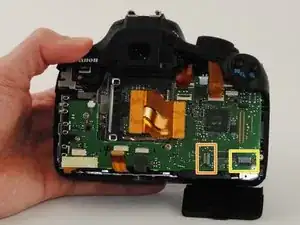
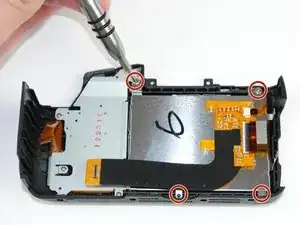
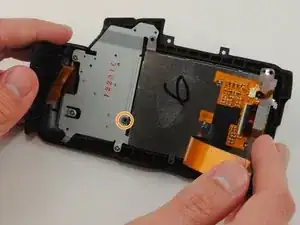
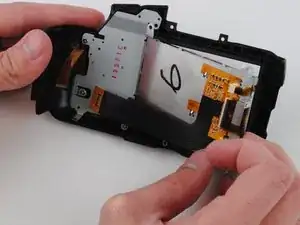
    • Remove the four silver 4mm Phillips #000 screws connecting the LCD screen to the back of the camera.

    • Be sure to lift the ribbon cable to remove the remaining hidden black 4mm Phillips #000 screw.

    The circled screw on the bottom in the middle isn’t a screw, it’s an alignment nub. The 4th screw is behind the black flex.

    Michael Gill -

  9. WLsco3XbxpRXRBMU
    • The LCD screen can now be lifted from the right side to be replaced.

    New LCD pressure fits into metal carrier tray. Assemble back together upside down, or LCD will fall out of tray.

    Michael Gill -

Conclusione

To reassemble your device, follow these instructions in reverse order.

Austin Tucker

Membro da: 28/08/15

1027 Reputazione

8 commenti

This guide is NOT COMPLETE. THere are several missing screws that need to be removed.

2 from the viewfinder,

and 2 from the IO ports....

Do not follow this and force the back open or you will need more repair!

11romej -

Hi, I followed every step and replaced the LCD screen but when turned on the camera, I only got a yellow horizontal line. Do you know what could have gone wrong? Thank you.

Griselda Garcia -

Hi, excellent guide but I’ve a problem.

I’m need to buy a lcd display. Do you know where can I buy ? Can you recommend me one store to buy it?

Nicolás Morales -

@nickmorales I found the lcd display as well as the connected controller card ar eBay.

Tom Kane

Tom Kane -

I had problems connected the actual LCD component to the controller card, as seen in step 9. We need more illustrations for actually connecting the ribbon cables (plural!) and for actually mounting the LCD and the controller card.

Tom Kane

Tom Kane -

11romej is correct. There are an additional 4 screws that must be removed not still not shown in the tutorial as of March 29, 2019. Much easier to accomplish this repair with a fine tipped pair of tweezers.

Benjamin Betteridge -

I can’t get the hinged piece to stay closed and keep computer ribbon on back of LCD screen in place. Any suggestions.

Tom Johnson -

Yes, this worked well. You did miss 2 screws under the viewfinder but the rest was spot on. Thank you...you saved me about $200 by repairing the camera myself

Cynthia Lamberty -