Introduzione

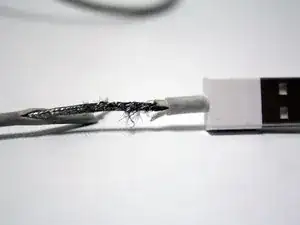
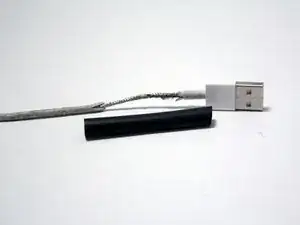
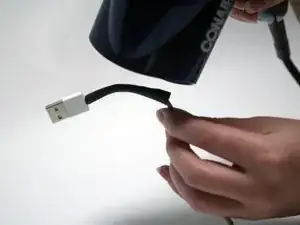
I cavi dei caricabatterie Apple, come il cavo da Lightning a USB, sono soggetti allo sfilacciamento più di altri. Questo avviene soprattutto perché si tende ad utilizzare i dispositivi mentre sono in carica. Per questo motivo, subiscono piegamenti che usurano la gomma e a lungo andare si scoprono i fili sottostanti. I fili così esposti sono pericolosi sia per l'utente che per il dispositivo, poiché possono causare scosse e cortocircuiti. La riparazione di un cavo sfilacciato con una guaina termorestringente è un'alternativa semplice ed economica che permette all'utente di caricare in sicurezza i propri dispositivi.
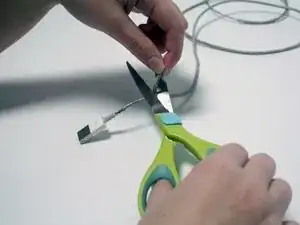
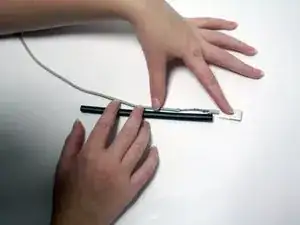
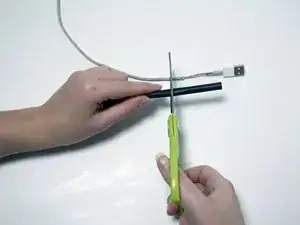
  1. nsqOc4YFYdMEHBSk
    nsqOc4YFYdMEHBSk
    3oaXuN6USmXHBUsD
    • Localizzate la zona sfilacciata o usurata del cavo Lightning.

    • Potrebbe essere necessario scoprire ancora più il cavo per effettuare la riparazione. Tirate delicatamente con le dita la guaina rotta fino a che non si stacca dal cavo.

  2. bLFRfDbkLuSpERSU
    bLFRfDbkLuSpERSU
    CuhYDkCWJ1IJ6LAO
    • Rimuovete la guaina in eccesso tagliandola con le forbici.

  3. wK2XIQZGfttDHH5T
    wK2XIQZGfttDHH5T
    BXMo3pLNuPiWTPmA
    Vvgs64TY4W23wX5K
    • Misurate la quantità di guaina termorestringente che vi serve per coprire l'area esposta.

    • Tagliate un pezzo di guaina termorestringente più lungo della zona danneggiata da coprire.

  4. M3qoSfsTiQxt4x3n
    M3qoSfsTiQxt4x3n
    QZSWKgUNagNM2CBK
    cMPQRevdTDOYxjrQ
    • Infilate la guaina termorestringente sul cavo fino a coprire tutta la zona danneggiata.

    • La guaina termorestringente da 1/4 di pollice è troppo stretta perché possiate far passare il connettore USB. Inseritela dall'altro lato del cavo e fatela scorrere sulla zona danneggiata.

  5. ZqbijnwENUn5UlF2
    ZqbijnwENUn5UlF2
    OdBQYQQBAcRFnSbD
    • Per riscaldare il phon accendetelo e portate il calore al massimo.

  6. ldNCCMZRObmkBPRe
    ldNCCMZRObmkBPRe
    NKYfJTG1yjs3LiTp
    • Scaldate la guaina termorestringente.

    • Mentre scaldate la guaina dovete tenere il phon in movimento. Se vi concentrate su una zona per troppo tempo potreste surriscaldarla e danneggiare ulteriormente il cavo sottostante oppure fondere la guaina nuova.

  7. tCfk26fVs6I6AnEO
    • Fate raffreddare la guaina termorestringente per un paio di minuti.

  8. GBajC2lMYtGyqk3K
    GBajC2lMYtGyqk3K
    dBTsFmCWeHud26pm
    • Per testare il lavoro svolto, flettete la guaina in varie direzioni.

    • Se la guaina è troppo larga, aggiungetene un ulteriore strato ripetendo i passaggi da 3 a 7.

    If the wire isn’t completely broken and if it is still working, you can also add some MSeal around it, this worked well for my adapters. Besides, I think it is a better idea to prevent cable breaks rather than fixing it afterwards. You can know more about here.

    Michael B -

    One problem is the heat shrink wraparound bandage used isn’t equivalent to the original.

    Original lightning cables are wrapped with an insulator, a metallic shield and finally the outer white plastic jacket. And possibly a drain wire for grounding of the insulator.

    So the simple heat shrink plastic jacket applied totally lacks the electromagnetic interference shielding capability.

    Wu Ming -

    This doesn’t address fraying of the wire itself. The title would be more accurate if it said “How To Repair Exposed Charger Wires”

    Silver Wolf -

Conclusione

Per rimontare il vostro dispositivo, seguite questa guida in ordine inverso.

Kalynn Copeharve

Membro da: 30/09/16

315 Reputazione

7 commenti

Thank you for taking the time to post your pictures and the steps to repair a lightening cord. I plan to do this repair, and also, apply heat shrink to the other end BEFORE that one frays. Thanks!!

craig.eden -

I have cables that do not work anymore due to the fraying at the lightning port end. Are there instructions on how to fix this?

Christine Lucas -

The wiring is too intricate, Christine. It’s not worth the time it would take, IMO.

Dave -

Kills me as I recently fixed 3 separate lighting cables at the power converter end, but took no pictures! You have to razor the seam around the outside of the case, split the case apart by pulling out with pliers in the cord-wrap flap area (careful don’t split it) and then attach a new cord to the solder spots on the circuit board, or just to the wire stubs. Best to just order a replacement cord as these include the little stopper that fits into the case between the halves. If you’re good at solder-joining cables you can just do this and shrink-wrap ‘em, but I prefer to use a little crimp joiner, and then fill the crimp with solder before sliding the shrink-wrap down over it. It’s tricky because the join has to fit a small space inside the case. You can get replacement cords at AliExpress. I use duct-tape to tightly close the case in case of more repairs.

https://nl.aliexpress.com/wholesale?catI...

Atticus Mullikin -

Does this work with plastic straws instead of heat shrink?

joris van de noort -

Plastic straws cause several issues: it will be difficult to push the Lightning connector through, they won’t shrink as easily or uniformly compared to shrink tubing, and they’re rigid so there will be a hard edge at the end, likely creating a strain point where the cable will fray. Heat shrink tubing is readily available at hardware stores and it’s not expensive.

Mark Cousins -

My iPad charging cable has three layers frayed: the plastic jacket, the metal shielding sleeve and the plastic insulator sleeve exposing the cables underneath. How to fix them?

Wu Ming -