Introduzione
Guida solo prerequisita! Questa guida è legata a un'altra procedura di cui fa parte e non è fatta per essere usata da sola.
Strumenti
-
-
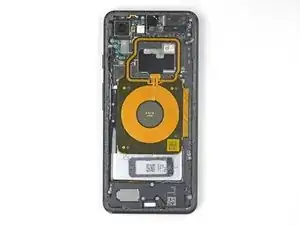
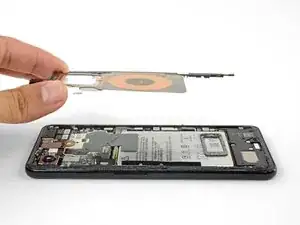
Rimuovi le cinque viti a croce Phillips che fissano la bobina di ricarica wireless:
-
Due viti da 1,9 mm
-
Due viti da 4,2 mm
-
Una vite da 4,3 mm
-
-
-
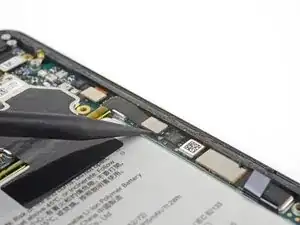
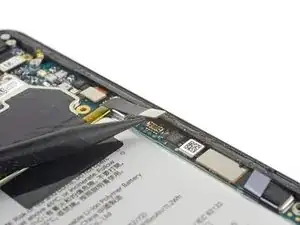
Usa la punta di uno spudger per staccare e scollegare il connettore a pressione della batteria dalla sua presa vicino al bordo destro del telefono.
-

Conclusione
Per rimontare il tuo dispositivo, segui queste istruzioni in ordine inverso.

The top 1.9 mm screw can’t be totally removed — it comes out with the coil once loosened
Dmitriy -
This was not true for me.
Will Herrick -
Can I leave the wireless charging coil out?
This may also allow a bigger battery!
Jex Webster -
You may be able to! Note that this is not only the wireless charging coil, but also the NFC antenna (the upper loop).
Arthur Shi -
The 1.9 mm screws are actually screwed into the head of another screw beneath them. Sometimes the lower screw unscrews instead of the upper. That leaves both screws attached to the coil. If possible you should separate the two screws and screw the lower one back in first using a small flat blade screwdriver.
Richard Elder -
If you decide to clean the wireless coil assembly, be aware that IPA will completely remove the printed 2-D barcode on the lower right. (Hopefully that's not important.)
Bitt Faulk -
There were 7 screws!!! The last two were both near the power button.
Emily Viehland -
Yes, I have that to, and a little black plastic part covering I port.
ekan97Kingen (ekan) -
l won’t mother board google pixel3 contact on WhatsApp +250783996430
Nhimimana Glibert -