Introduzione

Questa è soltanto una guida prerequisita per disconnettere in sicurezza la batteria prima di intraprendere una riparazione.

  1. HaV1NGBYhCNRNIAS
    • Prima di smontare il tuo MacBook Pro, scarica la batteria sotto il 25%. Una batteria al litio-ioni carica può prendere fuoco e/o esplodere se viene forata accidentalmente.

    • Spegni e scollega dall'alimentazione il tuo MacBook Pro prima di iniziare.

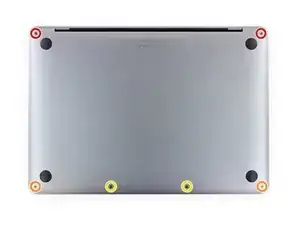
    • Usa un cacciavite Pentalobe P5 per rimuovere le sei viti che fissano il coperchio inferiore:

    • Due viti da 6,2 mm

    • Due viti da 5,3 mm

    • Due viti da 3,4 mm

    • Nel corso di tutta la procedura, tieni traccia di ogni vite e accertati che ognuna di esse torni esattamente al suo posto pe rnon danneggiare il tuo dispositivo.

    Before any repair is carried out that involves removing the bottom case, the machines auto-boot function has be disabled. This can be disabled via the terminal command “sudo nvram AutoBoot=%00” once the repair has been completed the auto-boot function can be re-enabled via the vermin command “sudo nvram AutoBoot=%03”.

    Aaron Dalziel -

    I recommend that you have an organizer tray for all the small parts, and label it in advance with the numbered “step” associated with each removal of screws and other parts. It really helped me when I needed to put everything back in reverse order, after the new battery is glued in place.

    tommy404 -

    Finished the repair last week. Some key comments that helped me:

    - Step 12, Robert

    - Step 13, MikeG1

    - Step 13, Rick Jaffe (take a photo when disassembling)

    Also added some own comments on Steps 15, 18, 22

    Per Haglund -

  2. 2D2F4g6jfVQN5UFM
    2D2F4g6jfVQN5UFM
    4ubxAbemmWdpRQvQ
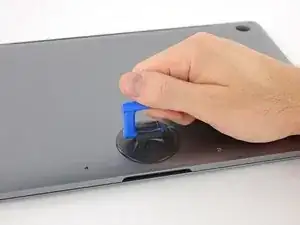
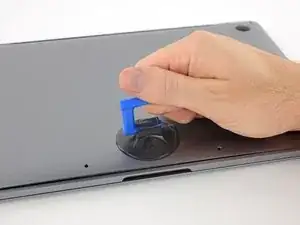
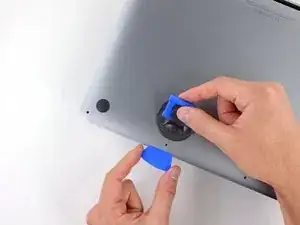
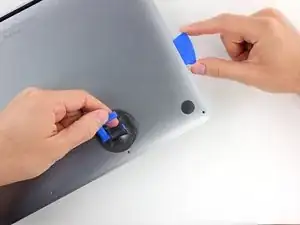
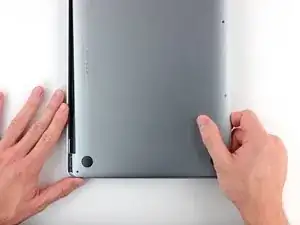
    • Applica una ventosa al coperchio inferiore vicino alla parte anteriore-centrale della MacBook Pro.

    • Solleva la ventosa per creare una piccola fessura tra il coperchio inferiore e lo chassis.

    To replace the bottom just line it up just like it came from the factory. Make sure it clears the display connectors. And press firmly down until the clips connect to the bottom again.

    olivia drinkwine -

  3. ELdcSRREMfOxcv6U
    ELdcSRREMfOxcv6U
    VWG35wvVRoTWChfK
    ZmSNPLfF5MpqYlOA
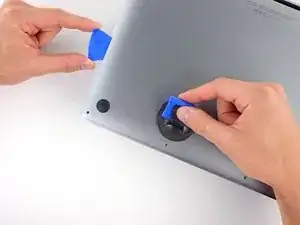
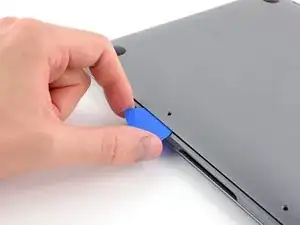
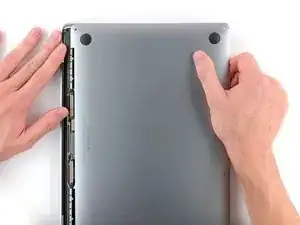
    • Inserisci l'angolo di uno strumento di apertura nello spazio tra il coperchio inferiore lo chassis.

    • Fai scorrere lo strumento di apertura lungo l'angolo più vicino e quindi fino alla metà della parte laterale del coperchio.

    • In questo modo si apre la prima delle clip nascoste che fissano il coperchio inferiore allo chassis. Dovresti percepire al tatto e udire lo scatto della clip che si apre.

  4. VZfGyDwUMCU2qBk5
    VZfGyDwUMCU2qBk5
    UeFvuggRrq4YQTxX
    mHPRNGBDdQmmDtDP
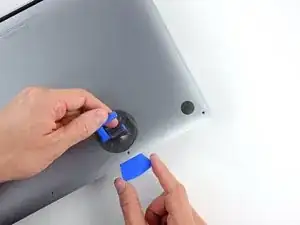
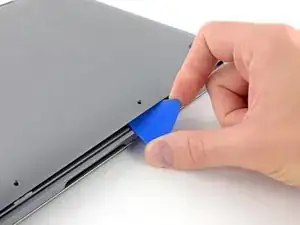
    • Ripeti il passo precedente dal lato opposto, facendo scorrere il tuo strumento di apertura sotto il coperchio inferiore e fino a metà del lato per sbloccare la seconda clip.

  5. 1CTISLsLTrsJcIYL
    1CTISLsLTrsJcIYL
    OSARj41dkAMpUPrX
    rbs6NtxnCWNWbnSK
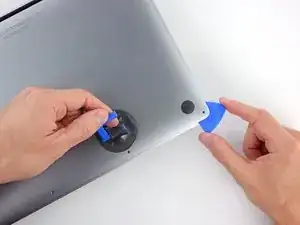
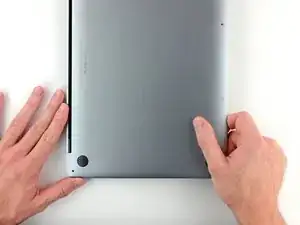
    • Inserisci di nuovo il tuo strumento di apertura sotto il bordo anteriore del coperchio inferiore, vicino alla sede di una delle viti di fissaggio in posizione più centrale.

    • Imprimi allo strumento una torsione decisa per sbloccare la terza clip che fissa il coperchio inferiore allo chassis.

    • Ripeti questa procedura vicino all'altra vite in posizione centrale per far scattare anche la quarta clip.

    My 3rd and 4th clips released simultaneously with clip 1 and 2.

    Therefore I was looking to do something which had already been accomplished.

    David Hutzler -

    yeah be sure not to bend those clips by the display bottom. You pull towards yourself to get it off

    Grant Tyler -

  6. FKBXVGyU3kTdvPhQ
    FKBXVGyU3kTdvPhQ
    bKfmGyDq2iE4uOUe
    12IjuyZ1DGyUymk2
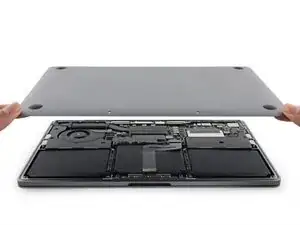
    • Tira con una certa decisione il coperchio inferiore verso la parte frontale del MacBook (allontanandolo dall'area delle cerniere) per separare l'ultima delle clip che tengono in posizione il coperchio stesso.

    • Può essere utile spingere prima da un lato e poi dall'altro.

    • Può essere necessaria molta forza.

    Difficult to explain clearly, but worked easily for me by gripping the adjacent bottom and top corners then pulling in opposite directions, rather than trying to grip the hinge corner which is too narrow to afford a strong grip.

    Andrew Gordon -

    This helped me. It needed more force than what I expected. Basically grab the corner with 6.2mm screw with one hand and the cover of that same corner with the other. Then pull the cover and push the laptop. Careful, it pops off with force!

    Javier De la Garza -

    I initially tried shifting the whole panel off the front after using the separating tool to make some space at the back where the hinges are. I only had luck when I pushed the panel back to it’s normal state and using the separating tool again to open the front, then getting my fingers underneath the slide it off the front was easy. I guess the lesson is to not use the separating tool to “push from the back“.

    Josh Brown -

    This step really through me through a loop. My last two MBP were a 2011 and 2013 and on those the bottom just lifted off when you removed the screws. The clips and this sliding lock design added in the 2017 model was frustrating the first time. I was following a youtube video first and he did not explain the sliding part at all. I should have come here first, this guide explains it pretty well. The second time I opened my 2017, I kept an “opening pick” between the bottom panel and the body on each side, and used my two smallest screwdrivers as levers in both “front” corner screw holes. Used the same method without the picks to put it back together at the end. Wayyy easier that trying to grip the panel or laptop body. Just make sure the screwdrivers/pins that you’re using as levers are small enough to be loose in the screw holes and have room to move

    Jambu Atchison -

    I used a pick underneath one of the back corners and nudge it (push down and towards the front - to get it off the hinge). This will make it easier to do the same for the other corner. The lower case will move off the middle plastic L-clips (which you will see after you inspect it.) Cheers! =)

    LSD -

    I have found that your iFixit blue pry tool is excellent at giving me leverage to slide the bottom case forward to release it from the internal clips.

    themacdoctor -

    the panel is sharp on the edges, sharp enough for you to cut yourself when pulling on it. i learned the hard way, just make sure your fingers are in a good spot before pulling

    Micah P -

  7. tFYjRm6fPkjordk2
    • Rimuovi il coperchio inferiore.

    I used the green prying tool in the air gap at the rear to nudge the bottom forward.

    That is far easier and more reliable.

    David Hutzler -

    David. I agree. I've found the blue iFixit prying tool most helpful. I place it with the curve of the tool around the hinge and move the bottom case towards the front to release it from the slide-in clips. I consider myself to have pretty good grip strength but I have had some bottom cases that just wouldn't budge until I used this method. Scott The Mac Doctor 

    themacdoctor -

    Like Dave and "themacdoctor" said, this job is MUCH easier if you use a spudger or similar tool to gently push the cover away from the air gap, at the rear of the laptop. Once you do this, you've loosened clips that are on the inside of the bottom case. This is much easier than tugging on the case itself.

    ECJohansen -

  8. tQ1ZOGsjZM1kmWJ6
    tQ1ZOGsjZM1kmWJ6
    D4xZmUdhNXRfuBGK
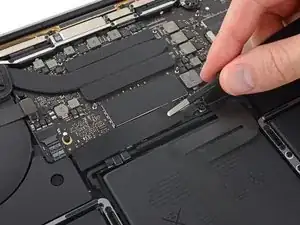
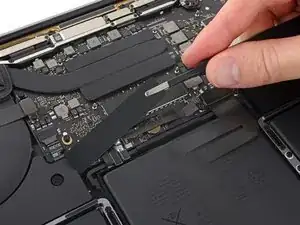
    • Stacca con cura il grande pezzo di nastro adesivo che copre il connettore della batteria, sul lato della scheda logica più vicino alla batteria.

    • Rimuovi il nastro adesivo.

    once the tape's back in place, it doesn't look tightly attached. not sure, did I do something wrong here or it should be so.

    Anton Monakhov -

    The tape will likely not adhere as well as when it came out of the factory. This isnt an issue! As long as the tape is in place when the lower cover is put back on the device you should be good to go.

    Tarun Thiruma -

    The underside of the tape is not uniform. Therefore, pay attention to which direction it is placed by looking at the underside when you remove it. Possibly mark one edge so that you can replace in the same direction during reassembly.

    Rick Jaffe -

    Be very careful to ensure you're pulling the large rectangular patch of tape and NOT the little black tab on the data cable that is below. At first glance they look like they're all one piece. I made this mistake and think that I ruined that cable.

    Brendan C -

    Mark one of the tape’s edges and, upon removal, stick it down with the same orientation. The first time I was inside the MacBook Pro (to upgrade the SSD) I failed to do this, and spent almost 30 minutes trying to get it back like it had been. Making a photo also helps.

    anasazi4st -

  9. LXXyyoAGWUOdnJNi
    LXXyyoAGWUOdnJNi
    R4tq4QFSXNugFvep
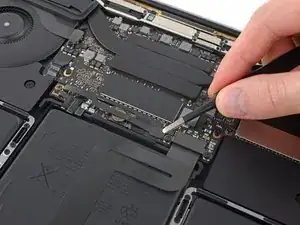
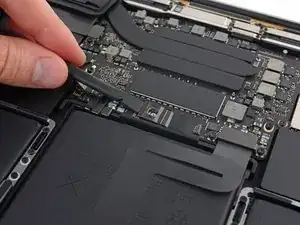
    • Stacca con delicatezza il piccolo pezzo di nastro adesivo che copre il connettore dati della scheda batteria.

    • Il nastro adesivo è integrato nel cavo piatto e non si può staccare del tutto. Devi staccarlo solo quel tanto che basta per accedere al connettore.

    There is no replacement for this cable in the new battery, is this normal?

    Marin dcv -

    the replacement battery doesn't supply the small cable. It needs only be disconnected fro one end as in the pictures.

    robert -

    Well the tape may not supposed to be able to separate but with gentle force, my tape just pulled right off leaving the connector still attached.

    John M -

  10. 3APZ5ZVRaFXGNCLW
    3APZ5ZVRaFXGNCLW
    4jnIaCiZBFvDHRxG
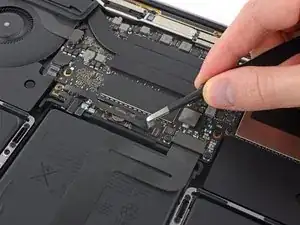
    • Usa l'estremità di uno spudger per sollevare la piccola linguetta di fissaggio nera che fissa il cavo al suo connettore.

    If this ribbon comes off on both ends, how do you re-attach

    Gord Alder -

  11. YXYvfsuBlOPnF1XR
    YXYvfsuBlOPnF1XR
    WsqZSnxKwXehS6f5
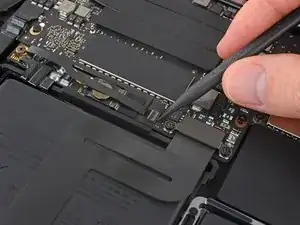
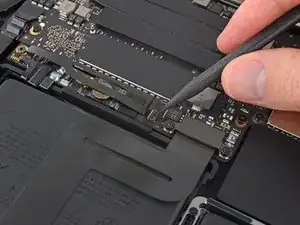
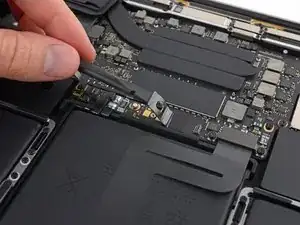
    • Stacca il cavo dati della scheda batteria facendolo scorrere fuori dalla sua sede.

    • Fallo scorrere parallelamente alla scheda logica, in direzione del cavo.

    the cable connector (where the twizzer tip is) should be cleaned with alcohol or acetone before insertion because the cover (where the tip is holding it back) will have glue deposit smeared on top of the connector circuit traces. Glue will prevent a good connection with the BMS.

    tarex7 -

    The little tab that you pull back on, at least in my cable, was simple glued onto the rest of the cable. I tried to carefully remove the cable, and the tab came off. I did not have flat tweezers in the ifixit replacement kit and did not want to pinch the cable with sharp instruments. Therefore, be extremely careful when removing the tab as it is difficult to reattach the cable without it.

    Rick Jaffe -

    Same problem with the tape coming loose and the cable not coming out. Go further back along the cable and pull gently on the cable with your fingers and the connector will come out easily.

    Robert -

  12. 4st3fOg3YsUWn3Wf
    • Piega indietro il cavo dati della scheda batteria in modo che non dia fastidio.

    • Se stai sostituendo la batteria, può essere necessario rimuovere completamente questo cavo e trasferirlo sulla nuova cella. Disconnetti entrambi i capi e rimuovi con attenzione il cavo. Nel corso dell'installazione, stai attento a non installarlo capovolto o con le estremità invertite: fai riferimento all'orientamento nelle foto.

    The new battery I received did not come with the battery board data cable, so I had to remove the existing one and transfer it. The lock at the smaller end is the same mechanism as the one at the end shown in steps 11 and 12, but smaller (and harder to see. It helps to gently straighten the left end of the cable before trying to insert it in the end of the replacement circuit board.

    MikeG1 -

    I can corroborate MikeG1’s comment. My battery came without the long data cable as well. I had to remove it from the fried battery. Plastic lock tab mechanism on the ZIF connector is smaller. My inspection microscope helped to transfer the cable to the new battery board. Thanks Mike!

    Macrepair SF -

    Likewise - the new battery came without a data cable. The cable was successfully removed from the old battery assembly and installed on the new battery, but it was tricky and nerve-racking (the cable is delicate and the connectors are very small) without instruction provided! The instructions should be updated to highlight the missing cable possibility, and provide information/illustration on transferring the cable.

    Marc -

    In step 13, notice the amount of the data cable that sticks out of the connector. When moving this cable to the new battery, it is difficult to tell how far to push the cable into the connector or when it is fully inserted because the cable is so bendable.

    Rick Jaffe -

    AMEN!! This was the hardest part of the ENTIRE process! Hard to know when the small end of the cable was “fully” inserted. Cable is SOOOOO delicate!

    Kevin McAda -

    If your laptop is showing the x where the battery icon is, this cable is at fault. This cable is referred to as the BMU (Battery Management Unit) flex cable. If it’s damaged, replacing it should solve your issue.

    Josh M -

    my old battery was working but could not hold a charge very long so I replaced the battery and now my mac does not recognize the new battery. Thought it was a bad battery at first but I purchased a new batter and still the same problem, My mac will work off power outlet but does not register it has a battery at all now. I tried putting my old battery back on but i damaged the very small clip when i slid out the flex cable so its gone now. Could this cable be at fault? I don/t know what else it could be, i only messed with the battery.

    Leo Ruiz -

    I have this same problem! Did you figure out what the issue was? Do I need a new flex cable?

    Jessica Mouland -

    I am having the same issue as Leo. After install. Is there a way to identify the fault?

    Nathan Jelinek -

    Although the rest of fixit manual on this is excellent, this step is woefully lacking and the fact that the replace “kit” doesn’t have the Battery Board Data cable included makes the replacement kit significantly lacking (especially compared to other kits and instructions I’ve used before from them)

    zandar10 -

  13. ZhM4nEISbNQ1tQLj
    ZhM4nEISbNQ1tQLj
    EFUTGD2SbokoP1dc
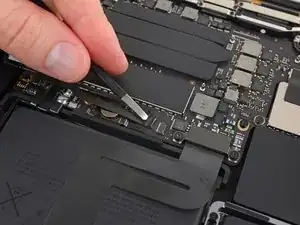
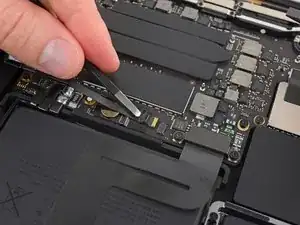
    • Usa un cacciavite Torx T5 per rimuovere la vite a ciambella da 3,7 mm che blocca il connettore di alimentazione della batteria.

    When the battery management “BMS” circuit board is re-installed, loosely install the two 3.7 mm screws, put a spudger on the left side of the BMS board to wedge theBMS board to the right then tighten the two 3.7 mm screws. The reason for doing this is that the two power traces on the board may not make physical contact with the battery connector (connector at where the spudger is on step 15). One clue that you didn’t have physical contact is if you reinstalled everything but there is no power unless the AC supply is plugged in (with battery meter on the top at 0%). This was what happened to me. The reason is that when you bend the battery connector in step 15, it’s no longer in alignment with the traces on the BMS board and hence, you have to shift the BMS board to the right to compensate. Once I did this, voila 64% power.

    tarex7 -

  14. FvGUpQZrXfcMaUeV
    FvGUpQZrXfcMaUeV
    BhM2nAuumNowEOiJ
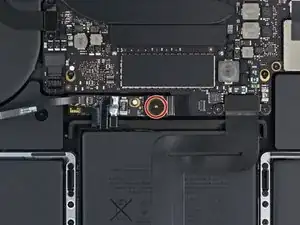
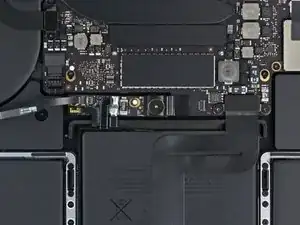
    • Usa uno spudger per sollevare con delicatezza il connettore di alimentazione della batteria e disconnettere così la batteria stessa.

    • Solleva il connettore a un'altezza sufficiente perché resti separato dalla sua sede. Se dovesse fare contatto accidentalmente nel corso della riparazione, il tuo MacBook Pro potrebbe danneggiarsi.

    On disassembly note the position of the connector before you lift. It has two gold-plated connections on the underside. On reassembly these need to make contact with the matching battery board connectors. Bending the connector out of the way deformed it a bit, and on reassembly I could see that the connectors didn't align well with the board's connectors. I needed to adjust the battery board position to the left a bit by loosening the 3.1 mm screws in step 23. Possibly this could be the reason why some people report that new battery is not detected.

    Per Haglund -

Conclusione

Per rimontare il tuo dispositivo, segui queste istruzioni in ordine inverso.

Jeff Suovanen

Membro da: 06/08/13

426759 Reputazione

0 commenti