Introduzione

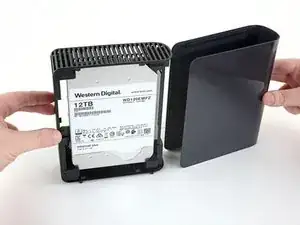
L'estrazione di un hard disk esterno dal suo guscio prevede lo smontaggio dell'involucro per tirarne fuori la nuda unità disco contenuta al suo interno. In questo modo il drive può essere utilizzato nel tuo home server, in un server di rete o in un PC. Questa procedura mostra come rimuovere l'unità lasciando intatto il suo involucro.

"Sgusciare" degli hard drive esterni è un ottimo modo per disporre di tanto spazio di archiviazione a prezzo. Molti dischi esterni utilizzano HD con qualità da server che, se acquistati da soli, senza l'involucro, costerebbero quasi il doppio.

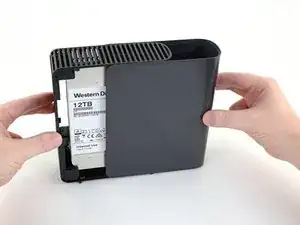
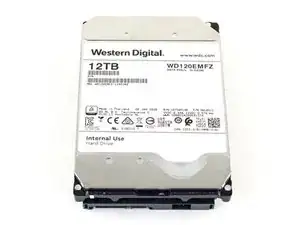
Questa guida mostra come aprire l'involucro di un hard drive esterno WD Elements da 12 TB, prodotto da Western Digital come modello WDBWLG0120HBK-NESN, ma la procedura si applica a qualsiasi disco esterno da 3,5" WD Elements.

Nota: prima di avviare l'estrazione, ricordati di effettuare il boot del disco esterno e di eseguire un deepscan per evidenziare eventuali settori danneggiati usando un programma come HD Tune Pro o Stablebit Scanner. Se vengono rilevati degli errori, restituite il drive al negoziante o al produttore.

  1. YrxXV6hrVY3NbfNY
    YrxXV6hrVY3NbfNY
    2Zk1HKj1PJ3LhvQn
    • Ricordati di spegnere e staccare l'unità dall'alimentazione prima di iniziare lo smontaggio.

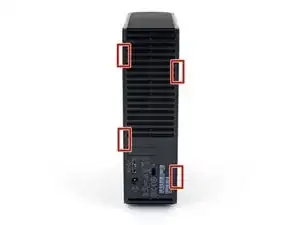
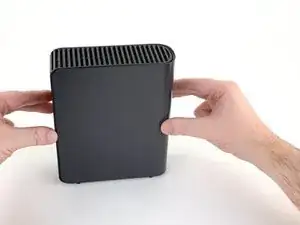
    • La cover dell'involucro esterno è collegata alla scocca con la griglia di ventilazione da quattro clip interne in plastica. Prendi nota della loro posizione prima di continuare con il passo successivo.

  2. XNKSEYTExp5XnfI4
    XNKSEYTExp5XnfI4
    5Irfmtguvipr2cbl
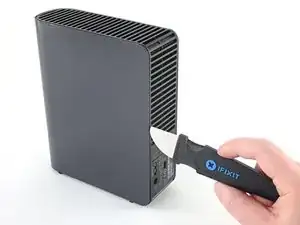
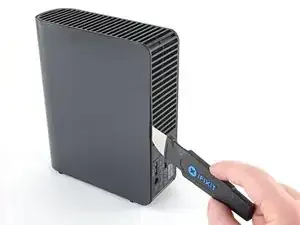
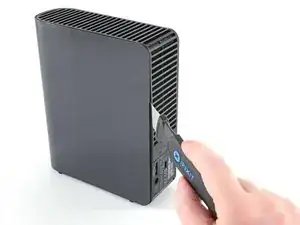
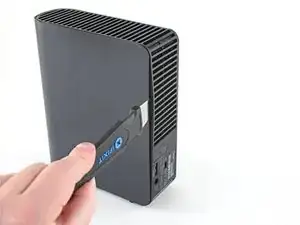
    • Inserisci un "Jimmy" o spatola metallica nella fessura tra la scocca e la cover su uno dei lati del drive, all'incirca a metà strada tra la base e la cima dell'unità.

    • Può essere necessario muovere la spatola variandone l'inclinazione per riuscire a infilarla nella giunzione.

  3. QAUcT6YUWybpSxAS
    QAUcT6YUWybpSxAS
    BG2HdhGENnsUuFPY
    BwydJS56cD3NvEkY
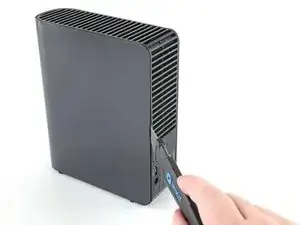
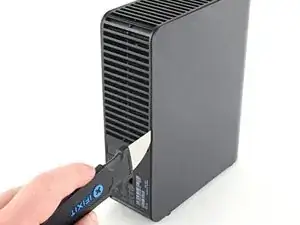
    • Con il Jimmy inserito tra la scocca e la cover, fai leva verso l'esterno per sganciare la clip inferiore.

    • Fai attenzione a non usare troppa forza nell'azione di leva, perché potresti rompere l'involucro.

    • Se hai delle difficoltà a sganciare la clip, fai scorrere la spatola più vicino alla clip stessa e prova di nuovo.

  4. PJwhe5weXBrDcETd
    PJwhe5weXBrDcETd
    v3FFK2UyKmrSSZCv
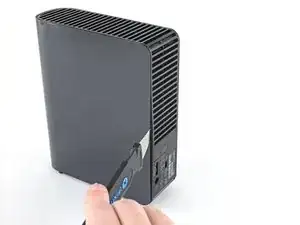
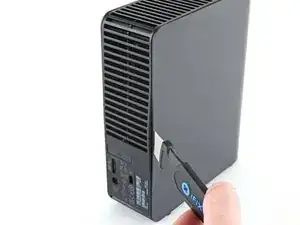
    • Fai scorrere il Jimmy lungo la fessura e fai leva verso l'esterno per sganciare la clip in plastica superiore.

  5. 2TZAYMAoU4QDwbOp
    2TZAYMAoU4QDwbOp
    4ePUfxtTZ4ETkw3f
    • Ripeti i passi da 2 a 4 sull'altro lato del case esterno.

    • Non usare troppa forza, perché potresti rompere involucro.

    • Se incontri dei problemi a sganciare le clip, fai scorrere il Jimmy più vicino alle clip stesse e prova di nuovo.

  6. fEw4BujQrPI6oKyN
    fEw4BujQrPI6oKyN
    GC46HPATxHFcI3jU
    pEnxLDsJQWs5jNbg
    • Fai scorrere la cover allontanandola dalla griglia verticale della scocca per rimuoverla.

  7. 4XpDcqUbSuP1CYk5
    4XpDcqUbSuP1CYk5
    pgplwFMPjGqWvtwY
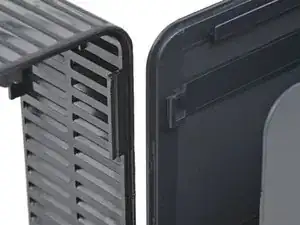
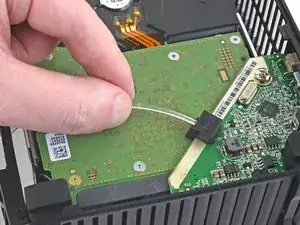
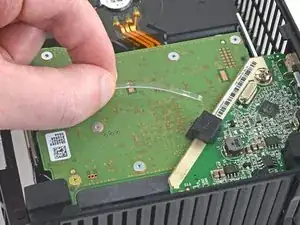
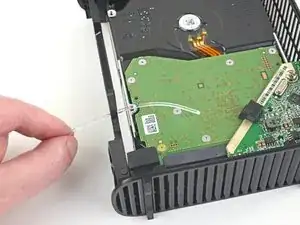
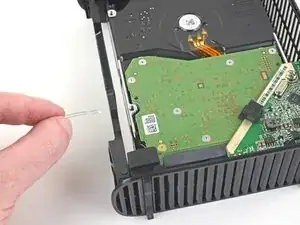
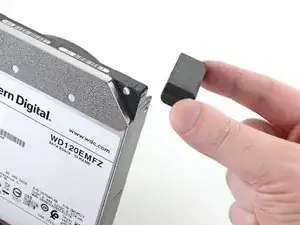
    • Sfila il canalizzatore della luce dall'alloggiamento del LED sulla scheda del controller del drive.

  8. xQGjBPWmjLC1iWZH
    xQGjBPWmjLC1iWZH
    lSYuotIADANJx3qa
    jGW5WyP4x4FqNxkF
    • Afferra l'estremità del canalizzatore della luce LED e rimuovilo facendolo scorrere completamente fuori dalla scocca.

  9. sVTZcBPHK2UAkbEf
    sVTZcBPHK2UAkbEf
    W2wpLR1gfhgiZsWa
    TQjxEu3ZL6Q3uDpO
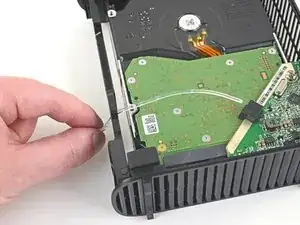
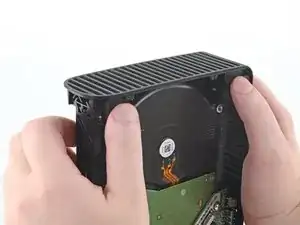
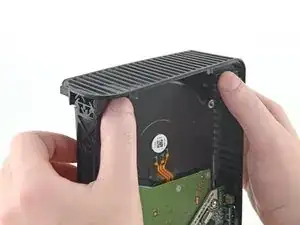
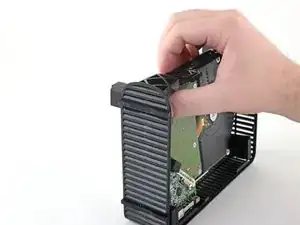
    • Usando le mani, spingi i quattro blocchetti di gomma negli angoli per sbloccare il disco dalla sua posizione nella scocca.

    • Spingi lentamente uno o due blocchetti alla volta finché l'hard drive non è completamente libero dalla scocca.

    Wtf. How? This doesn’t work.

    Feddy Friender -

    Ok, got it, but these directions are terrible. You don’t want to push the blocks out, like the illustration and directions say, because they literally can’t be pushed out. They need to be lifted up while the plastic shell is manipulated until the drive is loosened.

    Feddy Friender -

    Thanks, Feddy!

    Mike Rosenberg -

  10. pxfYbJi6UUSSnuHr
    pxfYbJi6UUSSnuHr
    4kZ6AL4J2MfPcgCa
    • Rimuovi il disco rigido dalla scocca.

  11. brKaRAnfhVHMsQWP
    brKaRAnfhVHMsQWP
    SXYPYFK5xZavWfNd
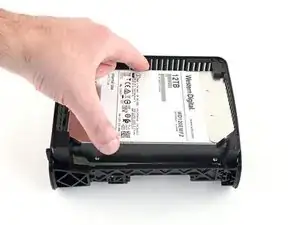
    • Se sono rimasti ancora attaccati, rimuovi blocchetti di gomma dall'hard drive; alcuni potrebbero essersi già staccati nella fase di rimozione del disco.

  12. dckiCGADPZ46o3Wm
    dckiCGADPZ46o3Wm
    iDQ2bprwuu3KyCDV
    keP21ltrHWHqJSSX
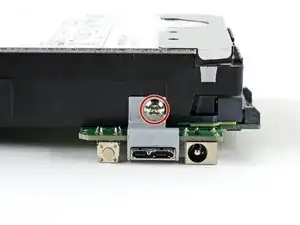
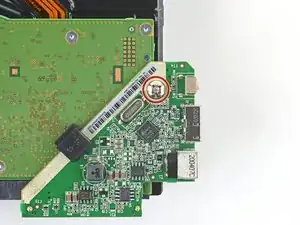
    • Con un cacciavite a croce Phillips, togli la vite da 8,5 millimetri che fissa la piccola staffa metallica che blocca la scheda di controllo sull'hard drive.

    • Rimuovi la staffa di metallo.

  13. C3dmb2DlDF5KYaKK
    C3dmb2DlDF5KYaKK
    YSjxJDvScqYV4ipD
    Dx5jIFpWWHBnSxAX
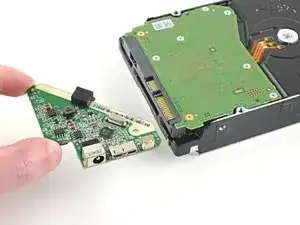
    • Usa un cacciavite a croce Phillips per rimuovere la vite lunga 8,5 millimetri che fissa la scheda di controllo all'hard drive.

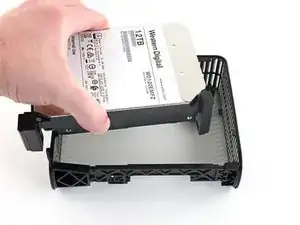
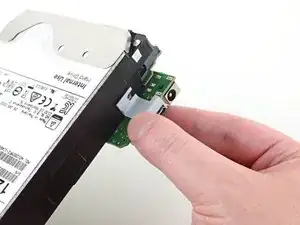
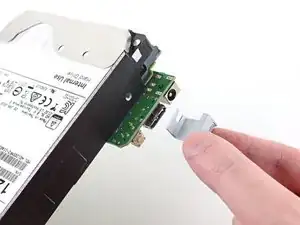
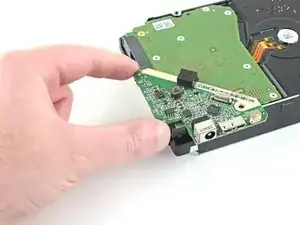
    • Allontana da bordo esterno del disco la scheda di controllo per rimuoverla.

    • Ci sarà una certa resistenza nel rimuovere la scheda, perché è connessa ai connettori SATA e di alimentazione del disco.

  14. kGf6bjfZQhHAKvdf
    kGf6bjfZQhHAKvdf
    JjLLn5aZXVxaSTHU
Conclusione

Ricordati di tenere da parte l'involucro, così come tutte le parti e le viti che lo compongono, fino alla scadenza della garanzia. Dopo questo termine, consegna il tutto a un riciclatore certificato R2 o e-Stewards. Puoi anche offrirlo a r/DataHoarder perché possa essere utilizzato.

Per rimontare il driver e l'involucro, segui queste istruzioni in ordine inverso.

Craig Lloyd

Membro da: 10/02/16

35207 Reputazione

15 commenti

Can you recommend a Mac program for running a deep scan to check for bad sectors?

This article only gives two recommendations and they’re both for Windows :(

Martin -

Disk drill (not free but hey... works well)

JeanJean -

I have a question. Is it possible to take a similar drive but smaller capacity like this about and turn it into a portable drive from it having to have a power supply?

Louis Wilson -

It is not possible. The problem is that a 3.5” disk drive (as used in the Elements drive) needs 12 V as well as 5 V, and they need more power than a USB socket can typically deliver. 2.5” disk drives operate from just a 5 V supply, and, having smaller disks inside, they use less power to start up, so they can be run completely through USB.

Andrew Morton -

Hi Craig! My PC sees it as Local Disc (E:) and wants to format it. Can’t do that! Is there a workaround? This was due to a power surge and I think it was just the adaptor power supply that got damaged. Running W10Home21H1 on Lenovo DESKTOP-699CIMO. Intel(R) Core(TM) i7-4790 CPU @ 3.60GHz 3.60 GHz 16,0GB 64bits Any ideas would be greatly appreciated! Cheers, Marco

Marco66 -

On Step 14, you see there are no screws to take the HDD cover off. How do you take the cover off the HDD to get inside?

Nathan -

lol + other characters to allow comment

Jerry Attric -

I have a WD element 4T and it will not power up. New cable and power adapter. It was stabilized in one spot for over a year, powered up just to store my movies. Plug it up after two weeks of none use and would not power up, no light inside. What can be done? My other storage drives work fine. By the way, you have the best directions on the web.

Tim Newton -

I just wrote you about WD Element, it is a 5.0TB Sata/64MB Cache, WD50EZRZ

WDBlue PC Hard Drive. It will not power up. I wonder if I can get a new USB controller board for it? I am only interested in getting information off of the hard drive. Can an "WEme USB 3.0 to SATA Converter Adapter for 2.5 3.5 Inch Hard Drive Disk SSD HDD" work to power it up to retrieve the Data?

Tim Newton -

Hey Tim, yeah so if you already tried a new power adapter, then it could be a bad controller board. If the drive is already shucked (or you don't mind shucking it), then you can get a SATA to USB adapter to see if the drive will boot up. That will at least rule out the USB controller board.

Craig Lloyd -

Very informative explenation wih clear pictures that show EXACLY in which direction to move the tool to safely detach the casing from the clips without breaking them, much better than most YouTube video's.

Only, I've used two old bank cards. That is i.m.o. much safer than using a metal knife or "Jimmy". With two plastic credit- or bank cards or two guitar picks it's almost impossible to damage the case.

Ruud Wilschut -

Thank you for the guide!

I found that I had a 3 TB Toshiba hdd lying around which I put in one of WD Elements enclosures I was about to recycle. Now I have a fully stacked NAS as well as an external hdd :)

And I'm keeping a controller board + wall wart to be used as simple usb-to-sata device.

Frida Mattias -

Hi.

Is possible on this box, change the HDD. For example. I have WD Elements to 4Tb and have another ( Seagate ) 12Tb and I thinking to change the HDD 4Tb for 12Tb using the same case.

Is possible?

Thanks a lot

Victor Santos -

Did it successfully with fairly limited experience of taking electronics apart (other than joycons a few times), didn't even break any clips. Worked fine for me installing it in a PC without taping over anything.

Jack Bailey -

Can I remove the drive and install in a new enclosure? My WD 8tb no longer mounts on my mac. I think it's probably the usb port or whatever communicates with the port.

Jim Fields -