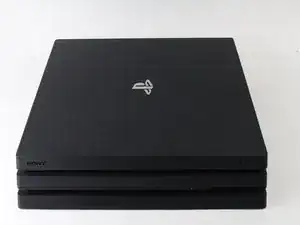
Introduzione

SOLO PREREQUISITO (per tenere un buono scorrimento della guida)

  1. 54rT6gxKYMdDALg2
    54rT6gxKYMdDALg2
    NMFNlBRXta42yJSx
    AJvelILqtOoEZyPh
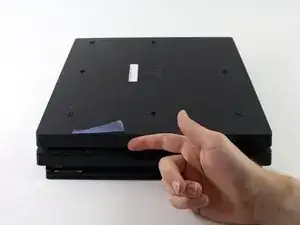
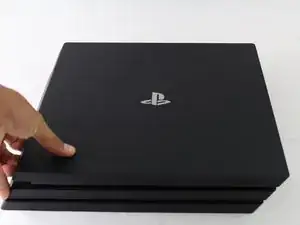
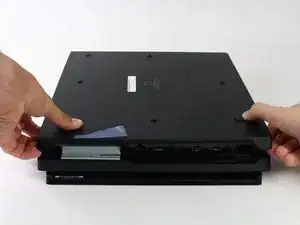
    • Gira la console a faccia in giù.

    • Usa le unghie per tirare e sganciare la copertura in plastica sopra il disco rigido.

    DON’T FORGET TO HAVE THERMAL PASTE HANDY! It should be added to the “Tools Required” Section. You will NEED it!

    Jaquell Chandler -

    What if thermal paste is not applied again when remounting ? Will the playstation start and work anyway or not ?

    Vincent Bee -

    It will start and run normally until you put it under load. Then it will heat up and thermal throttle or it can overheat and destroy itself.

    Jeremy Ivey -

    I posted this down in another step too, but: if you have a very early North American PS4 Pro, with the exact optical drive shown here - the key way to tell is the very long data cable that’s folded a couple of times, see pictures in later steps - then the replacement drive iFixit offers WILL NOT WORK IN YOUR MACHINE. It has to be a very early model, apparently, but the model number isn’t enough to tell you.

    Even if you swap the too-short cables in their replacement with the longer cables on your drive, it still will not work. At all. It’ll just sit there like the drive isn’t even getting power.

    So if you do have this drive, what you probably need to do is get a replacement KES-496A Optical Pickup Assembly and replace that within your existing drive. That’s what I had to do after two different replacement drives sent by iFixit failed to work in my system. It worked immediately and I’m back online.

    The optical pickup replacement is awfully fiddly, and adds a solid 20 minutes to the repair easily. But it does work.

    Dara Korra'ti -

    I had originally been told by several people that to properly repair the optical drive within the PS4 Pro (so that the PS4 actually works), you have to replace the Optical Pickup Assembly like you mentioned because the drive is paired with the motherboard. I was surprised to find that iFixit is pushing this repair tutorial when it has a low probability of success for many PS4 Pro models.

    Instead, iFixit should be documenting replacement of the KES-496A Optical Pickup Assembly... when that repair has a near 100% chance of success, even though it's a fair bit more fiddly to complete and requires two different teardowns (one for the PS4 Pro and one for the optical drive... needed to install the replacement optical pickup assembly).

    commorancy -

    Follow-on note. I could be mixing up the original PS4's pairing with the PS4 Pro (which might or might not have device + motherboard pairing). Because I can't find a definitive source confirming if the drive is paired on the PS4 Pro, using a drive replacement might or might not work.

    There are a number of commenters below who followed these instructions and found that the replacement drive didn't work after completing the repair. I think I'd still go with replacing the KES-496A Optical Pickup Assembly. That repair is more fiddly, but the optical assembly replacement part is a whole lot cheaper, costing less than $10 in some stores, than buying a full replacement drive at $70.

    commorancy -

  2. RR6LZcIKB6LHbgHD
    RR6LZcIKB6LHbgHD
    SDci2Vv2GAmVwWXk
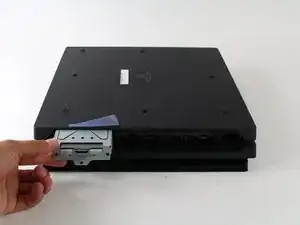
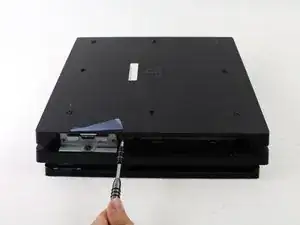
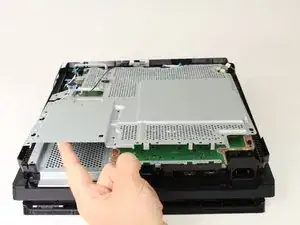
    • Usa un cacciavite a croce Phillips #1 per rimuovere l'unica vite che tiene fermo il carrello del disco rigido.

    • Sfila il carrello del disco rigido tirandolo.

    This is a Phillips #1 bit.

    Trevor Frey -

  3. TEfsVkAhghmOwoLV
    TEfsVkAhghmOwoLV
    5kWOpQHUOUHPFx3o
    kBmwtXcnRhNAWAa4
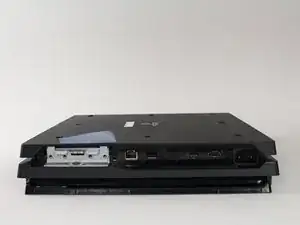
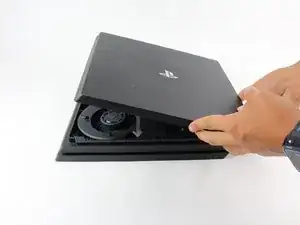
    • Gira la console a faccia in su.

    • Prendi i due angoli anteriori del dispositivo.

    • Tirali verso l'alto finché non senti un forte rumore.

    • Ciò potrebbe richiedere molta forza, quindi non avere paura di essere un po' rozzo con la tua console.

    • Dopo aver sganciato entrambi gli angoli, sfila la copertura all'indietro e sollevala per rimuoverla.

    %#*@. I thought I was gonna break the thing. You really do have to give it some elbow grease.

    Addison Francisco -

    there were also some screws that needed to come out before popping it off. Might have been a different version im working on. there were three screws attached to the console that I had to remove before popping off the top.

    Ricky Arias -

    The 7215B has one TR8 security Torx behind the center “void” sticker.

    cylentstorm -

    This cover is really on there. It sounds like your breaking plastic when you pop it open. I ended up using a metal tablespoon in the corners where you should pull up to pop the cover up the first bit, worked well.

    azade91 -

  4. 22wpYKO4yTNgW3Kh
    22wpYKO4yTNgW3Kh
    vBx4W1iSIAwRpNoD
    jOxTLN2D2HYZVHRG
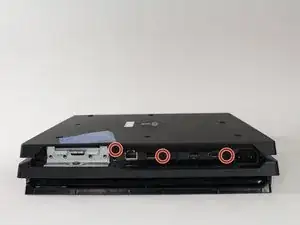
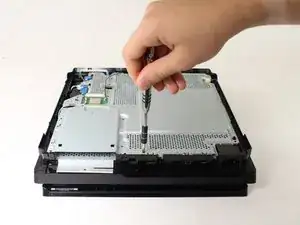
    • Usa un cacciavite Security Torx T8 per svitare le cinque viti dal retro del dispositivo.

    • Due viti da 31 mm.

    • Tre viti da 10 mm per i modelli 7000; Due viti grigie da 10 mm (viti superiore ed inferiore nell'immagine) se la PS4 Pro è un modello della serie 7100.

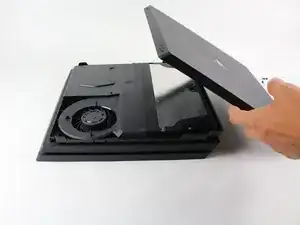
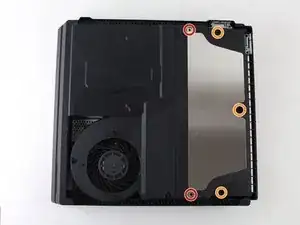
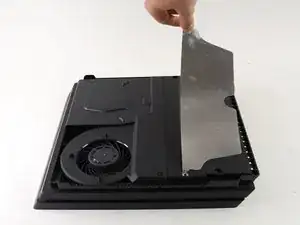
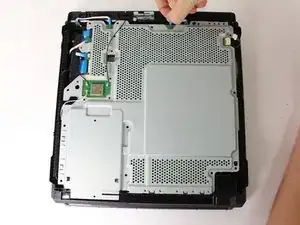
    • Rimuovi la placca in metallo tirandola verso l'alto.

    I copy the comment written by Jason at the end of this guide, because it’s better to have it here:

    This guide is for the initial release CUH-7000 models. Of note is the changes to the CUH-7100 series that do make this guide an issue. Steps 4 and 5 have a different items to note. You can damage it following this guide if you don’t adjust. There no longer 3 security screws for the case, but just one. This single screw is still covered by a warranty sticker, but the second one is a blank sticker and no screw behind it. There is also no 10mm screw in the center power supply in Step 4, it’s a support post. You still remove the 4 other screws, but you must then flip the console over and remove a T8 screw to the right on the HDD cage and another closer to the right side. You can then flip the console over again to remove the battery and plug it. Just remove all the metal plate screws to be sure, but make sure you hold the board when you flip it again or you will bend the battery prongs like I found out the hard way.

    kautame -

    Oh! That explains why I stripped the middle screw. What’s a support post?

    Philippe Morin -

    Had to use TR8 instead of 10mm here.

    Addison Francisco -

    After I popped the top off, I got 4 out of 5 screws out. The 5 th screw for some reason, was a little bit bigger, therefore, I could not take out that screw so I could clean the heatsink and fan.

    Dixie Dawg -

    Me too it’s not like another screw it’s have black and I can’t remove if you know pls tell me how i do bro ???

    Montri Meka -

    I stripped the %#*@ screw in the middle. (orange highlighting) It’s a black head and the T8 Torx Security head doesn’t work! I have a CUH-7115B. I think it’s a regular T8 or some kind of Hex head. ? I don’t know what to do now!! :(

    Philippe Morin -

    As mentioned above, this guide is for the old models. 7215B: There 4 TR8 screws (2 long, 2 short) holding the plate. The middle is a support post.

    cylentstorm -

  5. JJlhIcb3U2yBLvMW
    JJlhIcb3U2yBLvMW
    DCfbqKLZUNXSO6Wh
    uMkvUSRNKvYVRAkZ
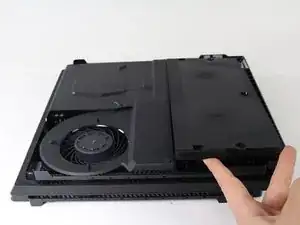
    • Gira la console a faccia in giù in modo che la parte inferiore sia rivolta verso l'alto.

    • Usa un cacciavite Security Torx T8 per svitare le tre viti nere da 7 mm nella copertura posteriore. (solo per i modelli serie 7000); o una vite da 4 mm (quella centrale) per i modelli serie 7100 e l'adesivo della garanzia a sinistra.

    • Rimuovi la copertura inferiore come fatto con quella superiore. Prendi la copertura da entrambi i lati e tira verso l'alto finché non scatta. Quindi sfilala via; Sui modelli serie 7100, stai attento ai due ganci che sostituiscono le rispettive viti.

    Adding to this, the screws are not visible unless you remove the warranty stickers!

    George Diaz -

    Also, the plastic on the back of the cover is prone to cracking. Be careful and undo snaps across the whole back of the panel gently!

    Nick Podrebarac -

    Vielen vielen Dank. Endlich ist der jumbojet gelandet #fan

    Christian Radke -

    7215B has 1 TR8 screw beneath a sticker between the optical and USB ports, and two clips (1 next to the HDD slot and 1 beneath a sticker near the power port.)

    cylentstorm -

  6. XVJsyqaqvWMpHyML
    XVJsyqaqvWMpHyML
    qYeNPcGxS3SLHqCt
    YSgOJyhZRcqRxp4A
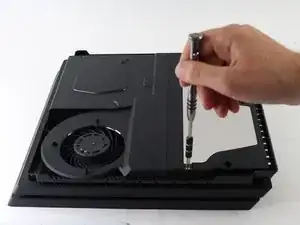
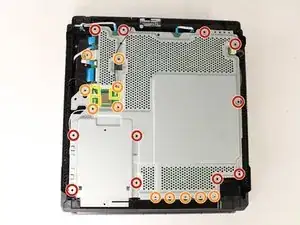
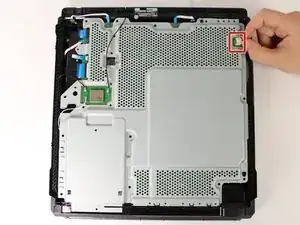
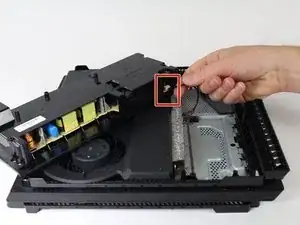
    • Usa un cacciavite Security Torx T8 per svitare le undici viti argento da 10 mm dalla placca in metallo.

    • Usa un cacciavite a croce Phillips #1 per svitare le undici viti da 4 mm dalla placca in metallo.

    • I modelli serie 7200 hanno altre 13 viti da 4 mm attorno i lati superiore e destro della placca in metallo. Queste viti sono indicate con un triangolo. Potrebbe essere valido anche per alti modelli.

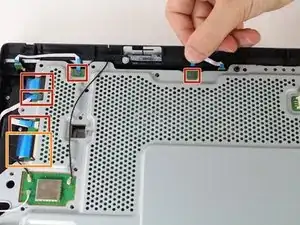
    • Usa uno spudger per scollegare i tre cavi dell'antenna (due neri e uno bianco) facendo leva per sollevarli dalle loro prese.

    Noted during my replacement that the PS4 Pro appears to have additional #0 Phillips Head screws in Step 6 required to remove the metal plate from the motherboard and that the metal “X” plate in Step 11 appears to be included now in this overall metal cover for the motherboard, no longer separate, which accounts for the additional screws.

    David Carlsen -

    Original pro here. Had 12 torx

    Skyler Cook -

    cuh0-7216b have more philips #1 screws on metal plate on right, +13 screws :)

    Papolo0 -

    (PS4 Pro) Bei mir ebenfalls 11 T8 Torx, von denen 3 Sicherheitstorx waren.

    Rebecca Dorsch -

    My PS4 Pro 7115 has additional sets of #0 Phillips screws on the plate. 10x in the primary processor space (blank plate area of the graphic here), 2x over the fan, and 1x on the outside edge to clamp down on the primary processor area. Model CUH-7115B

    r0flm4k3r -

    What are the 3 different antennas identifications or functionality ?

    Robert Aldred -

  7. heEDQBHHh5KdEDR6
    heEDQBHHh5KdEDR6
    rZU2aMJngJnkmHDS
    • Sfila il connettore bianco della ventola dalla presa gialla sulla scheda madre.

  8. FDTBl1FGfJFeSuA1
    FDTBl1FGfJFeSuA1
    ym5X6LUCOKJEJM36
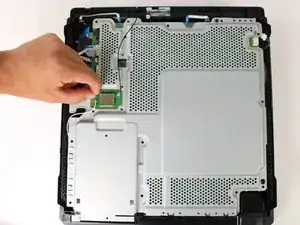
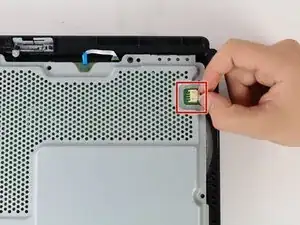
    • Sfila i cinque piccoli cavi blu a basso profilo collegati alla placca in metallo.

    • Solleva l'aletta di bloccaggio sul connettore ZIF del cavo a nastro largo.

    • Sfila il cavo a nastro largo dalla sua presa.

    • Non sfilare il cavo blu più grande senza sollevare l'aletta prima. Farlo può danneggiare la connessione.

    What the cable in the up left corner is for? I broke it and i’d like to know at what is it connected?

    Thanks

    Enrico Pensalfine -

    The blue ribbon cables aren’t connected to the metal plate. The plate can be safely removed beforehand. The only thing one should do prior to its removal is de route the antenna cables for the WNIC.

    Robert -

  9. PoXEHXeCsNy6UAcG
    • Tira verso l'alto e rimuovi la placca in metallo.

  10. iNt5ZNLVFmWnNB2T
    iNt5ZNLVFmWnNB2T
    3Wj6Xx1YmrTOaDIg
    yCUNXe2bCxwEjKui
    • Gira la console a faccia in su per continuare a lavorare sulla parte superiore.

    • Tira verso l'alto il gruppo dell'alimentatore ed appoggialo sulla console.

    • Stai attento a non tirarlo troppo lontano: il gruppo è ancora collegato in un punto.

    • Prendi il connettore dietro l'alimentatore e tiralo verso l'alto.

    Why do I have to remove the PSU here? I do not see the necessity judging by the following steps.

    Alexander Bla -

    This comes in handy when removing the entire motherboard which is necessary when cleaning the heat sink.

    George Diaz -

    Bonjour, Que se soit le connecteur du bloc comme celui sur la partie ps4 , il est difficile à retirer ce câblage… peut-on tirer sans risque réellement ?

    Brezu Sama -

    IMPORTANT: The connector on the motherboard is very sensitive. I’d recommend using pliers to put pressure down on the connector while slowly jerking the cable out of the socket to avoid serious damage to the connector and/or motherboard that could render the PSU connection useless and require advanced soldering / rewiring.

    Daniel Larusso -

    This!

    Connector was quite tight in PSU side and I ended pulling connector from motherboard resulting me getting PS5 for Christmas.

    tero -

    Also der stecke lässt sich nicht entfernen

    Slime -

    Der Stecker am Netzteil (letzter Schritt) erscheint mir ungewöhnlich fest, und lässt sich ohne weiteres nicht entfernen. Besteht die Möglichkeit, dass dieser neuerdings verklebt ist oder dergleichen? :-/

    Rebecca Dorsch -

    Das würde mich auch interessieren. Ich habe den Stecker weder vom Mainboartd noch von der PSU abbekommen. Leider habe ich den Stecker dann abgerissen - aber er hat sich auf keiner Seite abziehen lassen.

    Tobias August -

    Bei dieser Stecker-Buchse Verbindung handelt es sich um einen Molex-Stecker, der verriegelt ist. An der Seite befindet sie ein kleiner Hebel, den man nach innen drücken muss, damit sich der Stecker löst.

    Volker Diederichs -

    Danke für die Info!

    Fabian Neidhardt -

Conclusione

Per rimontare il tuo dispositivo, segui le istruzioni in ordine inverso.

Thomas

Membro da: 26/04/17

3841 Reputazione

0 commenti