Introduzione
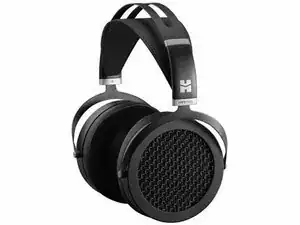
This guide will show you how to replace the headstrap on your HIFIMAN Sundara planar magnetic headphones.
In preparation for this guide, you will need the following tools:
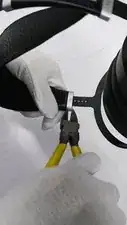
- Cutting pliers.
You will also need the following materials:
- HIFIMAN Sundara
- New HIFIMAN Sundara headstrap
Strumenti
Ricambi
-
-
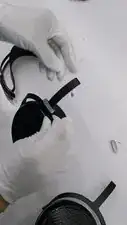
This step is necessarily destructive, and with careful application of the cutting pliers, no damage will be done to the headphones. Make sure to remove both fasteners.
-
The headstrap-headband interface is the piece of plastic which the headstrap itself adheres and whereby it attaches or interfaces with the headband. This part will be referred to as Interface for brevity from here on.
-
-
-
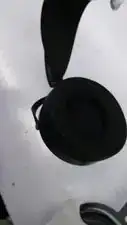
Remove the old headstrap from the headband as shown by detaching the Interfaces from the headband.
-
A metal strip is present inside both of the Interfaces. Make sure to retrieve them and set them aside in a salient location.
-
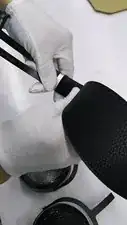
Remove the drivers (speakers) as shown.
-
-
-
Insert the new headstrap as shown into the headband by inserting the Interface into the headband, but do not yet press the Interface into the headband.
-
Don't forget to re-insert the metal strips mentioned in Step 2 here as shown in the video.
-
-
-
As the design of the headband is ambipolar, which side of it is designated as the left or right side does not matter.
-
Before inserting the drivers back into the headband, make sure the metal place holders that secure driver length are correctly inserted at the start of the interface. The small spheroidal convex indentation of this piece should have the convex (protruding) side facing outwards which will interface with the concave indentations on the drivers.
-
To verify that the metal placeholders are properly installed: if the inner part of the Interface that attaches the headstrap to the headband can be closed with ease (must be actively held together), and the driver being inserted correctly locks in place, the metal place holders have been correctly installed and you may proceed onwards.
-
Make sure the metal fasteners have the correct polarity, either L or R, facing on the inside.
-
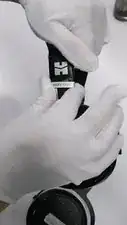
After ensuring that the metal fasteners are facing the correct direction, slide the drivers back into the headband and firmly press closed the Interface as shown in the video.
-
-
-
Firmly push the metal fastener upwards to permanently secure the Interface to the headstrap as shown. No adhesive is required.
-
Make sure to apply equal amounts of force as you push the fastener onto the Interface.
-
Headstrap replacement is complete.
10 commenti
you absolutely do not need to cut the metal fastener in step 1. just pry it downward carefully with a flathead screwdriver and it comes free.
Thanks for this tip, had to deal with a loose headstrap and it is very easy to just pry it with a screwdriver. You don't even dent it at all if you're careful.
Where do you buy the headstrap?
This assumes you can get past the heavy glue. The videos are from the factory itself apparently in my parts and repair request. Questionable use of copyrighted content, yes, but I had let them know, and they haven't done anything, so /shrug.
Andrew -
@ryanfergus24861 Simply contact HiFiMan themselves and request parts. That's what I did.
Andrew -
I opened them brand new and one side of the strap just fell out. I've tried doing what you did here, but I can't seem to get the one side to stay
Moki -
If by "one side of the strap just fell out" means "the strap is loose, but the metal fastener on the end is intact and in-place; and the plastic interface which it's normally attached to is thus likewise, then either it has been torn off, or (my guess if out of box) the piece wasn't glued, or the adhesive has been weakened such that one side of the strap came out.
You'll need to either: do what was suggested elsewhere here (manage to pry off the metal fastener where the strap fell out flawlessly [it's quite malleable and soft a metal]),
OR request replacement parts directly from HiFiMan (specifically the metal fasteners and a new strap just in case), then follow my instructions here as-is; and take a strong adhesive of your choice in which you are confident will not chemically corrode the plastic to which the strap will be permanently bonded with the plastic interface (as it should be). If there is insufficient material, then use a new strap (comes attached to the plastic interfaces). The latter is safer.
Andrew -
Has anyone here tried to undo the screws on the yokes? I want to change the headband for a different one, but those screws came really tight from the factory for some reason.
Yes -
If there's screws now, that's certainly better on Hifiman's part, but if so, then this guide is not applicable to this updated hardware. Suggest uploading an image of what you're talking about. In any case, you'll have to unscrew those at your own risk. Sometimes screws are screwed in with a sort of adhesive, or otherwise have something at the other end of the screw to keep it from falling out when unscrewed. It's a pain because if it's adhesive, depending on how much the designers and implementors cared, the force of torque may loosen the screw at the cost of damaging the product itself, but in my experience, I've never had that happen to me really; worst thing has usually been ripping threads off, either from the hole itself because it's hard metal on soft plastic, or vice versa.
Andrew -
Oh boy did they glue it! It's some loctite plus very low quality screw combo, only way to get it off in my case was to grind the screw-head inside until the outer end came off.
emaN -
DON'T CUT IT.
from the inside of the headband, stick a flathead between the metal fastener and the plastic body, and pry downward carefully. the metal fastener should come free without breaking it.
never perfect -
It's adhered with glue, the glue hardens with time it seems, mine naturally come off because I've had my pair for several years; maybe there is non-physical means of removing it?
oh dear god -