Introduzione

The keyboard and touchpad of your HP Chromebook 14-Q010DX are essential for typing, scrolling, and navigating your laptop. If they are damaged or malfunctioning, you may want to replace them with a new part. The repair should take 5-10 minutes and this guide will help you to replace the Keyboard and touchpad and will show you how to open the laptop, disconnect the old part, and connect the new one. You will need a new keyboard, touchpad, a Phillips #00 screwdriver, a Spudger and an iFixit opening tool which can be found online.

  1. rTgUkWXeIjWfhJcx
    rTgUkWXeIjWfhJcx
    SjfgyAv25cWEMocK
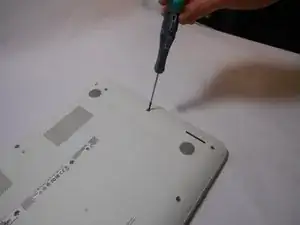
    • Flip the laptop with the base of the laptop is facing you.

    • Using the #00 screwdriver, unscrew these screws.

  2. HOQCvYq4UmPC6yVr
    HOQCvYq4UmPC6yVr
    UBO21MeVoQs2RgKN
    1OwaB2cOiKGJFiDC
    • Warning! When prying open a laptop it could require some force, but it also has fragile connectors underneath. Use caution so as to avoid breaking these connectors.

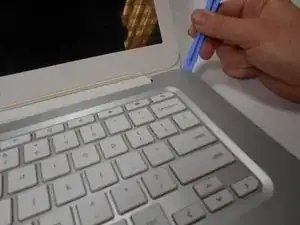
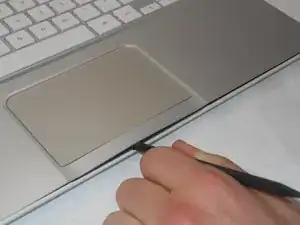
    • Start from the top right corner of the laptop and work clockwise with an iFixit opening tool or spudger to pry the keyboard from the frame of the laptop.

  3. VKnKBtlTplmYBQmh
    VKnKBtlTplmYBQmh
    4ZUPEP4Hx4UEB6k2
    GIiayODhtKmVgKuN
    • Warning! Handle the flaps and ribbon cables with care to prevent damage.

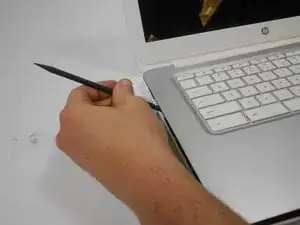
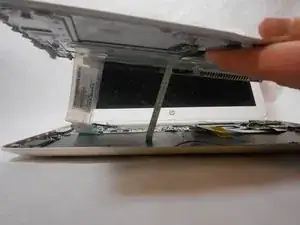
    • Gently pull the keyboard in the opposite direction of the screen, so the wires beneath are exposed.

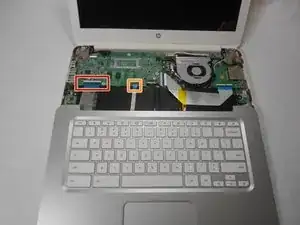
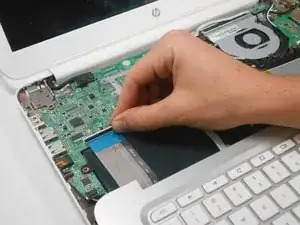
    • Lift the black flap and pull the blue ribbon gently towards you until it is disconnected.

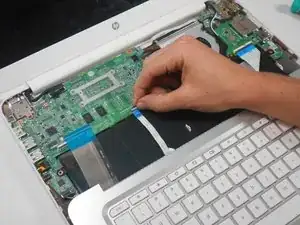
    • Lift the white flap and pull the blue ribbon towards you until it is disconnected.

  4. p42wjgUxJJWmQAq5
    • Lift keyboard slightly and remove the strip gently to prevent damaging any parts.

    • The tape has no function other than to keep the wire tucked away.

  5. 4GlFGjxrrWBtTj1C
    • Set aside the detached keyboard.

Conclusione

To reassemble your device, follow these instructions in reverse order.

Wilfredo Ramos

Membro da: 28/01/15

606 Reputazione

10 commenti

In the black variant of this model I found that there are two screws under the rubber feet near the hinge.

Justin Cowen -

Super easy repair, keep track of your screws and be very careful with ribbon that connects keyboard and Touch pad.

Terry -

This was very close to a similar HP Chromebook I had to repair recently. Such a beautiful and simple process. I cleaned the keyboard connectors and everything functioned perfectly after I was done. The whole process took about 30 minutes (allotting 10 minutes to find my rubbing alcohol that my wife hid from me).

Josh Bollman -

Any idea how to get the replacement keyboard?

Pawel Wozniak -

At the top of this page under "Relevant parts" there is a link to purchase the keyboard replacement.

Kevin Piper -

Purchased a Chromebook like this one at a garage sale. The previous owner stated that several keys didn't work. I used this guide to dis-assemble and clean it, re-seated the keyboard connector and now it works perfectly. Thank you for this excellent guide.

Steven Sizelove -

Very helpful! This was way easier than I thought it would be. I agree with Justin, though. I have a white/green model (14-x015wm model) and I had to remove the two rubber feet which are at the top of the image (closest to the screen) in order to remove two more screws.

Patrick Maguire -

In my unit, the issue was with the keys directly over the CPU fan. The backing did not provide enough support when pressing the keys. I taped a support mesh plate behind the keyboard (held in place by electrical tape). Now, it seems to provide the necessary support that the plastic mesh could not.

btaira -

I had a problem with certain chromebook keys not responding - pretty much all the ones around the 'h' key. I followed this guide, disconnected the keyboard connector and cleaned it with white spirit then reconnected. Hey presto I can now type words like hyugjmtnb and bjumgytun again with ease. Many thanks, I love my chromebook and this was my last resort before splashing out on a new machine :)

Ric Bar -

is there a way to avoid my chromebook from turning on when i open it after unscrewing the screws from the underside? or do i have to wait until it dies?

Eugene Zabala -