
Introduzione
Questi sono i video che mi hanno aiutato durante i quattro smontaggi che ho effettuato per vari motivi e che vi consiglio di guardare assieme alle note che ho scritto in questa guida in base alla mia esperienza.
-
-
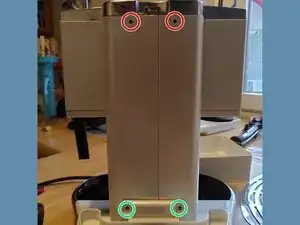
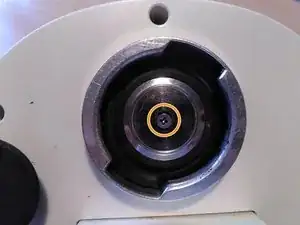
Prima di procedere allo smontaggio rimuovere il filtro del caffè (cerchio verde) e il pomello del vapore (cerchio azzurro): tirare con (tanta) forza verso l'alto.
-
Staccare dalla corrente la macchina e posizionarla su un piano con diversi stracci: l'acqua contenuta nei tubi verrà persa durante lo smontaggio.
-
-
-
[vista posteriore] Una volta rimosso il serbatoio trasparente dell'acqua si possono svitare le due viti alla base (cerchio verde) e le due viti in cima (cerchio rosso) che permetteranno la rimozione del coperchio metallico superiore più avanti.
-
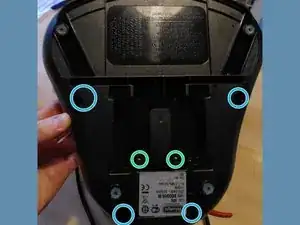
[vista inferiore] Svitare le quattro viti a sezione esagonale (cerchio azzurro) e le due viti a croce (cerchio verde) dalla base.
-
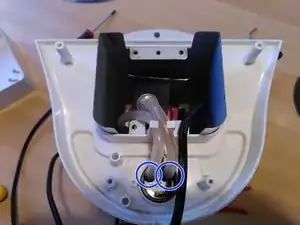
Una volta rimossa la base nera si possono rimuovere i tubi di plastica che portano l'acqua dal nostro serbatoio alla caldaia. Tirare con forza i tubi (cerchi blu)
-
-
-
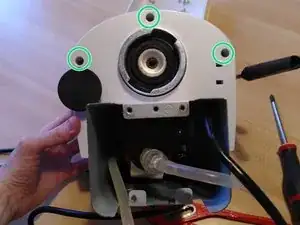
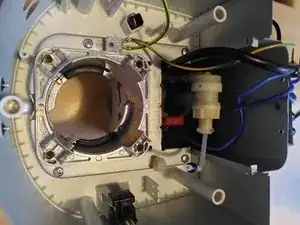
Una volta rimossa la base si può iniziare a rimuovere il coperchio. Dalla parte inferiore svitare le tre viti (cerchio verde).
-
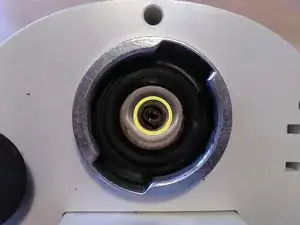
Rimuovere il filtro metallico dell'acqua erogata (cerchio arancione)
-
Rimuovere la valvola che fa scendere l'acqua dal serbatoio interno con un cacciavite piatto (cerchio giallo) - questa operazione si può fare anche senza smontare la base in caso di necessità di sostituzione del singolo pezzo.
-
-
-
Rimuovere parzialmente il coperchio e rimuovere il cavo giallo/verde (terra) dal coperchio (cerchio verde) semplicemente tirandolo
-
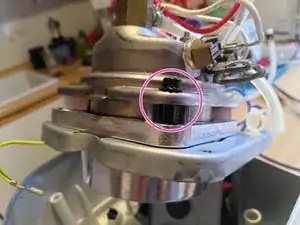
Svitare la vite (cerchio viola) per rimuovere liberare il modulo con i tre bottoni (accensione, caffè, vapore)
-
Rimuovere le clip metalliche (cerchio giallo) per liberare il tubo rigido che porta l'acqua dal serbatorio esterno alla caldaia
-
Allentare le clip metalliche (cerchio blu) che fissano il tubo morbido che collega la caldaia (in basso) all'uscita del vapore (a destra). Farle scorrere sul tubo morbido e rimuovere il tubo
-
-
-
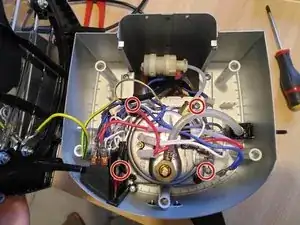
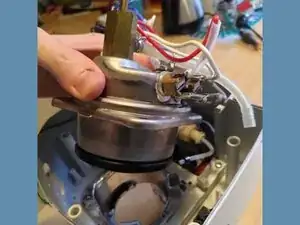
Rimuovere le viti (cerchi rossi) che fissano la caldaia al corpo principale
-
Una volta rimossa la caldaia è possibile aprirla svitando le 4 viti a sezione esagonale poste sui quattro angoli (cerchio viola). Questo passaggio è utile per rimuovere il calcare accumulato nella caldaia.
-
-
-
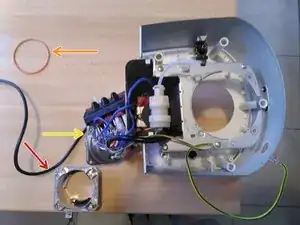
Una volta smontata la caldaia si possono sostituire i pezzi necessari: pezzo inferiore (freccia rossa), guaina (freccia arancione), pezzo superiore (freccia gialla)
-

Per rimontare il dispositivo, segui queste istruzioni in ordine inverso.
12 commenti
Great, clear instructions and easy to follow. I've been looking to into this machine, and tons of scale in the boiler. works fine now! Cheers
Muss man vor dem zerlegen eig den (wenn vorhanden) Boiler oder Erhitzer entleeren, dass kein restwasser entweicht beim auf-den-Kopf-stellen? Wenn ja, wie geht das? Danke schon mal für den obigen, ausführlichen Bericht!
Hi, I think you can empty the boiler (the one depicted in step 6) before disassemblying the coffee machine. Just try to remove the water container (the one on the back of the machine) and try to "make a coffee". The machine should try to empty the residual water in the tubes, but probably some water will remain inside the boiler.
Either way you can open the boiler (step 6) on a sink so that the residual water won't wet your working space.
VooBee -
Guten Tag, wie bekommt man das Ventil aus der Maschine um es auszutauschen? Ich bekomme es einfach nicht hin. Muss dafür der Erhitzer ausgebaut werden?
Hello,
if you are referring to the valve in step 3 - yellow circle - you can remove it with a flat screwdriver but it's not necessary if you don't need to replace that specific valve.
VooBee -