Introduzione
Per questa guida, abbiamo smontato un CR-10S Pro per poter mostrare meglio come installare un kit BL Touch. Se lasci la tua macchina montata, la procedura è la stessa ma dovrai proteggere la superficie di montaggio se la vuoi usare come stazione di lavoro. La gravità non può essere spenta, ricordatelo.
Leggi questi passaggi prima di iniziare
- Rivedi l'intera procedura prima di rimuovere una componente dalla tua macchina. Devi assicurarti di essere a tuo agio e di saper eseguire la procedura.
- Conferma di avere una connettività USB con la tua macchina. Puoi provare prima ad installare il firmware della scheda madre. Quindi, se ci sono problemi, hai ancora una macchina funzionante e puoi risolvere i problemi con la USB prima di aggiornare.
- Assicurati di avere il tempo e gli strumenti necessari per l'aggiornamento. Non è divertente doversi fermare a metà dell'opera perché ti manca qualcosa.
-
-
Svita a testa piatta le viti che tengono ferma la cinghia del fermo dell'asse X con una brugola M3.
-
Spingi il fermo dell'asse X verso sinistra per rilasciare la tensione.
-
Rimuovi le estremità della cinghia dal carrello dell'asse X.
-
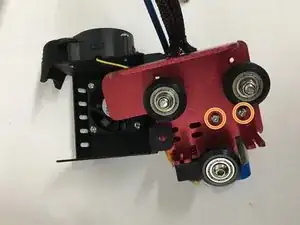
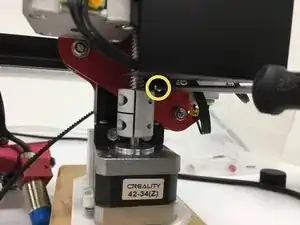
Svita i fermi che tengono ferma la rotella inferiore usando una chiave doppia e una brugola M3. Non svitare del tutto il bullone.
-
Svita le viti a testa bombata usando una brugola M2.
-
-
-
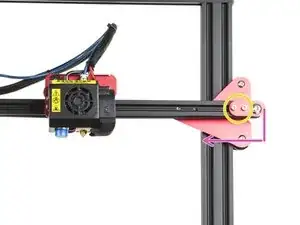
Rimuovi il gruppo dell'asse X dalla macchina.
-
Taglia la fascetta.
-
Dal retro, rimuovi le viti a testa bombata usando una brugola M2. Questo sgancerà la sonda e il montaggio originali.
-
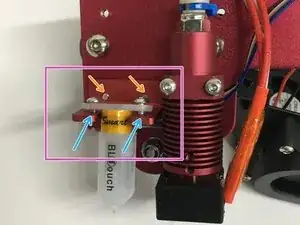
Usando le stesse viti, fissa la staffa del BL Touch come mostrato.
-
La sonda sarà installata come mostrato, ma lasciala libera per ora. I cavi si collegheranno più facilmente con la sonda rimossa.
-
Le viti M3x 6 a testa bombata incluse fisseranno la sonda.
-
-
-
Taglia le 2 fascette.
-
Svita le tre viti a testa bombata usando una brugola M2 per rimuovere la copertura della scheda figlia.
-
Scollega il connettore della sonda originale. Potrebbe avere della colla sul connettore. non sui fili.
-
-
-
Tira la sonda originale dalla parte opposta per sfilarla e rimuoverla dalla maglia.
-
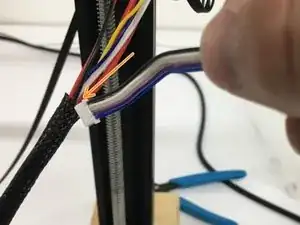
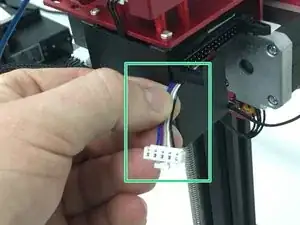
Dal lato della scheda figlia, infila i cavi della nuova sonda dall'estremità della presa piccola. Con la maglia ancora allargata dovresti poterla farla passare del tutto.
-
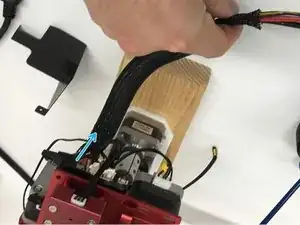
Lascia all'incirca 3-5 centimetri dell'estremità dei cavi esposti vicino al connettore del cavo a nastro e riattacca la copertura della scheda figlia.
-
-
-
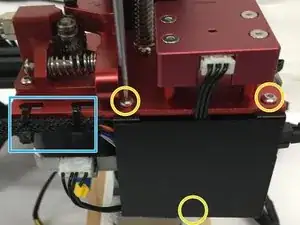
Stringi le viti a testa bombata con una brugola M2. Inizia dalle 2 superiori, quindi posiziona l'aletta inferiore, allineando i fori per avvitare la terza vite.
-
Stringi delle nuove fascette per tenere ferma la maglia dei cavi.
-
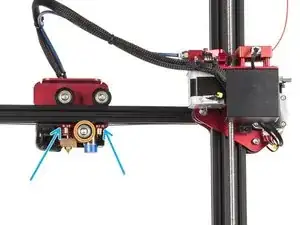
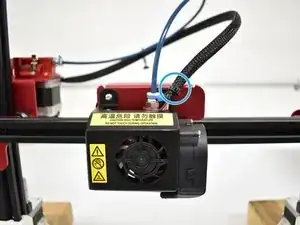
All'estremità calda/della sonda, fai passare i cavi dietro l'estremità calda e collegali nella sonda.
-
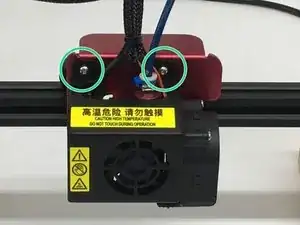
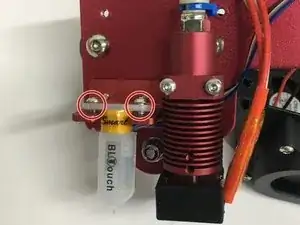
Avvita e stringi le due viti a testa bombata.
-
-
-
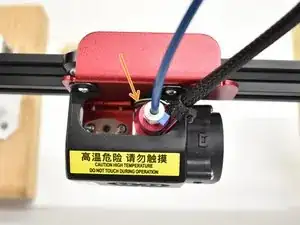
Reinstalla una nuova fascetta.
-
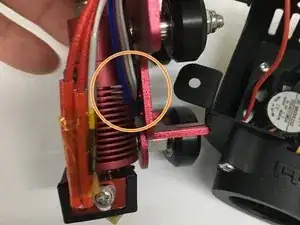
Fai passare i cavi del BL Touch dietro l'estremità calda come mostrato.
-
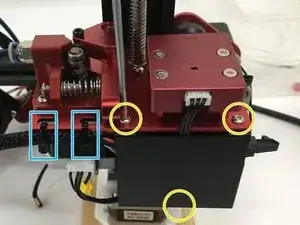
Riattacca il carrello X.
-
Stingi la rotella inferiore e riattacca la cinghia su entrambi i lati (vedi il passo 1 per le immagini).
-
Riattacca la copertura della ventola anteriore, stando attento a tutti i cavi.
-
Riattacca le estremità della cinghia al carrello X.
-
Spingi il fermo dell'asse X a destra per tendere la cinghia e stringi le viti a testa piatta.
-
-
-
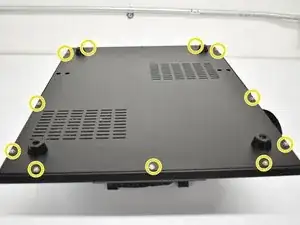
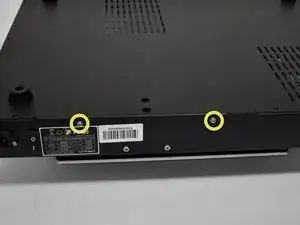
Usando un cacciavite a croce Phillips #1, svita le 11 viti sulla copertura inferiore e le due viti su entrambi i lati, per un totale di 15 viti. Quindi, rimuovi la copertura inferiore.
-
Scollega il cavo a nastro originale (non mostrato nelle immagini).
-
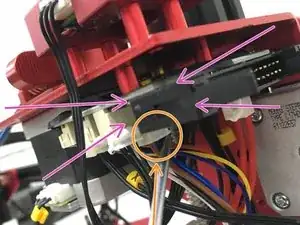
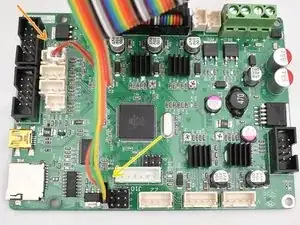
Collega le nuove connessioni. Per chiarezza, abbiamo mostrato solo le nuove connessioni.
-
Cavo a nastro (indentato)
-
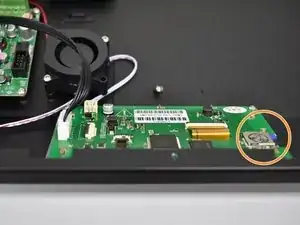
Presa a 3 contatti nella D11 (ultima fila verso il lettore di schede SD), con il cavo arancione rivolto verso il cavo a nastro come mostrato.
-
Presa bianca a 2 contatti nella Z+ (connessione più vicina al cavo a nastro), dalla stessa visuale dell'immagine, usa i due contatti a destra.
-
-
-
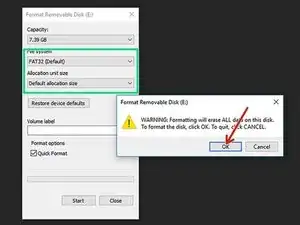
Trova una scheda micro SD non più grande di 16 GB e formattala in FAT 32/spazio allocato predefinito.
-
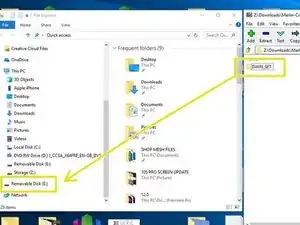
Scarica gli Screen Files, estraili e trova la cartella chiamata "DWIN_SET". Trovi un link a questi file anche nel Passo 12.
-
Copiala nella scheda SD formattata.
-
-
-
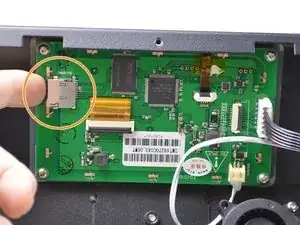
Inserisci la scheda SD configurata correttamente nel lettore sullo schermo.
-
Assicurati che l'interruttore di accensione sia sullo "0", quindi attacca la tua macchina alla corrente. Posiziona la macchina in modo che tu possa vedere lo schermo e metti l'interruttore di accensione su ON.
-
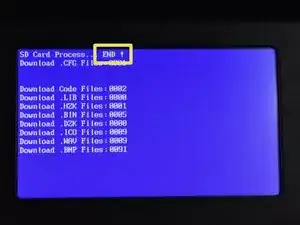
Se tutto va bene, vedrai i file caricarsi, una serie di immagini ed infine la scritta "END" in alto. Nel prossimo passaggio c'è un video.
-
-
-
Se tutto va bene, vedrai i file caricarsi, una serie di immagini ed infine la scritta "END" in alto. Nel prossimo passaggio c'è un video.
-
-
-
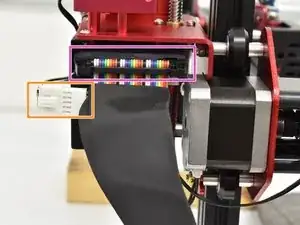
Collega il cavo a nastro spingendolo finché non senti i due ganci sui lati scattare in posizione, fissandolo.
-
Collega la presa a 5 contatti per la sonda BL Touch. Anche questa presa ha un blocco quando inserita completamente.
-
-
-
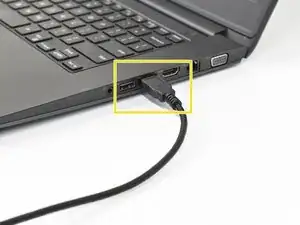
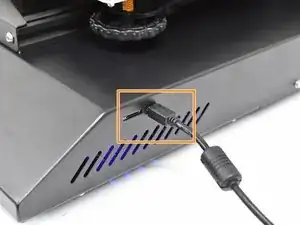
Collega l'estremita USB A nel tuo computer.
-
Collega l'altra estremità del cavo USB nella tua stampante 3D.
-
FIRMWARE
-
Via a questo link per trovare i file e le informazioni d'installazione del firmware.
-
-
-
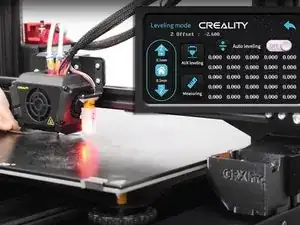
La procedura di impostazione sarà la stessa TRANNE che non dovrai impostare l'altezza della sonda o la sensibilità. Devi solo impostare il tuo Offset Z.
-


Guarda i passaggi iniziali per avere delle immagini per aiutarti con il rimontaggio.

17 commenti
My LCD display got blank after turning on my printer once the display was flashed. I thought it would be fixed by the time I uploaded the hex.file but it didn't work. Now my printer is frozen and I dont know what to do. Is there an advice for this situation I will appreciate any help thank you!!
If you purchased the kit from Tiny Machines 3D, you can contact us directly at support@tinymachines3d.com
This guide is for customers but as it is public, it is open to all as reference. If you are having issues beyond that, check wiring.
So, does this mean that you would recommend that no one use your firmware upgrades unless they purchased their CR-10S Pro V2 from you? Unfortunately, I received my V2 before I learned of you guys and the very cool stuff you have done related to this printer (else, I definitely would have purchased from you). I was looking forward to upgrading with your firmware(s).
No, we don’t mean this at all. We want people to understand that there are some differences between our firmware and stock and the configuration outlined in the guide must be followed for the firmware to work correctly.
I had bought the BLTOUCH V3.1 with the jumper and the extension cable from you, but which firmware should I use now on my CR-10S PRO? that stock of Creality3d CR-10S PRO V2?
V2 and use Z+ port on the mainboard.
Keep all screws as they will be reused during assembly.
Note how the X-Axis Belt is positioned before removing belt ends from carriage.
Do not fully remove the X-Axis Belt
Joel Gabel -
Revised, remove your comment if you agree.
Tiny Machines 3D -
Orange step - “UNTIL THE…” Until the What? This sentence wasn’t finished. Thanks.
johnyringo83 -