
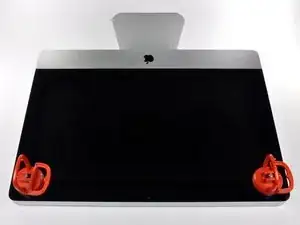
Introduzione
L'aggiunta di un secondo SSD nell'iMac offre diversi vantaggi, fra cui: velocità più elevate, maggiore spazio di archiviazione e la possibilità di installare nuovi software senza problemi. Usa questa guida per eseguire l'installazione mediante un case per disco rigido nell'alloggiamento ottico.
-
-
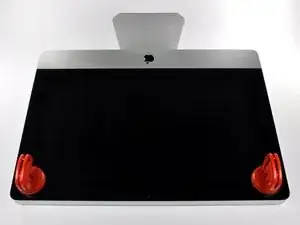
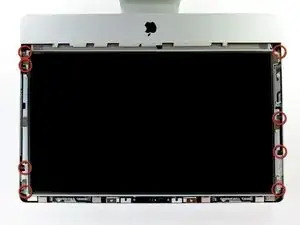
Fai aderire una ventosa accanto a ciascuno dei due angoli superiori del pannello di vetro.
-
Se la ventosa non aderisce, prova a ripulire il pannello di vetro e la ventosa con un solvente delicato.
-
-
-
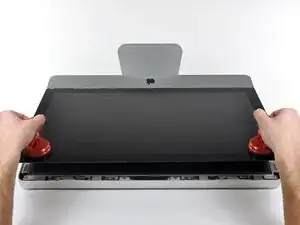
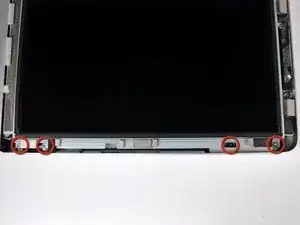
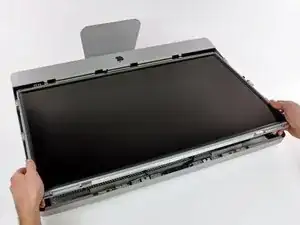
Solleva il pannello di vetro in perpendicolare rispetto alla superficie dello schermo LCD, affinché sia possibile liberare i piedini di montaggio in acciaio inseriti lungo il lato sottostante al bordo superiore del pannello di vetro.
-
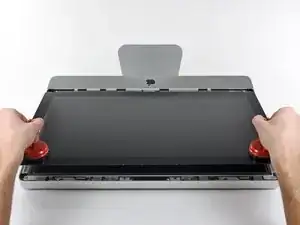
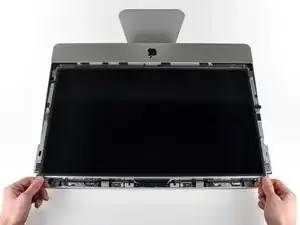
Estrai il panello di vetro dal bordo inferiore dell'iMac e mettilo da parte con attenzione.
-
-
-
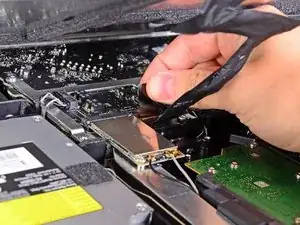
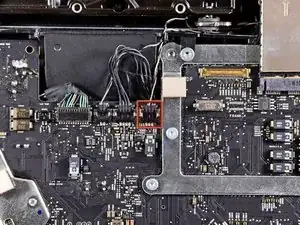
Estrarre il connettore del cavo della sincronizzazione verticale dal connettore femmina sulla scheda di azionamento LED, vicino all'angolo superiore sinistro dell'iMac.
-
-
-
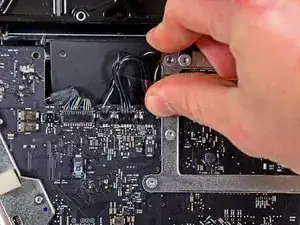
Ruotare il display dal case esterno affinché sia possibile scollegare il cavo di alimentazione della retroilluminazione LED dall'apposita scheda di azionamento.
-
-
-
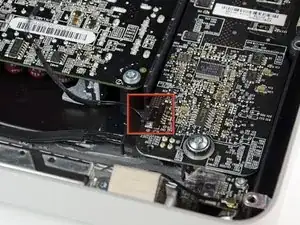
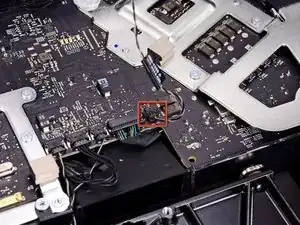
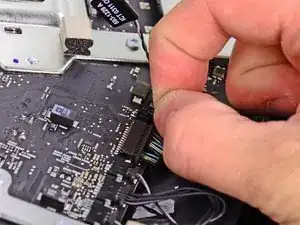
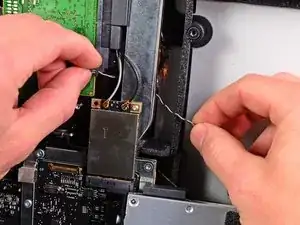
Scollegare il connettore del cavo del sensore termico dell'LCD dal connettore femmina sulla scheda logica.
-
-
-
Estrarre con cautela il cavo verso il bordo superiore dell'iMac e sollevarlo dal case esterno, facendo attenzione a non tirare altri cavi.
-
-
-
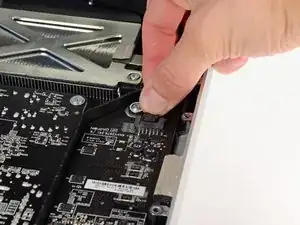
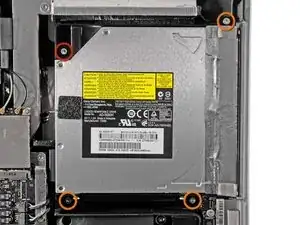
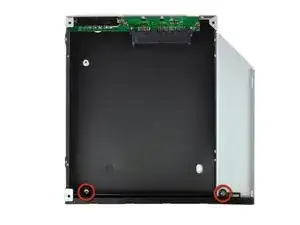
Rimuovere le quattro viti seguenti:
-
Una vite Torx T10 da 9,3 mm a testa grande
-
Tre viti Torx T10 da 9,3 mm a testa normale
-
-
-
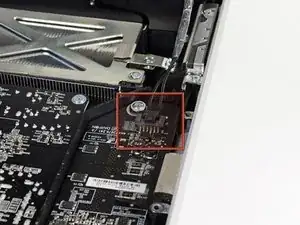
Estrarre il connettore del sensore termico dell'unità ottica verso il bordo superiore dell'iMac per scollegarlo dal connettore femmina sulla scheda logica.
-
-
-
Sollevare il bordo interno dell'unità ottica e spostare il connettore dietro al telaio della GPU collegato alla scheda logica.
-
Estrarre con cautela l'unità ottica dai piedini di montaggio sul lato destro del case esterno, affinché sia possibile scollegare il cavo dell'unità.
-
Lasciar pendere l'unità ottica mentre si sposta il connettore del sensore termico dell'unità ottica dalla parte posteriore del dissipatore della GPU.
-
-
-
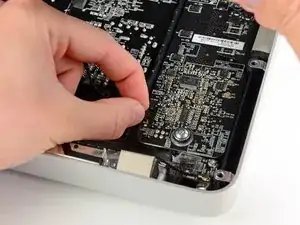
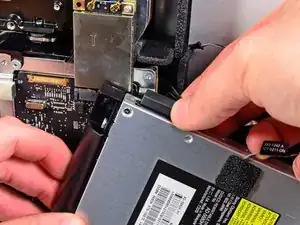
Scollegare il cavo dell'unità ottica estraendone il connettore.
-
Rimuovere l'unità ottica dall'iMac.
-
-
-
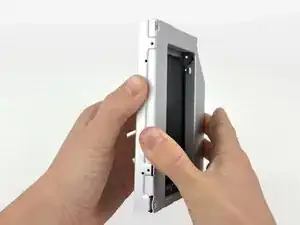
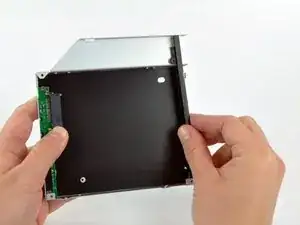
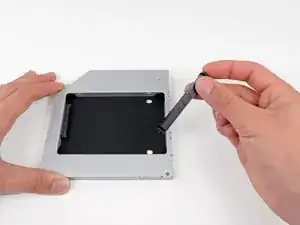
A partire dal bordo sinistro, apri delicatamente il case dell'unità ottica.
-
Continua ad aprire le due metà del case fino a separarle.
-
-
-
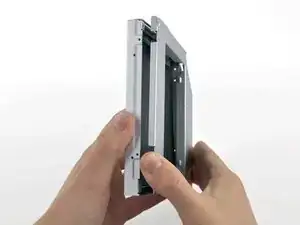
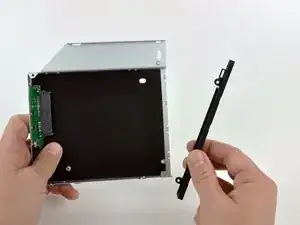
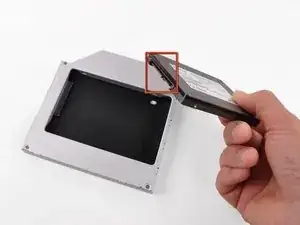
Rimuovi le due viti con testa a croce Phillips n. 0 da 3 mm che fissano la mascherina al case dell'unità ottica.
-
-
-
Solleva la mascherina in plastica nera dal case dell'unità ottica.
-
Riassembla il case dell'unità ottica senza la mascherina, riutilizzando le tre viti con testa a croce da 3 mm originali per preservarne l'integrità.
-
-
-
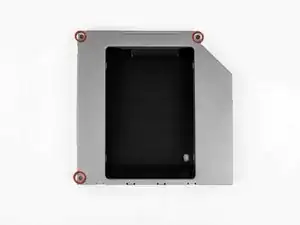
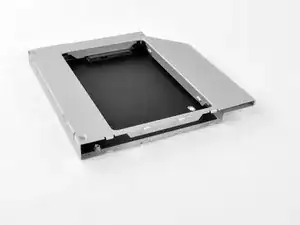
Rimuovi il posizionatore di plastica dal case del disco rigido dell'alloggiamento ottico, premendo una delle clip poste lateralmente e sollevandolo dal case.
-
-
-
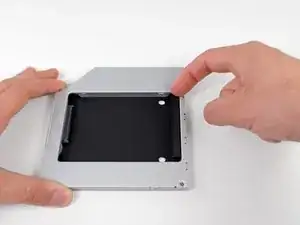
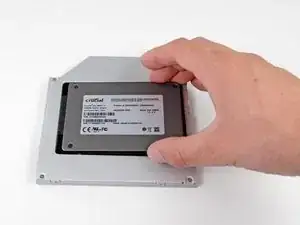
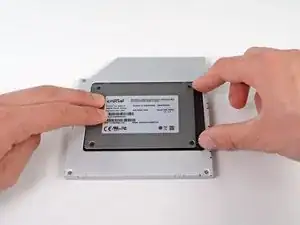
Verifica che i connettori del disco rigido siano rivolti verso il basso prima di posizionarlo nel case.
-
Posiziona il disco rigido delicatamente nell'apposito slot del case.
-
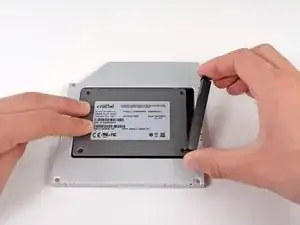
Tenendo saldamente il case in posizione con una mano, premi il disco rigido nei connettori del case con l'altra.
-
-
-
Una volta agganciato il disco rigido, reinserisci il posizionatore di plastica tenendo il disco premuto contro la parte inferiore del case.
-
Ricollega tutti i cavi rimossi dall'unità ottica originale nel case dell'alloggiamento ottico.
-


Per riassemblare il tuo dispositivo, segui queste istruzioni in ordine inverso.

13 commenti
Well, actually, it was much easier than I thought.
The only problem about this is that the hard drive temperature sensor cable. Even I bought the same brand HD, it still doesn't work. So I have to install fan control to control the fan speed.
But other than that, it works very smooth. The speed is great.
Thanks, ifixit. The home tech toolkit is great and really helpful.
abouthui -
Hi. I wanna know if is mandatory to connect the SSD with enclosure or it's possible to connect directly to SATA cable like on model EMC 2428 that has an third SATA conector free and then fix the SSD to back panel with 3M
Ibai Bi -
Im pretty sure if you want to just mount it with tape that would be perfectly fine. Had mine apart and even thought about it myself before properly mounting it.
2389 doesnt support this. cd player isnt even sata
ty no ty
I just replaced with a 250GB SSD... So yes it does support this.
Very easy to lift the glass out. Don't jerk too hard.
kctipton -
Another comment on DATA & LCD Temp. Sensor cables: I had to remove the vertical sync, and the backlight cable, however, if you have an assistant or/can carefully rotate the screen clockwise/and then have it held up about 5" to 6" at a slight angle, you do not need to remove LCD data cable or LCD thermal cable, however - IMPORTANT: you must have a second pair of hands/or way to securely prop up the LCD. Also, don't rotate too much, since then you will pull out LCD data cable, and it renders the whole exercise moot, or can damage the cable or connector.
MaximBorzov -
You don't need suction cups. The screen, held by magnets, can simply be pried off using a very thin blade such as a screw driver and fingers.
Deepsurvival -
That's a bad idea. using a metal tool to pry off glass is likely to end with an expensive broken front glass.
Suction cups are common. Find a couple and do it the safe way. I use some cheap ones that came with iPhone repair kit.
max damage -
No need for suction cups, I just stuck my nails (short like guys usually have) between the top part of the screen and body, and it came off easily. I've never done it before, so it seems to be very easy.
Nikolas Lintulaakso -
Nails worked for me too
Rob Dale -
Just completed the replacement of the optical drive with an SSD using an OWC Data Doubler kit. Attempted to remove the optical drive without disconnecting any cables but found it a bit fiddly to orient the screen for good access. I bit the bullet and disconnected them and found the process less daunting than I imagined. Reconnecting them was similarly straightforward if you're careful.
Tip: you can skip the step for removing the optical drive thermal sensor connector from the motherboard. Still need to remove the sensor from the optical drive but you can leave that hanging and reattach it to the SSD later.
osienna -
I use Garmin GPS suction cup. Work very well
jc3Dcx -
I’ve just successfully installed a 1TB SSD in place of my optical drive thanks to the information here- thank you to everyone who has contributed!
3 comments- the procedure described here seems to vary between HD replacement and dual HD/optical drive replacement. This can be confusing at times.
Expect there to be minor differences between the layout described and what you find when you open up your iMac. There are also, surprisingly, differences between the HD enclosure description, and the article provided by ifixit.
I was able to replace the DVD/HD enclosure single-handedly without fully removing the LCD, or deconnecting any of the cables (steps 5-11). It’s a bit cramped, and fiddly, but I was not happy removing any of the cables despite watching videos, etc., since they all seemed to involve applying more force than I was comfortable with. A more detailed description of how to release them might have helped, but even here, there may be minor variations even within the 2389 model.
Good luck!
ivan birks -
I did it several times with one suction cup at the end of a kitchen brush. Once with the blade of a swiss army knive, also ok. And i’m pretty sure it works with fingernails too
Tai -
Fingernails are all you need to free the glass from its magnetic hold. If you don’t have them, slip something thin and plastic, like a spudger, at a top corner.
Max Powers -
Minha dúvida é a seguinte: após o técnico trocar o HD do meu iMac de 21,5 polegadas, a câmera parou de funcionar. Seria por causa da troca do HD? Tem solução?
Claudio -
Creio que o cabo da camera não foi plugado ou deu mau contato… ou até danificado.
glecyo@gmail.com
glecyo medeiros -
I can’t get my glass to budge. I’m replacing a cracked one and now it’s about to shatter.
jamboxmitchell -
I know that I'm replying really late but I advise to use clear tape over any cracks so the cracks don't get bigger
Jace Holmes -
Check for chips in the glass BEFORE you do this step. If there is a chip when you pull up with the suction cups you will wind up with a jagged mess. If you do have a chip I would advise covering the screen near the chip with clear tape of some kind before lifting out. Mine shattered right at the chip and the resulting glass dust cloud got all over. My solution was buying a new glass screen.
BCam -