
Introduzione
Sostituzione del case inferiore in alluminio nei MacBook Pro Unibody.
Strumenti
Ricambi
-
-
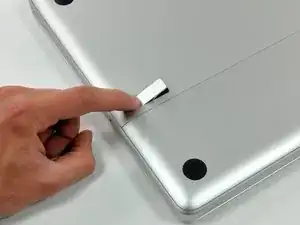
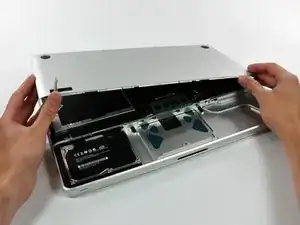
Con il case chiuso, posizionare l'Unibody capovolto su una superficie piatta.
-
Premere il lato scanalato della chiusura di sgancio dello sportello di accesso, affinché sia possibile prendere l'estremità libera con le mani. Sollevare la chiusura di sgancio finché non è in posizione verticale.
-
-
-
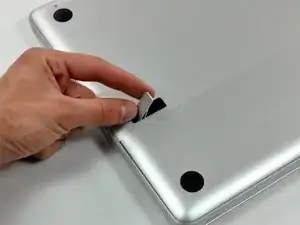
Adesso, lo sportello di accesso dovrebbe essere abbastanza rialzato per sollevarlo e rimuoverlo dall'Unibody.
-
-
-
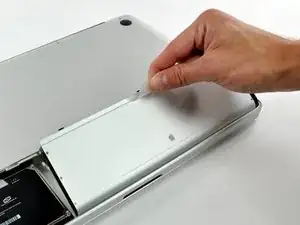
Afferra la linguetta di plastica trasparente e tira la batteria verso l'alto per rimuoverla dall'Unibody.
-
Premendo la chiusura, questa bloccherà la batteria in posizione.
-
-
-
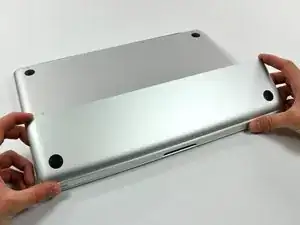
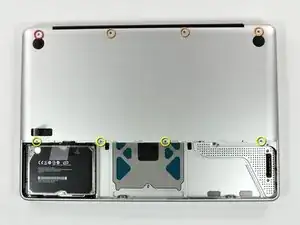
Rimuovere le otto viti seguenti, che fissano il case inferiore al case:
-
Una vite con testa a croce da 5,4 mm.
-
Tre viti con testa a croce da 14 mm.
-
Quattro viti con testa a croce da 3,5 mm.
-
Per riassemblare il tuo dispositivo, seguire queste istruzioni in ordine inverso.

2 commenti
My only comment is that the 00 phillips does not work it requires the #000. I brought my laptop to the hardware store to purchase the correct phillips.
Does anyone know where to get the Four 3.5 mm Phillips screws? It is extremely difficult to find.
Thx
The A1286 has no Access Door.!!
I actually can see no sign of the battery!...
aguib -
I assume you have the newer model, with the built-in battery. It's still removable with tools, but these are the wrong instructions for that model.
lgc90 -
when will there be a guide for the other unibody macbook pro. that does not have an access door?
irishking -
Is there a manual to show, how disasembly the display, i mean, after step 5, to check the display between lcd and aluminiun back case?
Max
Max -
On other guides you state the height of the HD that can be supported, e.g. MacBook Pro 15" Core 2 Duo Model A1211 Hard Drive Replacement , I have read ( but have not confirmed ) that the uni-body MacBook Pro can be fitted with the 750GB and 1TB 12mm drive from Western Digital.
Can you confirm this?
Many thanks in advance.
ahothabeth -
My display and aluminum casing has separated.
I don't know if it just snaps back together or does it need to be glued.
I dropped mine on the carpeted stairs and the display still works.
I'm hoping I can just snap it back together and that no plastic pieces or teeth of the snapping
portion have been broken........
SHerwood Ball -
When you say "left fan" is this "left when looking at the logic board after turning the computer over and looking it up opening it up" or "left when sitting at the computer keyboard and typing on it"?
thvv -
We always use left and right in reference to the computer when you're using it.
Andrew Optimus Goldheart -
Directions were great and the worn dc in board was replaced. The hardest part of the procedure is disconnecting the data display cable. A better description of step 21 is to slide the connector parallel to the circuit board towards the outside corner. Reconnecting correctly took several tries.
I used the tip of the spudger to nudge the corners a little at a time to seat the connector.
The ribbon connector for the keyboard has to be inserted all the way before seating the retaining cap. It took me three tries . First try power button did not work second try numbers keys did not work.
Thanks for the directions ...could not have done it with out them!!!
landryd -
Hola. Poseo un MacBook Pro Late 2008 y debo cambiarle las cornetas. Me sirve unas cornetas de un MBP Late 2011?
jegonzalez80 -
Please read the instructions about removing the bluetooth cable - you CAN work around it, and NOT take off the plug.
kenneth krabat -