Introduzione

Prerequisito interno.

  1. QNuiLQgFkQq4lHQX
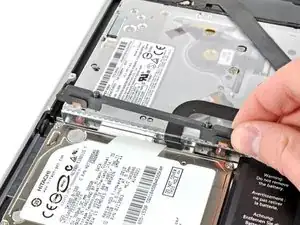
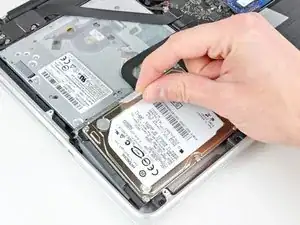
    • Rimuovere le due viti con testa a croce che fissano la staffa del disco rigido al case superiore.

    • Queste viti resteranno nella staffa del disco rigido.

    These were Philips #0 screws in my computer.

    Church Tucker -

    FYI my used Mac didn’t have the bracket or screws. 3D printed the bracket someone did (it’s on Thingiverse), M2x10mm screws were short but worked.

    sbierly -

  2. XoZgBtijMGxLjWhh
    • Rimuovere la staffa del disco rigido.

    • La staffa del disco rigido potrebbe essere fermamente posizionata contro il case superiore.

    Don't miss this step: I almost did and of course couldn't get the disk out until I looked at the video !

    francistasset -

  3. vsRJ1GZKgUr2LdGt
    • Utilizzare l'apposita linguetta per sollevare il disco rigido dal case superiore.

    • Non tentare di rimuovere completamente il disco rigido, poiché è ancora collegato all'apposito cavo.

  4. QIPPI6AGCpJFnMMH
    QIPPI6AGCpJFnMMH
    tgqxo1BVTnH6pBXk
    • Estrarre il cavo del disco rigido dal corpo di quest'ultimo.

    • Rimuovere il disco rigido.

    The hard drive cable is a recalled part on these machines. You may need to replace it before your drive will be read correctly. The Apple Store will replace your cable for free if it's problematic.

    Eric March -

    @emarch wrote "The hard drive cable is a recalled part on these machines. You may need to replace it before your drive will be read correctly. The Apple Store will replace your cable for free if it's problematic."

    Thank you, Eric. This is excellent information. I'm reading this guide because my Mac booted with the flashing 'folder with question mark' icon. It turns out that my drive is no longer recognized internally, but thankfully it works okay through a USB hard drive adapter cable--phew. I read somewhere (on iFixit?) that some have had success by putting two layers of masking tape on the plastic around the data side of the SATA connector on the hard drive; supposedly this improves the fit and contact. I might try this or otherwise replace the cable (c/o Apple or DIY). Thanks again!

    Sean Stewart -

    dont forget to save the torx T6 screws froom your old hard drive and install in your new one if you are replaceing the HDD at the same time

    Charlie -

Conclusione

Per riassemblare il dispositivo, seguire queste istruzioni in ordine inverso.

Andrew Bookholt

585555 Reputazione

0 commenti