Introduzione

  1. LjDLTLrgcTN6NZH2
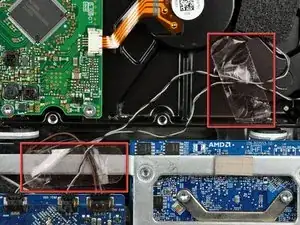
    • Se occorre, rimuovere i pezzi di nastro che fissano i cavi del sensore termico dell'unità ottica o del disco rigido all'iMac.

    Pull the temperature sensor cable for the optical drive well out of the way so you don't trap it when inserting the new hard drive.

    kevinp -

  2. 5tyrG1RUmZlBOdry
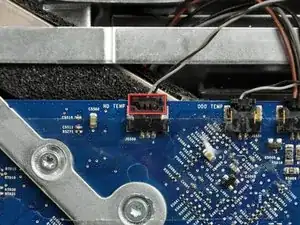
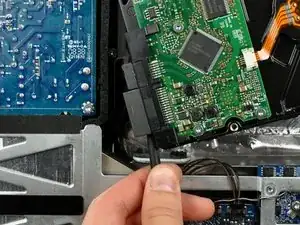
    • Scollegare il sensore termico del disco rigido estraendone il connettore verso la parte superiore dell'iMac.

    • Durante la rimozione del connettore, può essere utile premere con i pollici le linguette sui lati del connettore verso la parte superiore dell'iMac.

    I didn't do this on my 2133; just pushed wires out of the way.

    robgendreau -

    Rather than disconnect this cable, you might as well jump ahead to steps 19-21 and remove the sensor from the drive.

    kevinp -

  3. XARgcgviC4XvCMAa
    XARgcgviC4XvCMAa
    gbSjwbdKZQRXIZCI
    • La pressione della parte superiore della staffa del disco rigido per sbloccarla dal case posteriore richiede una buona dose di forza. Si consiglia di poggiare l'iMac con la staffa rivolta verso il basso su un tavolo per evitare urti e danni.

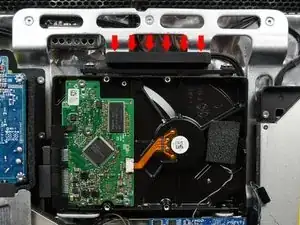
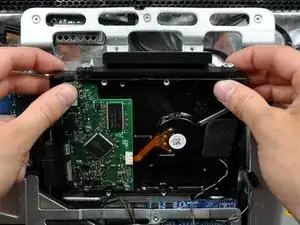
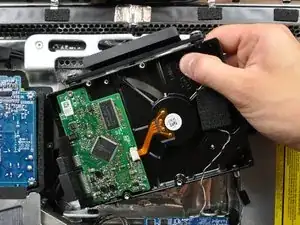
    • Premere la staffa del disco rigido verso il bordo inferiore dell'iMac per liberarla dal case posteriore, quindi ruotare la parte dell'unità verso di sé.

    At first it looked like it needed extra force, rather stand the computer in its stand press the bracket firmly it will come out.

    Great set of instructions altogether!

    Jim Laredo -

    I just braced the foot/stand against my thigh and found there wasn't much force needed. Had to do it twice as I missed the foam pad on the drive I was replacing.

    The whole process was simpler than I expected.

    I seem to have missed something somewhere as I now have a lot more fan activity than before. A missed sensor connection maybe. Not looking forward to tracking it down.

    paul beard -

    I worked with the top of the screen facing me. It was very easy to brace my fingers and press with my thumbs to release the drive. I recommend doing it that way if you can.

    marcintosh -

    I just used pliers….. Easy!

    Dennis Postma -

  4. VMitQPmVMd4qFbyA
    VMitQPmVMd4qFbyA
    42RQbCnZhAmVhvFi
    • Ruotare il disco rigido verso di sé, quindi sollevarlo dai piedini di montaggio.

    • Il disco rigido è ancora collegato mediante i cavi SATA.

    • Durante la reinstallazione del disco rigido, fare attenzione a non premere gli anelli di tenuta in gomma attraverso le aperture del case con i piedini inferiori del disco rigido, poiché per recuperarli potrebbe essere necessario rimuovere la scheda logica.

    During reassembly make sure not to trap the cable for the temperature sensor on the superdrive -- it goes on top of the new hard drive.

    kevinp -

  5. J2JseEWMkmZ2IWZR
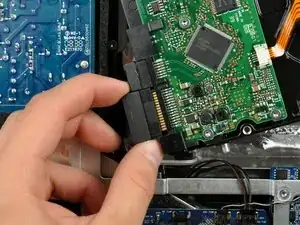
    • Inserire l'estremità piatta di un inseritore fra il connettore del cavo di alimentazione SATA e il bordo del disco rigido.

    • Ruotare l'inseritore per separare il connettore dal disco rigido.

  6. cmr5VJFpvLHAoe2W
    • Estrarre il connettore SATA di alimentazione dal disco rigido.

  7. HrqNAt5KIAqbaXQb
    • Scollegare il cavo dati SATA estraendone il connettore dal disco rigido.

Conclusione

Per riassemblare il dispositivo, seguire queste istruzioni in ordine inverso.

Walter Galan

693762 Reputazione

Un commento

Walter, I was working on a mid-2007 IMac (2133) and found your instructions helpful but not always complete or right. I have added some comments in some of the steps to clarify.

Pablo Guerrero -