Introduzione

Utilizzare questa guida per sostituire l'unità ottica con un secondo disco rigido. Alcuni alloggiamenti delle unità hanno un'altezza di 7 mm, mentre altri di 9,5 mm. In base alle dimensioni dell'alloggiamento dell'unità, potrebbe essere necessario un distanziatore per posizionare correttamente l'SSD.

  1. gvZEpOMtePwK2ret
    • Se la spatola è stata acquistata da iFixit.com, è possibile saltare questo passaggio. Le spatole vendute da iFixit hanno i bordi già sottoposti a molatura.

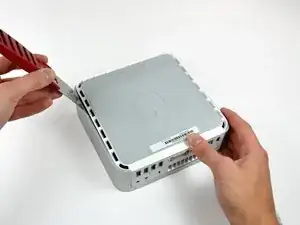
    • Per aprire il case, occorre una spatola. Una spatola sottile da 3,81 cm è l'ideale, tuttavia occorre levigarne il bordo. Strofinare il bordo corto della spatola in avanti e all'indietro su un foglio di carta vetrata a grana grezza (da 100 è ottimale) finché non si ottiene un bordo levigato.

    I used a tool for opening the back of watches to replace the battery (the type that have the non screw-on backs). Worked fine!

    Mike Haines -

    IMHO there are many steps not necessary. The guide is very good but i can't find the reason for steps 7-15. It is all about freeing the internal frame. As far as i know it is enough to remove the antennas and the 4 screws holding the optical drive?!?!

    Markus Obdenbusch -

  2. EbZWLpY2ZIjPMTSJ
    EbZWLpY2ZIjPMTSJ
    mkVCJUNO6TH4BnWS
    EfjjANafnrK6PQJs
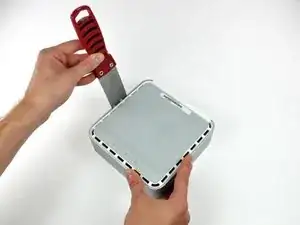
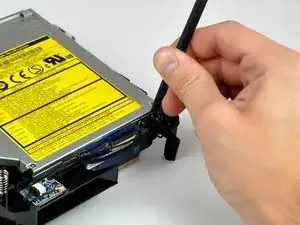
    • Inserire con attenzione una spatola nella fessura fra il coperchio superiore e l'alloggiamento inferiore. Iniziare dal lato sinistro. Premere la lama finché non si avverte una certa resistenza (circa 0,95 cm).

    • Allargare delicatamente la fessura facendo leva sul manico della spatola verso il basso e lontano dal Mac mini.

    • È consigliabile iniziare dal centro e quindi procedere lungo il bordo finché l'alloggiamento inferiore non si sgancia leggermente.

  3. ICQlx2LJIi3i5DWr
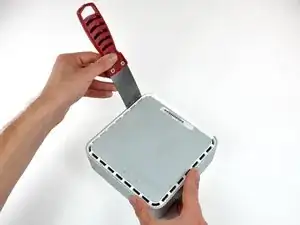
    • A questo punto, inserire la spatola nella fessura sul lato dello slot dell'unità ottica del computer.

    • Far pressione sulla spatola verso il basso, mentre si opera lungo il bordo del Mac mini, finché l'alloggiamento inferiore non si separa ulteriormente da quello superiore.

  4. DVYVrvGA3cTpItRn
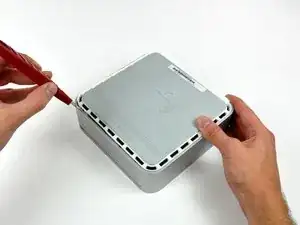
    • Ripetere la medesima procedura indicata nei passaggi precedenti per il lato destro del Mac mini.

    • A questo punto, attorno al perimetro del Mac mini, dovrebbe essere presente una notevole apertura fra gli alloggiamenti superiore e inferiore.

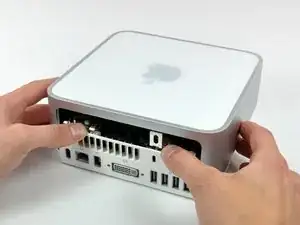
    • Capovolgere il Mac mini.

  5. VPN5xWMbATEaIwmV
    • Sollevare delicatamente l'alloggiamento superiore dal Mac mini e conservarlo altrove.

    • Potrebbe essere necessario inclinare da una parte e dall'altra l'alloggiamento superiore durante il sollevamento da quello inferiore. Se le linguette si bloccano sull'alloggiamento superiore, liberarle mediante la spatola.

    For reassembly, test your Mini before replacing the cover. This could save time, should the test reveal problems.

    Steve -

  6. tesVkqtkctF41qmD
    tesVkqtkctF41qmD
    YbBty6YuxcleAX6r
    TsrDTWhgReCx4LaK
    • Più avanti nella guida, occorrerà rimuovere diverse viti con testa a croce incassate. Di solito, i portapunta sono troppo grandi per entrare negli incassi, pertanto accertarsi di avere a disposizione un cacciavite con testa a croce sottile e con albero.

    • Per prima cosa rimuovere l'antenna AirPort (la più grande delle due), in prossimità del pulsante di alimentazione.

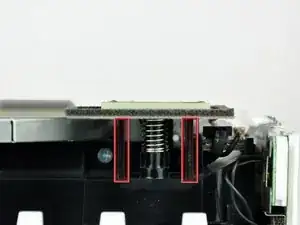
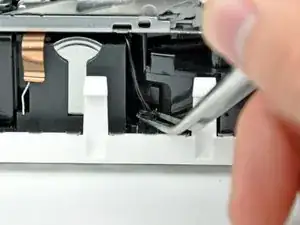
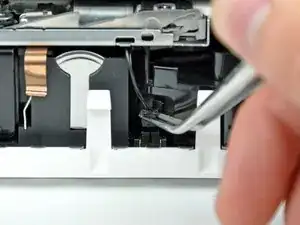
    • Premere leggermente le due linguette di fissaggio l'una verso l'altra e sollevare l'antenna AirPort dal proprio alloggiamento.

    • Premere eccessivamente le due linguette può spezzarle dal telaio interno, pertanto operare delicatamente.

    • Durante la reinstallazione, occorre premere leggermente le due linguette affinché si adattino alle aperture sulla scheda dell'antenna AirPort.

  7. Ne1HrDQvVHbckCOi
    Ne1HrDQvVHbckCOi
    RwZGARKpYRYjrbQO
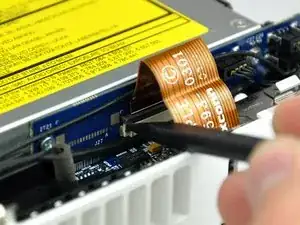
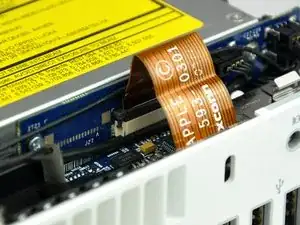
    • Utilizzare la punta di un inseritore per sollevare leggermente il lato sinistro del bloccacavo ZIF dal rispettivo connettore femmina.

    • Il bloccacavo ZIF si solleverà di circa 1 mm per poi arrestarsi. Non tentare di rimuovere completamente il bloccacavo ZIF.

    Now also lift the right side of the ZIF cable lock up from its socket.

    chriZ -

    Good catch of the incomplete unlocking instructions. ;P

    lamarhavard -

    Hmmm... what if I didn't read this before and I removed the cable and the lock sort of broke?... what would happen... would I experience problems? I can still put the cable back in place and push the lock back down with the spudger.

    Dan O -

    Same. I totally removed the lock , the edges are busted and won't stay in place, How can I get the cable to stay? what's the fix?

    Suzanne -

    Dan O & Suzanne, hold the cable in the socket and put a dab of hot glue on both sides, It's non-conductive and should hold...worked for me.

    lamarhavard -

    does any one know, where to get the connector from zhe ZIF Cable?

    someone, that preowned my mac broke the holder!

    julian gmeiner -

    Julian, did you ever find where to get a replacement lock for the Zip Cable. Mine is also broken..

    Suzanne -

    This is not my first memory replacement in a Mini and I got over-confident and stupidly fully removed the audio cable ZIF lock and assumed I had broken something. But, now that I have read this guide more carefully, I am not sure. I sure would love to hear some detailed instructions for putting a ZIF lock back on.

    Is it possible that I have removed it without having broken it? If I have broken it, do I have to buy a new cable? Just a new ZIF lock? A new audio board? This is a 2.0 GHz A1176.

    Thanks!

    GalvanicMacPro -

    Michael, Mine seems to be broken. I bought & tried the Kapton Tape that was suggested & still no sound.

    Suzanne -

    C’est la première que je doit déverrouiller un câble ZIF. Je précise qu’il faut lever à gauche et à droite, ça force un peu, prendre appui sur le boitier du Mac, comme e montre la photo.

    La partie noire reste dans la partie blanche (+1 mm), et la nappe flexible sort par le haut.

    Ludovic -

  8. EKFU6gDpNXCSQnLx
    • Sollevare il cavo piatto della scheda audio dal connettore femmina.

    • Se non si solleva dal connettore, il bloccacavo ZIF non è del tutto sbloccato. Verificare che sia sollevato in modo uniforme di circa 1 mm dal connettore femmina nella scheda di interconnessione.

    As an option to avoid potential damage when disconnecting the cable from the ZIF socket and clip, it is possible to unscrew the audio board and remove it along with the internal frame.

    Nick Baldwin -

  9. 61qvOIM5yqSBSjGd
    61qvOIM5yqSBSjGd
    MEBJfeYqFJgGhfDT
    • Ruotare il Mac mini affinché il meccanismo di caricamento dello slot SuperDrive sia rivolto verso l'utente.

    • Mediante un paio di pinzette, sollevare connettore del cavo del sensore termico del disco rigido dal connettore femmina sulla scheda logica.

    • Prendere il connettore con le pinzette (come indicato nell'immagine), ma non prendere i fili.

    • Il connettore si trova sotto l'apertura dell'unità ottica, accanto alla batteria PRAM.

    Managed to leave this connected by flopping back the drive rather than totally removing

    pglock -

    WATCH OUT!!

    separated one of the wires from the connector very easily. i would have preferred to use a spudger at this step. the tweezers in effect snipped the wire!!

    mklsvg -

    As my experience you should definitely use angeled tweezers as shown in several pictures. To avoid stripped cable deflash sharp edges of the tweezers a little bit. I never experienced problems when using that kind of tool carefully.

    Timpetou -

    I've had to remove a few of these connectors on iBooks and other small Apple devices ... I've found that, with careful and gentle pressure (working first one side and then the other) using a small flat-headed jeweller's screwdriver is best.

    Mike Haines -

    Note where the airport antennae connecting wire comes out from the interior along the top. When reassembling, it has to be routed the same way, or it won't reach its install position.

    robert -

    If your fan runs at high speed after you complete this project, you have forgotten to reconnect the thermal sensor.

    Curt -

  10. NcmfB3WBQrMtDS5h
    NcmfB3WBQrMtDS5h
    NBuQxBTA6wSbupxI
    • Nei prossimi passaggi, verranno rimosse le quattro viti con testa a croce che fissano il telaio interno al case inferiore. Ciascun passaggio comprende un'immagine riepilogativa che mostra la posizione generale e un primo piano sulla vite specifica.

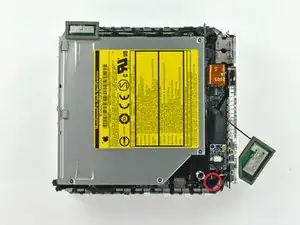
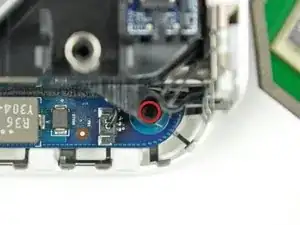
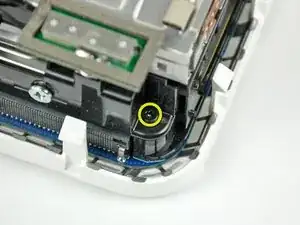
    • Rimuovere la vite con testa a croce incassata accanto al pulsante di alimentazione, che fissa il telaio interno all'alloggiamento inferiore.

  11. mQwsrv5mEdJQTbmE
    mQwsrv5mEdJQTbmE
    tp11nlYvAvPFAPsH
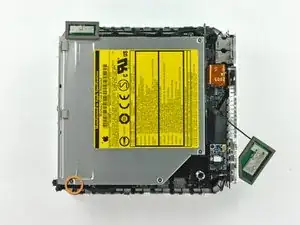
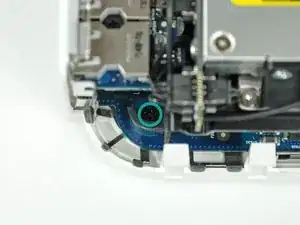
    • Rimuovere la vite con testa a croce incassata accanto alla spia della modalità sospensione, che fissa il telaio interno all'alloggiamento inferiore.

    • Delle quattro viti che fissano il telaio interno al case inferiore, questa è la lunga.

  12. 1qgIwm2POlMG5yqD
    1qgIwm2POlMG5yqD
    5vJl6xw6NFLCPtJV
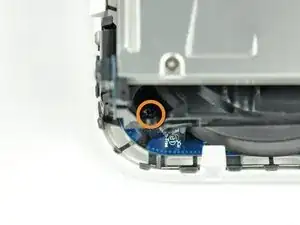
    • Rimuovere la vite con testa a croce dal telaio interno, in prossimità dell'antenna Bluetooth.

    Before removing any of these screws, there is another step needed which is not here:

    On the front of the optical drive, right side as you look at the slot-load, is a small blue board attached by a single black screw. This needs to be removed before the optical drive can be taken out.

    Mike Haines -

  13. mVrcohFF2qth5QAR
    mVrcohFF2qth5QAR
    4CIKANIBUuqghOGF
    • Rimuovere la vite con testa a croce accanto alle porte audio, che fissa il telaio interno al case inferiore.

    On reassembly, if you don't have a magnetic screwdriver, a tiny dab of grease at the tip of your screwdriver will help hold the screw on the driver so you can lower it into the recessed slot.

    pfbloom -

  14. CRHKcyOC23ZtADxD
    CRHKcyOC23ZtADxD
    xjktCYpDfSWnZWGd
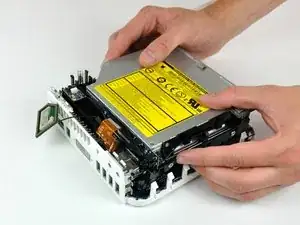
    • Sollevare delicatamente il telaio interno dall'alloggiamento inferiore, facendo attenzione a non incastrare il cavo dell'antenna AirPort o altri cavi.

    • Potrebbe essere necessario tirare in prossimità della scheda di interconnessione per la separazione dalla scheda logica.

    At this point be careful that you don't pull out the Airport antenna ... but if you do, just check that it is back before re-assembling.

    Mike Haines -

    During re-assembly, the internal frame has to go in at an angle ... the back of the optical drive goes in first.

    This means that you can seat the fan cover correctly, but more importantly, there is an interconnect board on the back of the optical drive that must be firmly pushed back into its housing on the logic board.

    Mike Haines -

    Reassembly: Before slipping the main frame back into its place, refer to earlier photos, ensuring proper routing of the WiFi cable.

    Steve -

    If, like me, you pull the wire on the airport antenna free, it snaps back into place easily. The connector is on the extra card screwed to the motherboard that looks like it has a phone battery embedded in it. The connector is at the top of the 'battery'. This accessory card is the wifi card, so it makes sense that the antenna plugs onto this.

    Dan -

  15. QuBMPeiM6GEeGNWZ
    • È possibile rimuovere l'antenna Bluetooth semplicemente sollevandola dal telaio interno.

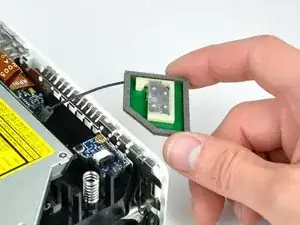
    • Rimuovere l'antenna Bluetooth dal telaio interno premendo entrambi i lati della scheda il più vicino al centro possibile.

    • L'operazione potrebbe richiedere della forza.

    I tried using quite a bit of force and still this board would not come free. In the end I didn't remove it and found I could do the repair without removing it!

    Mike Haines -

    use tweezers at other side to clamp and push the whitestud trough, otherwise you might brake it

    joost -

    I left this piece in place and the optical drive wiggled around it. I applied as much force as I was comfortable with and I did not want to break the Blue Tooth antenna. This was a good work around and did not cause much if any trouble removing the old drive or placing the new drive into the computer.

    sikkingj -

    Comme le dit Mike, l’antenne est un peu dure à enlever. Elle peut être laisée en place, à l’étape 20, lever le lecteur par le coin opposé à la carte d’interconnexion, pour extraire le lecteur par l’avant.

    Ludovic -

  16. AbS1Bbsa5KUqSEom
    • Rimuovere le due viti con testa a croce che fissano l'unità ottica al telaio interno.

    A Phillips #0 is definitely required for this!

    Javier Campos Delgado -

  17. MnZYmCjWj4igkETX
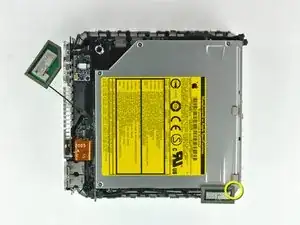
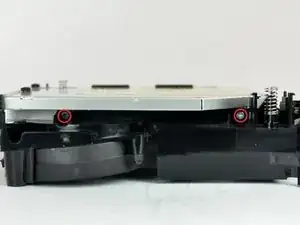
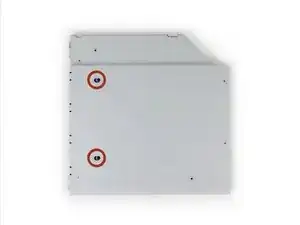
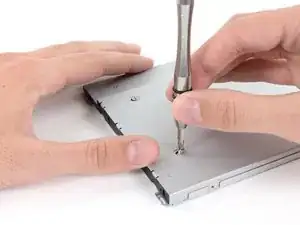
    • Ruotare il Mac mini di 180 gradi e rimuovere le due viti con testa a croce che fissano l'unità ottica al telaio interno sull'altro lato.

  18. vcJ6EwqO6hiOIj6m
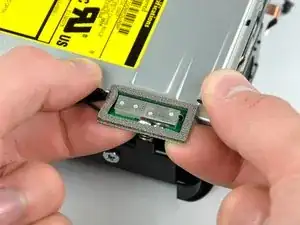
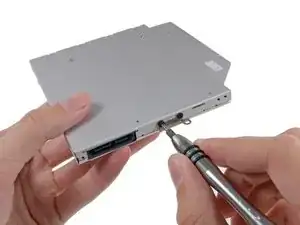
    • Rimuovere le due viti con testa a croce che fissano la scheda di interconnessione all'unità ottica.

  19. 1SXXMS4gyWE5rJah
    • Mediante l'estremità piatta di un inseritore, separare la scheda dall'unità ottica.

  20. FPCNttPMWvcnm4bZ
    • Sollevare l'unità ottica dal telaio interno.

  21. WPcg6hfCMkTtjj2Q
    WPcg6hfCMkTtjj2Q
    ACPTZX2IFKQ1K4WT
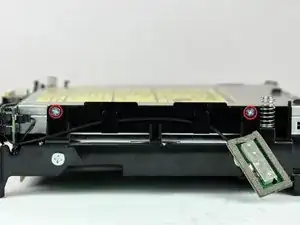
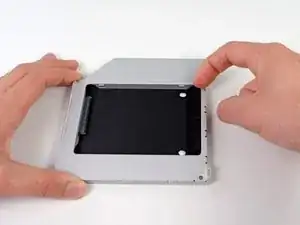
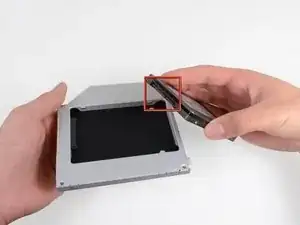
    • Rimuovi il distanziale di plastica dal case del disco rigido nell'alloggiamento dell'unità ottica premendo una delle clip poste da ciascun lato e sollevandolo dal case.

    is it 9,5mm or 12,7mm for the caddy? My stuff macbook pro mid 2010, need advice what size is compatible. Thank you

    Adi Purba -

    All Macbooks use 9.5mm Optical Drive Caddy, also, If you’re wondering as well, the Optical Drive runs at SATA II speeds just like with the main hard drive area, so if you’re using a SSD, then it’s going to run at a slightly slower speed.

    - PS5iscool - -

  22. NLZqqjQlYQPglXyI
    NLZqqjQlYQPglXyI
    xMhBlQkNdV4PwSMS
    UeALDwtY1rY2dJX4
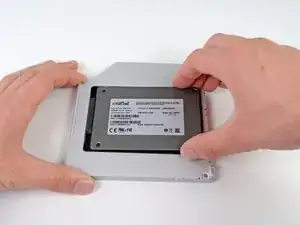
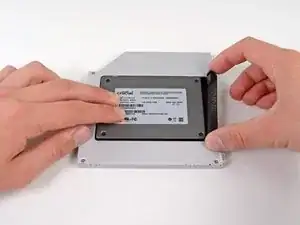
    • Verifica che i connettori del disco rigido siano rivolti verso il basso prima di posizionarlo nel case.

    • Posiziona il disco rigido delicatamente nell'apposito slot del case.

    • Tenendo saldamente il case in posizione con una mano, premi con l'altra il disco rigido nei connettori del case.

    Okay it seems like some models of MacBook Pro have issues with a fast (6Gbit/s) SSD in the optical bay. Even though my Mac says it offers 6Gbit on both bays it simply didn't work in the optical bay. So I switched places between the two drives and everything seems to work. My Mac booted from the old HDD in optical bay automatically and then I cloned it afterwards and changed the startup disk to the new one. As said before, don't put a fast SSD in the optical bay!

    Carl -

    This is an extremely late response to an old comment, but… whatev’s. My 2011 MacBook Pro had that issue: the main (HDD bay) SATA operated at 6Gbit, and while the optical bay said it was 6Gbit, the “Negotiated Link Speed” was like 1.5Gbits regardless of what you put in it (I can understand 1.5Gbits for an optical drive, but not for an SSD). Some of the early 2012 models did the same thing, from what I understand, but that was corrected pretty early on; both my 13” and 15” 2012’s run at 6Gb/s on both SATA busses.

    AJH -

    It’s not wise to swop the optidrive for an HD as there is no physical protection. The caddy is only intended for an SSD.

    Ben Ormerod -

  23. 4bUrYFHS5udDCnIj
    4bUrYFHS5udDCnIj
    Ayxd2pXAkaRgHAFN
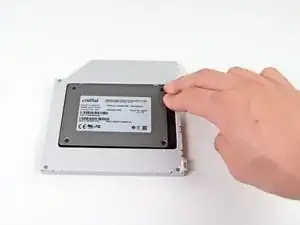
    • Una volta agganciato il disco rigido, reinserisci il distanziale di plastica tenendo il disco premuto contro la parte inferiore del case.

    Normally with the HD enclosure there come a set of screws. use these to screw down the HD in the enclosure since you need to flip it up side down to reinstall it into the MBP

    Bart -

  24. oXd3ohEWeSgsIcWE
    oXd3ohEWeSgsIcWE
    QionNQlc1ANtll4c
    • Fissa l'unità al case con due viti con testa a croce Phillips #1.

    Where are these screws coming from? Were they part of the original optical drive?

    Bradley DeHerrera -

    The new enclosure should include these two Phillips screws.

    Sam Omiotek -

    Can someone show the step of removal process of hdd/SSD placed in the caddy? I am unable to revert this process. Do we have to apply back greater force to remove back the hard drive/SSD from the caddy?

    Tarun Kumar Verma -

    Gads, I wish they made a caddy where the optical drive was removable without having to remove the entire caddy. That is a major peeve of mine. Like… just mount it the other way! I don’t want to have to go through this entire process every time I upgrade the secondary drive.

    AJH -

    These screws seems to be located in different places on different enclosures. I had serious trouble getting the SSD that the previous owner of this MacBook installed out of the enclosure until I realized the screws holding the SSD in place were on the side and not on the bottom. In case anyone else has the same issue!

    nessie1001 -

  25. wULpD1PuEZU6bo1R
    • Collega la staffa dell'unità ottica al nuovo case mediante due viti con testa a croce Phillips #0.

    • Ricollega tutti i cavi rimossi dall'unità ottica originale nel case dell'alloggiamento ottico.

    Replaced the optical with hdd, as well as replaced the hard drive with an ssd. Now I get the circle with a line through it. But, when I hold the option key down, it gives me both hard drives, PLUS, the thumb drive I have in the USB port with a Mountain Lion installer. It even shows the recovery disks, but gives me the circle with the line when I choose one. Any help is appreciated.

    claude -

    Mate,

    My mbp shipped with OS 10.8, and I had upgraded twice to 10.10

    I've a 10.7 USB which upgraded my old MBP.

    My plan today was to boot with my new ssd, my time machine back up and the Lion usb plugged in.

    I would then click on the Lion usb, and tell it to put the OS and time machine back up on the ssd.

    So I help down ALT and when it started it gave me the options of the usual Mac internal or the Lion USB.

    I clicked Lion, but instead of taking me to the install options (Disk utility, restore from time machine etc etc) it gave me that grey circle with a diagonal line through it. The no entry sign - grey on grey - that I think you have.

    Some googling said that it is because I was trying to usb a 10.7 install on a MBP that shipped 10.8

    You can't go back, apparently.

    So if any of the OSs are older than the mac you got, you will get this error. The grey in grey no entry.

    I just cloned my HDD to my ssd (Carbon copy cloner free 30 day trial) using an external stat-usb3 wire and all is good.

    Rory -

    I have a 17" Macbook Pro6,1 unibody with an Intel Core i5, 2.53GHz. I was successful installing a 250GB SSD in the DVD bay, and I'm able to boot from it. I did this by first installing OS X 10.9.4 on the SSD mounted into an external HD case, testing the system to see if it would boot up into the SSD, then installing the SSD and carrier in the DVD drive bay. The system now boots up from the SSD with no problems. If you are having installation problems, I recommend trying this method.

    roger hall -

    I just have finished installing second SSD to my MBP (unibody 15` 2010).

    First one was changed like one year ago. Samsung 500GB SSD. It is in my HDD bay and I'm running system from it.

    Today I put a new Samsung 1TB 850 Evo 1 SSD in to my optic bay.

    I encounter problem with SSD not recognized by Finder.

    But It was recognized by Disk Utility.

    What I did was I erase new SSD by Disk Utility. Then the new partition was created and now It has been seen by Finder.

    So If you see it in Disk Utility just erased it.

    Some extra info in under this link--> https://discussions.apple.com/docs/DOC-4...

    Wish you all luck :)

    rybafly -

    My installation went great thanks to the guide. I did notice a small thing that might make a good tip, and that is to inspect all the visible screws. I saw one that was slightly raised, and when I poked around with the spudger, I found 2 more that had worked themselves out a bit. Its probably something super rare but at the age of these things, it wouldn't hurt to check.

    Tineyi Chapisa -

  26. 3GeKNgsubSw2qWpF
    3GeKNgsubSw2qWpF
    YDaOtdHe4DPnEmIx
    fWvjh13qskVLHsiF
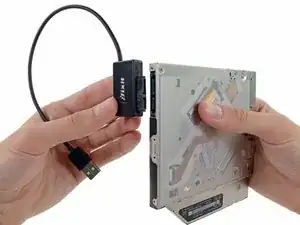
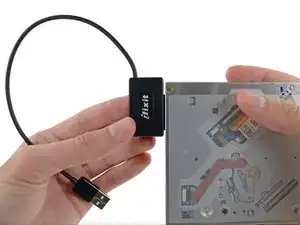
    • Non buttare via questo disco! Puoi ancora usare l'unità ottica esternamente con l'aiuto del nostro cavo USB per Unità Ottica SATA.

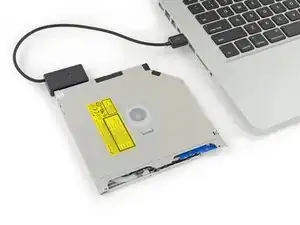
    • Allinea la spina del cavo SATA con la presa sull'unità e connettila bene.

    • Collega il connettore USB al tuo portatile e la tua unità ottica è pronta all'uso.

    There is a small metal button in the front of the drive and you can use that to eject the drive if you were wondering.

    Joseph Landry -

    Maybe that explain the eject button mechanism maybe….

    - PS5iscool - -

    Die neue SSD wurde durch das Laufwerk ersetzt aber leider wird jetzt die alte HDD nicht mehr erkannt. Hatte schon ein anderer das Problem?

    Alexander Richter -

Conclusione

Per riassemblare il dispositivo, seguire queste istruzioni in ordine inverso.

Brittany McCrigler

Membro da: 05/03/12

88905 Reputazione

6 commenti

Is there any drivers or anything that needs to be done on the Mac itself to install this hard drive? Can you use this hard drive to install applications onto as well?

Nathan -

Here's something important to be aware of. DVD Player will not function without a physical dvd drive installed. This is even if you use DVD image files, which I do. The explanation I got is that without that optical drive DVD Player can't check regions. If you want to watch DVDs on your mac mini, even DVD image files, don't remove the optical drive.

Bob Church -

Or, if you want to play dvd files just use vlc player... if vlc can't play it, it can't be played.

cort -

Just added a 500 gig HD I had laying around to a 2007 Mac Mini I got on eBay.....worked like a charm. Thanks iFixit!

Alexsander Jevtich -

although my optical bay hard drive enclosure did not use or have the bracket shown above with two Phillips #0 screws. And the hard drive had a different attachment system. The screws did not come in from the bottom. They came in from the side....no matter still a great solution.

Alexsander Jevtich -

I tried to open up the bottom of the mac mini but, I ended up with a bent pry tool

Alden Hughes -