Introduzione

L'aggiunta di un secondo SSD nel computer portatile offre diversi vantaggi, fra cui velocità più elevate, maggiore spazio di archiviazione e la possibilità di installare nuovi software senza problemi. Utilizzare questa guida per eseguire l'installazione mediante un case per disco rigido nell'alloggiamento ottico. Alcuni alloggiamenti delle unità hanno un'altezza di 7 mm, mentre altri di 9,5 mm. In base alle dimensioni dell'alloggiamento dell'unità, potrebbe essere necessario un distanziatore per posizionare correttamente l'SSD.

  1. YkoEfqbWbrNPgNSB
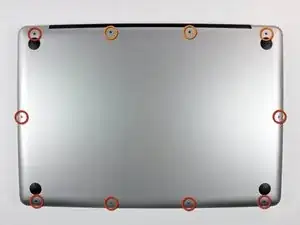
    • Rimuovi le dieci viti seguenti, che fissano il case inferiore a quello superiore:

    • Sette viti con testa a croce da 3 mm.

    • Tre viti con testa a croce da 13,5 mm.

  2. KmDGlwcxPu6ph3sm
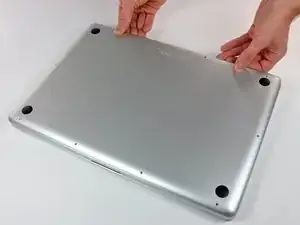
    • Solleva con entrambe le mani il case inferiore in prossimità della presa d'aria per estrarre le due levette di fissaggio al case superiore.

    • Rimuovi il case inferiore e mettilo da una parte.

  3. LHeE6iVx3STyDO3D
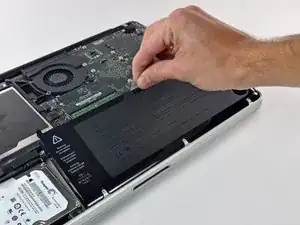
    • La batteria è fissata al case superiore mediante tre viti Pentalobe a cinque punte. È possibile rimuoverle mediante questo apposito cacciavite.

    • Se non haui un cacciavite Pentalobe, puoi usare un normale cacciavite a taglio da 1,5 mm. Verifica che la testa del cacciavite piatto si inserisca fermamente fra due delle cinque punte della testa della vite prima di iniziare a svitare, altrimenti rischi di spanare la testa della vite.

    • Se la punta del cacciavite si muove troppo nella testa della vite, prima di procedere prova punte più grandi finché non si inseriscono senza gioco.

    • Non occorre necessariamente seguire i passaggi da 3 a 7 per rimuovere la batteria per sostituire il disco rigido. Tuttavia, si consiglia di rimuovere tutte le fonti di alimentazione dai componenti elettronici prima di operare su di essi.

    It really depends on how thick the 1.5 mm flathead screwdriver is. I tried a low-cost tool and almost destroyed the screw. So be carefull

    Paul -

    Unfortunately, when I added a second hard drive via these instructions, all went well but Bluetooth is now MIA. Can anyone help?

    Peter Payne -

    I agree...

    I have bought a used MacBook Pro, when problems arise, opening Corps was trying to turn the screw, but with poor quality could not turn a screwdriver, only to ruin the screw. Try to buy ifixit Screwdriver set. Good luck to all and thank you ifixit team for such assistance as ifixit.com. Thank you.

    remjok -

  4. xGAhgZZyYYcDTHGa
    • Rimuovi le due viti di sicurezza Pentalobe esposte lungo il bordo superiore della batteria.

    The screws holding my battery were all worn out since an earlier removal. So instead of ruining them even more I put some saran wrap on the tip of my pentalobe driver and gently unscrewed them.

    magnus -

    I have a problem with these screw. They a completly warn and I need some new ones to fix the new Battery.

    Does anyone know which thread it is and which length?

    alexanderleith -

  5. Cu1rp51DpHW16GLl
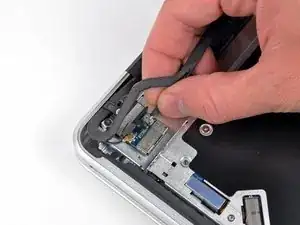
    • Usa la punta di uno spudger per piegare all'indietro l'aletta dell'adesivo che avverte di non rimuovere la batteria "Warning: Do not remove the battery" mentre rimuovi le viti Pentalobe nascoste sotto.

  6. QphNb6fJqTBD2cYF
    QphNb6fJqTBD2cYF
    cdkwbvUvHl3QeCJg
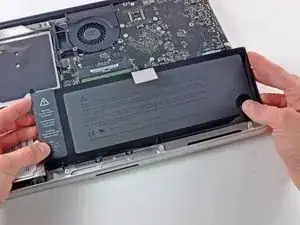
    • Solleva la batteria tirandola dalla linguetta di plastica e falla scorrere lontano dal bordo lungo del case superiore.

    • Non tentare ancora di rimuovere completamente la batteria.

  7. BQ1JtoRMPS3hs3VU
    • Inclina la batteria all'indietro quanto basta per rendere accessibile il connettore del cavo della batteria.

    • Tira via il connettore del cavo della batteria dallo zoccolo sulla scheda logica e rimuovi la batteria dal case superiore.

    • Se stai installando una nuova batteria, dovresti calibrarla non appena è possibile.

  8. Zh2pOnMrAV5iCHcJ
    • Attaccata alla scheda logica c'è una piccola striscia di plastica con adesivo su un lato per bloccare nella sua sede il connettore del cavo della fotocamera. Nel rimuoverla, assicurati di non danneggiare alcun componente della scheda logica.

    • Tieni ferma con un dito la parte finale del fermacavo mentre usi la punta di uno spudger per sollevare lievemente l'altra estremità e ruotala allontanandola dal connettore del cavo della fotocamera.

    I tried to move the plastic piece, but it seemed risky for someone with no experience like me. It was not hard at all to just peel off the camera cable without messing with the connector, and then, carefully take the optical drive out.

    joaquingoyret -

    Totally agree. Optical drive is easily removed by peeling off camera cable

    John Doyle -

  9. TVvjKBOcMbINxlyB
    • Scollega il cavo della fotocamera tirando fuori la spina dalla presa sulla scheda logica.

    • Tira il connettore parallelamente alla superficie della scheda logica, e non verso l'alto.

  10. Kqd3ZeFOJnDD6Crc
    • Stacca il cavo della fotocamera dall'adesivo che lo fissa all'unità ottica.

  11. IjPEwiE5RtYYvu6j
    IjPEwiE5RtYYvu6j
    viDidjS6wPXYvPkm
    • Questo passo è necessario solo se hai un display antiriflesso. Se hai un display lucido, salta questo passo.

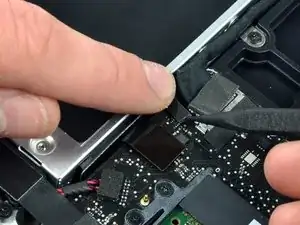
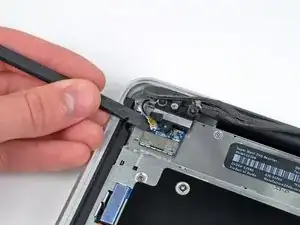
    • Collega il cavo Bluetooth tirando fuori la spina dalla presa.

    • Tira il connettore parallelamente alla superficie della scheda logica, non verso l'alto.

    • Usa l'estremità piatta di uno spudger per staccare il cavo dell'antenna Bluetooth dalla sua presa sulla scheda.

  12. YMdXj5NiEBXYWBub
    YMdXj5NiEBXYWBub
    ZOP3GRxTDkMLKIPW
    • Questo passo è necessario solo se hai un display antiriflesso.

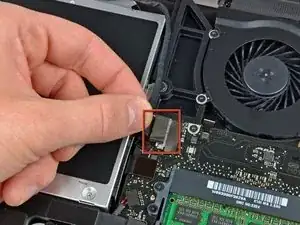
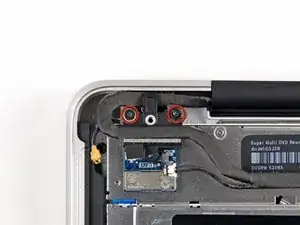
    • Rimuovi le due viti a croce Phillips da 8 mm che fissano al case superiore il fermacavi del cavo Bluetooth/fotocamera.

    • Una delle viti potrebbe rimanere bloccata nel cablaggio di terra del cavo Bluetooth/fotocamera. Se stai sostituendo il display, assicurati di trasferire questa vita sul nuovo componente.

    • Solleva dal case superiore il gruppo schedina Bluetooth/fermacavo.

  13. U21dsKeHTKvIqVlp
    • Usa uno spudger per staccare il connettore dell'unità ottica dalla scheda logica.

  14. SJJW4cbZDsljflPq
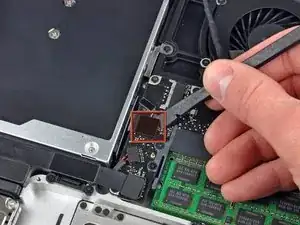
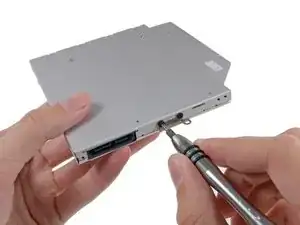
    • Rimuovi le tre vite a croce Phillips da 3,5 mm che fissano l'unità ottica al case superiore.

  15. 6hu2sKTENrPKhgqq
    6hu2sKTENrPKhgqq
    eIstg4xvNpaSxdWx
    • Solleva il lettore ottico dal suo lato sinistro e tiralo fuori dal computer.

    • In fase di rimontaggio, accertati che il cavo SATA non rimanga schiacciato sotto la scheda logica.

  16. KVTEiPkQZkOWbCZP
    • Stacca il connettore del cavo dell'unità ottica.

  17. k1WEGVTIJVdmQTWM
    • Rimuovi il cavo del drive ottico tirandolo via direttamente dall'unità ottica.

    • Nel caso ci siano un CD o un altro oggetto incastrati nel drive ottico, abbiamo una guida di riparazione del drive ottico.

  18. Bx2jvDGErdaFmktm
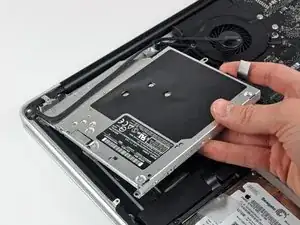
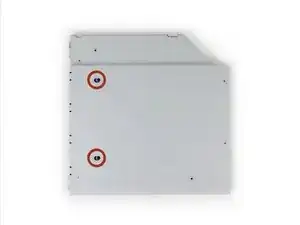
    • Rimuovi le due viti a croce Phillips #0 che fissano la piccola staffa metallica di supporto. Trasferisci questa staffa sulla nuova unità ottica o sul case esterno per hard drive.

  19. WPcg6hfCMkTtjj2Q
    WPcg6hfCMkTtjj2Q
    ACPTZX2IFKQ1K4WT
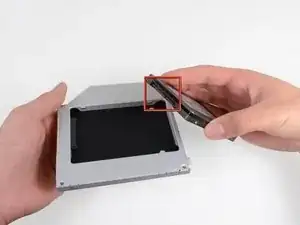
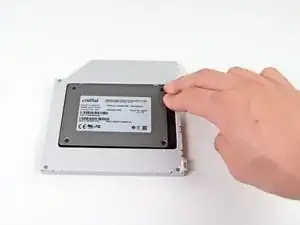
    • Rimuovi il distanziale di plastica dal case del disco rigido nell'alloggiamento dell'unità ottica premendo una delle clip poste da ciascun lato e sollevandolo dal case.

    is it 9,5mm or 12,7mm for the caddy? My stuff macbook pro mid 2010, need advice what size is compatible. Thank you

    Adi Purba -

    All Macbooks use 9.5mm Optical Drive Caddy, also, If you’re wondering as well, the Optical Drive runs at SATA II speeds just like with the main hard drive area, so if you’re using a SSD, then it’s going to run at a slightly slower speed.

    - PS5iscool - -

  20. NLZqqjQlYQPglXyI
    NLZqqjQlYQPglXyI
    xMhBlQkNdV4PwSMS
    UeALDwtY1rY2dJX4
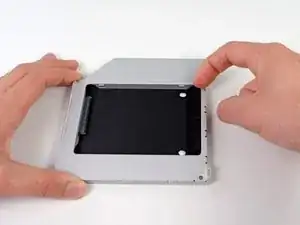
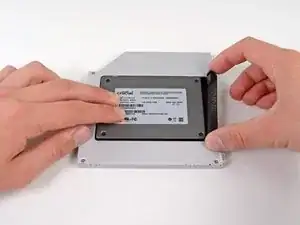
    • Verifica che i connettori del disco rigido siano rivolti verso il basso prima di posizionarlo nel case.

    • Posiziona il disco rigido delicatamente nell'apposito slot del case.

    • Tenendo saldamente il case in posizione con una mano, premi con l'altra il disco rigido nei connettori del case.

    Okay it seems like some models of MacBook Pro have issues with a fast (6Gbit/s) SSD in the optical bay. Even though my Mac says it offers 6Gbit on both bays it simply didn't work in the optical bay. So I switched places between the two drives and everything seems to work. My Mac booted from the old HDD in optical bay automatically and then I cloned it afterwards and changed the startup disk to the new one. As said before, don't put a fast SSD in the optical bay!

    Carl -

    This is an extremely late response to an old comment, but… whatev’s. My 2011 MacBook Pro had that issue: the main (HDD bay) SATA operated at 6Gbit, and while the optical bay said it was 6Gbit, the “Negotiated Link Speed” was like 1.5Gbits regardless of what you put in it (I can understand 1.5Gbits for an optical drive, but not for an SSD). Some of the early 2012 models did the same thing, from what I understand, but that was corrected pretty early on; both my 13” and 15” 2012’s run at 6Gb/s on both SATA busses.

    AJH -

    It’s not wise to swop the optidrive for an HD as there is no physical protection. The caddy is only intended for an SSD.

    Ben Ormerod -

  21. 4bUrYFHS5udDCnIj
    4bUrYFHS5udDCnIj
    Ayxd2pXAkaRgHAFN
    • Una volta agganciato il disco rigido, reinserisci il distanziale di plastica tenendo il disco premuto contro la parte inferiore del case.

    Normally with the HD enclosure there come a set of screws. use these to screw down the HD in the enclosure since you need to flip it up side down to reinstall it into the MBP

    Bart -

  22. oXd3ohEWeSgsIcWE
    oXd3ohEWeSgsIcWE
    QionNQlc1ANtll4c
    • Fissa l'unità al case con due viti con testa a croce Phillips #1.

    Where are these screws coming from? Were they part of the original optical drive?

    Bradley DeHerrera -

    The new enclosure should include these two Phillips screws.

    Sam Omiotek -

    Can someone show the step of removal process of hdd/SSD placed in the caddy? I am unable to revert this process. Do we have to apply back greater force to remove back the hard drive/SSD from the caddy?

    Tarun Kumar Verma -

    Gads, I wish they made a caddy where the optical drive was removable without having to remove the entire caddy. That is a major peeve of mine. Like… just mount it the other way! I don’t want to have to go through this entire process every time I upgrade the secondary drive.

    AJH -

    These screws seems to be located in different places on different enclosures. I had serious trouble getting the SSD that the previous owner of this MacBook installed out of the enclosure until I realized the screws holding the SSD in place were on the side and not on the bottom. In case anyone else has the same issue!

    nessie1001 -

  23. wULpD1PuEZU6bo1R
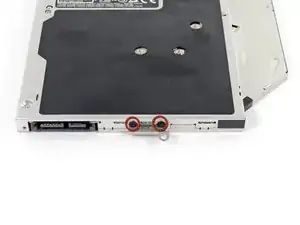
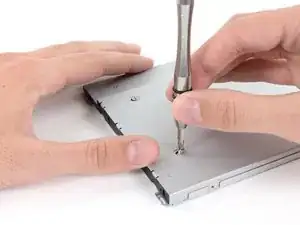
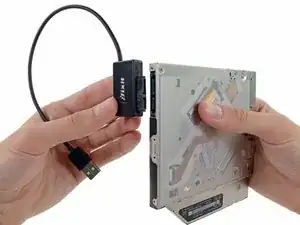
    • Collega la staffa dell'unità ottica al nuovo case mediante due viti con testa a croce Phillips #0.

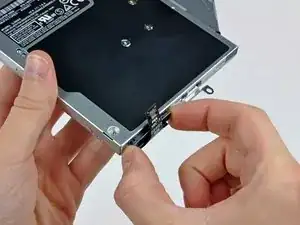
    • Ricollega tutti i cavi rimossi dall'unità ottica originale nel case dell'alloggiamento ottico.

    Replaced the optical with hdd, as well as replaced the hard drive with an ssd. Now I get the circle with a line through it. But, when I hold the option key down, it gives me both hard drives, PLUS, the thumb drive I have in the USB port with a Mountain Lion installer. It even shows the recovery disks, but gives me the circle with the line when I choose one. Any help is appreciated.

    claude -

    Mate,

    My mbp shipped with OS 10.8, and I had upgraded twice to 10.10

    I've a 10.7 USB which upgraded my old MBP.

    My plan today was to boot with my new ssd, my time machine back up and the Lion usb plugged in.

    I would then click on the Lion usb, and tell it to put the OS and time machine back up on the ssd.

    So I help down ALT and when it started it gave me the options of the usual Mac internal or the Lion USB.

    I clicked Lion, but instead of taking me to the install options (Disk utility, restore from time machine etc etc) it gave me that grey circle with a diagonal line through it. The no entry sign - grey on grey - that I think you have.

    Some googling said that it is because I was trying to usb a 10.7 install on a MBP that shipped 10.8

    You can't go back, apparently.

    So if any of the OSs are older than the mac you got, you will get this error. The grey in grey no entry.

    I just cloned my HDD to my ssd (Carbon copy cloner free 30 day trial) using an external stat-usb3 wire and all is good.

    Rory -

    I have a 17" Macbook Pro6,1 unibody with an Intel Core i5, 2.53GHz. I was successful installing a 250GB SSD in the DVD bay, and I'm able to boot from it. I did this by first installing OS X 10.9.4 on the SSD mounted into an external HD case, testing the system to see if it would boot up into the SSD, then installing the SSD and carrier in the DVD drive bay. The system now boots up from the SSD with no problems. If you are having installation problems, I recommend trying this method.

    roger hall -

    I just have finished installing second SSD to my MBP (unibody 15` 2010).

    First one was changed like one year ago. Samsung 500GB SSD. It is in my HDD bay and I'm running system from it.

    Today I put a new Samsung 1TB 850 Evo 1 SSD in to my optic bay.

    I encounter problem with SSD not recognized by Finder.

    But It was recognized by Disk Utility.

    What I did was I erase new SSD by Disk Utility. Then the new partition was created and now It has been seen by Finder.

    So If you see it in Disk Utility just erased it.

    Some extra info in under this link--> https://discussions.apple.com/docs/DOC-4...

    Wish you all luck :)

    rybafly -

    My installation went great thanks to the guide. I did notice a small thing that might make a good tip, and that is to inspect all the visible screws. I saw one that was slightly raised, and when I poked around with the spudger, I found 2 more that had worked themselves out a bit. Its probably something super rare but at the age of these things, it wouldn't hurt to check.

    Tineyi Chapisa -

  24. 3GeKNgsubSw2qWpF
    3GeKNgsubSw2qWpF
    YDaOtdHe4DPnEmIx
    fWvjh13qskVLHsiF
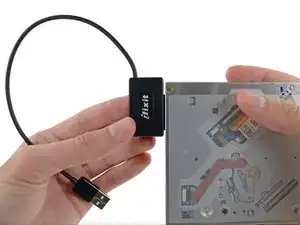
    • Non buttare via questo disco! Puoi ancora usare l'unità ottica esternamente con l'aiuto del nostro cavo USB per Unità Ottica SATA.

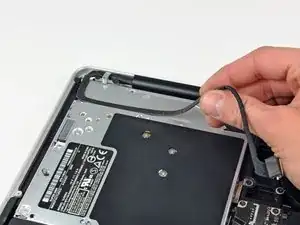
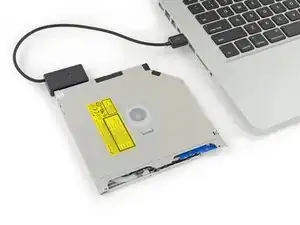
    • Allinea la spina del cavo SATA con la presa sull'unità e connettila bene.

    • Collega il connettore USB al tuo portatile e la tua unità ottica è pronta all'uso.

    There is a small metal button in the front of the drive and you can use that to eject the drive if you were wondering.

    Joseph Landry -

    Maybe that explain the eject button mechanism maybe….

    - PS5iscool - -

    Die neue SSD wurde durch das Laufwerk ersetzt aber leider wird jetzt die alte HDD nicht mehr erkannt. Hatte schon ein anderer das Problem?

    Alexander Richter -

Conclusione

Per riassemblare il dispositivo, seguire queste istruzioni in ordine inverso.

Brittany McCrigler

Membro da: 05/03/12

88905 Reputazione

Un commento

Well, actually a question.

Reading the parts list for this project, I find FOUR different drives -- 2 hybrid, 2 SSD -- that I will be installing. Is that correct, or have I misinterpreted something about these components?

Nicky -