Introduzione

L'aggiunta di un secondo SSD nell'iMac offre diversi vantaggi, fra cui velocità più elevate, maggiore spazio di archiviazione e la possibilità di installare nuovi software senza problemi. Utilizzare questa guida per eseguire l'installazione mediante un case per disco rigido nell'alloggiamento ottico.

  1. LL6ZKkaC1k3fjQpN
    LL6ZKkaC1k3fjQpN
    JFgfEOMMil6Wa6MI
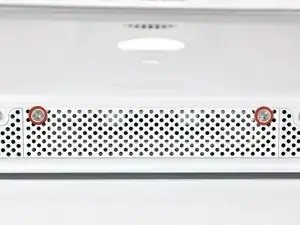
    • Allentare le due viti con testa a croce che fissano lo sportello di accesso all'iMac.

    • Entrambe le viti restano all'interno dello sportello di accesso.

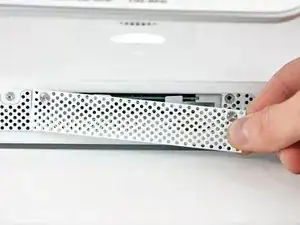
    • Rimuovere lo sportello di accesso.

  2. BMJL1RwW1UZLer3v
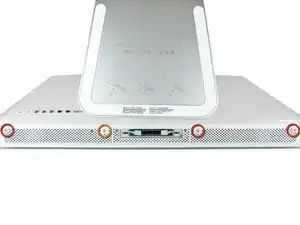
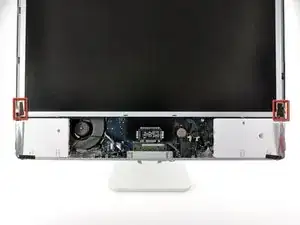
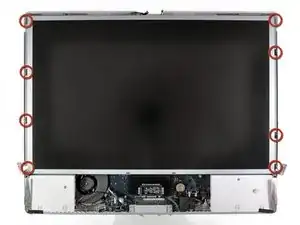
    • Rimuovere le viti seguenti lungo il bordo inferiore dell'iMac:

    • Tre viti Torx T8 da 6 mm

    • Una vite Torx T8 da 8 mm

    My iMac had four 6mm T8 Torx screws (so not one 8mm screw)

    floor -

    My late 2006 iMac24 also has only 4, 6mm long T8 screws here.

    JC Gidley -

  3. y5CssgvFJhbaVMYI
    y5CssgvFJhbaVMYI
    drlImZCRxMNH1lyG
    • Poggiare l'iMac dal lato della staffa su una superficie piatta.

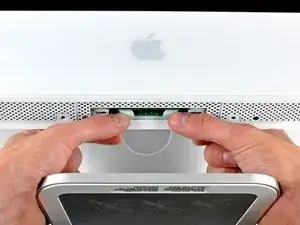
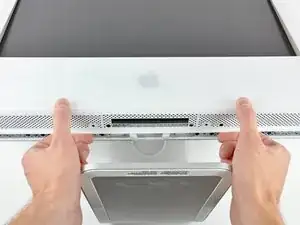
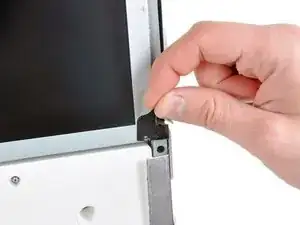
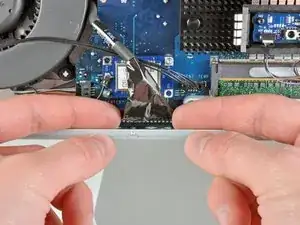
    • Per sollevare la mascherina anteriore dall'iMac, eseguire queste operazioni contemporaneamente:

    • Premere con i pollici le alette della memoria RAM e tenere l'iMac verso il basso.

    • Tirare con gli indici il piccolo ponte sulla mascherina anteriore verso di sé.

    • Tirare la mascherina anteriore verso l'alto con gli indici.

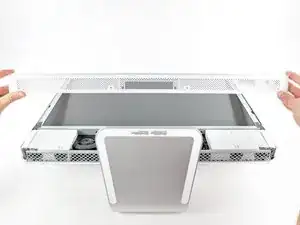
    • Dopo che il piccolo ponte ha liberato le alette della memoria RAM, sollevare la mascherina anteriore dal bordo inferiore, quanto basta a liberare il bordo inferiore del case posteriore.

    My iMac did not have the "small bridge of material" mentioned, however the bezel just lifted off easily.

    maccentric -

  4. XF5OJ1jfbYqZF6ih
    XF5OJ1jfbYqZF6ih
    le4ypK11ghkRxDiZ
    GfGw4oMrNjgaLQ6x
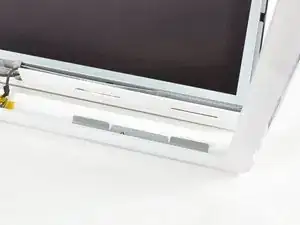
    • Sollevare la mascherina anteriore dal case posteriore e ruotarla per rimuoverla dal bordo inferiore dell'iMac. Attenzione: i cavi del microfono e della fotocamera sono ancora collegati al bordo superiore.

    • La terza immagine mostra le staffe superiori della mascherina anteriore e delle relative fessure intagliate nel bordo superiore del case posteriore dell'iMac.

    • Non rimuovere completamente la mascherina anteriore, poiché è ancora collegata tramite i cavi della fotocamera/microfono.

  5. GSfpKTBUIFGSkjyO
    • Se occorre, rimuovere il nastro che copre il connettore del cavo del microfono.

    • Il connettore del microfono si trova vicino alla parte interna del bordo superiore dell'iMac.

  6. pRRiD1ryQ2F5BETU
    pRRiD1ryQ2F5BETU
    AQWEuC2Se1pw6ah4
    v3MxvKvMpHYtvEM4
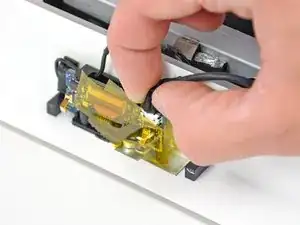
    • Scollegare il cavo del microfono.

    • Scollegare il cavo della fotocamera estraendone il connettore dal connettore femmina sulla scheda della fotocamera.

    • I due connettori del cavo della fotocamera sono delicati e si piegano facilmente. Rimuoverli con attenzione.

    I found it easier not to remove the cables connecting camera and microphone, but rather to lean the plastic frame agains a pile of books so that it could rest almost vertical avoiding the need to disconnect those two sensitive cables.

    Stefano C -

    I agree that for a simple, quick battery change, don't risk damaging those delicate wires. Ignore Step 6 and instead of disconnecting the mic and camera wires, keep them in place and just have a friend hold the plastic frame up while you change the battery, or prop it up as mentioned by Stefano C above.

    WT Kwok -

    Make sure you double check the new logic board for the presence of the GPU assembly before installing. I stupidly installed a new board without moving the GPU from the old one first. So i guess you can say this guide worked for me twice. :)

    Trevor Kearsey -

  7. uUBGquKPbFhpIIxR
    uUBGquKPbFhpIIxR
    MdWgVt3W1b2D1t3a
    • Sollevare le due linguette della schermatura EMI evidenziate dal telaio dell'LCD.

  8. TTTVsccSkGIwqT1W
    • Rimuovere le due viti Torx T6 che fissano il cavo dati del display alla scheda logica.

    Wait, we need a T6 screwdriver as well?

    I purchased the T8 and T10 from your site as per the parts list above and now am here with an opened iMac on the dining room table unable to continue :/

    Stephen Alianiello -

  9. ex542vRRKQ6cnl55
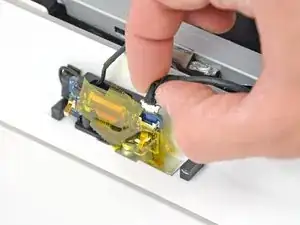
    • Tirare la linguetta di plastica nera collegata al connettore del cavo dati del display per scollegarlo dalla scheda logica.

  10. lUe11GfWiaoilYqg
    lUe11GfWiaoilYqg
    AamxNAPKOZH2agn4
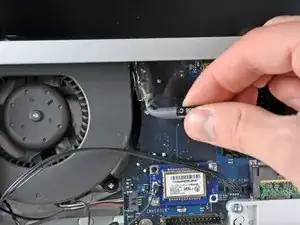
    • Mediante la punta delle dita, tirare entrambi i lati del connettore largo del cavo dell'inverter per estrarlo dal connettore femmina sulla scheda logica.

    • Estrarre il cavo dell'inverter dalla posizione accanto alla ventola della CPU.

  11. lxXhlNXHYirstgFx
    • Prima di tentare questo passaggio, si consiglia di appoggiare l'iMac con la parte della staffa rivolta verso il basso su un tavolo, per impedire la caduta del display.

    • Rimuovere le otto viti Torx T8 che fissano il gruppo del display al case posteriore.

    • Può essere utile adoperare un cacciavite magnetico per rimuovere le viti.

    It would be useful to use a torx screw driver with a long, narrow shank… some of these screws are in tight places.

    Joe Liscouski -

    It may also be useful to prop up the back so it is level. This will prevent the screws from falling inside. They can be retrieved once the scene is off.

    John-Francis mergen -

  12. YmtqPI1UP1aEZ3pX
    • Rimuovere il gruppo del display dall'iMac.

  13. EfQPmAmZqOCU2dNb
    • Rimuovere la striscia di nastro che copre il connettore del cavo dell'unità ottica.

  14. ovySQZLTGiuqRIfH
    ovySQZLTGiuqRIfH
    QIlh5wLUEIxjMIs3
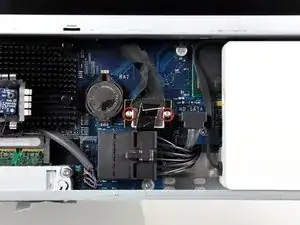
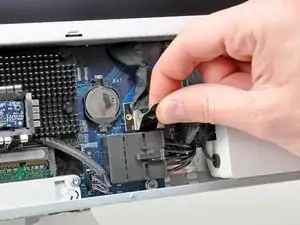
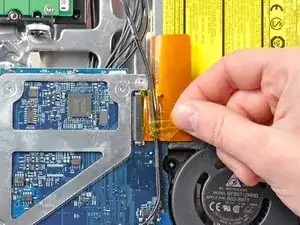
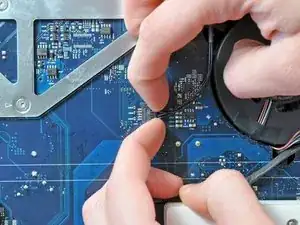
    • Tirare delicatamente il fermacavo sul connettore femmina ZIF del cavo dell'unità ottica verso il lato destro dell'iMac.

    • Il fermacavo dovrebbe spostarsi di circa 1 mm e poi arrestarsi. Non tentare di rimuovere il fermacavo.

  15. BA14hXBPVAHCXNGO
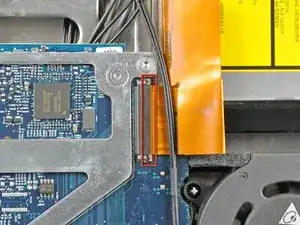
    • Estrarre il cavo piatto dell'unità ottica dal connettore femmina, facendo attenzione a non strapparlo durante l'operazione.

  16. MNuTWnPsfHOAWemL
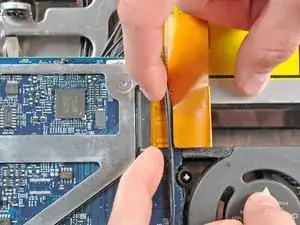
    • Estrarre il connettore del sensore termico dell'unità ottica verso il lato destro dell'iMac per scollegarlo dalla scheda logica.

  17. cNjYYpBllkQaXcPY
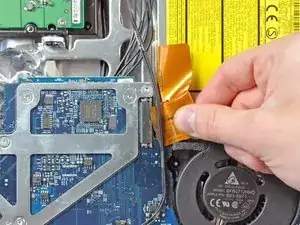
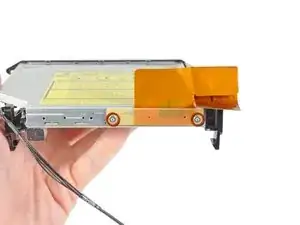
    • Sollevare la striscia di nastro EMI che fissa la parte destra dell'unità ottica al case posteriore.

  18. O6svRxgSUbAmFT1Q
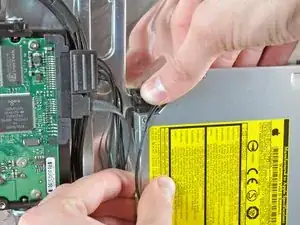
    • Premere la levetta di fissaggio della staffa dell'unità ottica mentre si estrae il bordo superiore dell'unità ottica dal case posteriore.

    Looking at pic on step 18, if you follow the black plastic release clip downwards there is another clip (just below the drive) so you need to pinch them together (with the optical drive in the middle), rather than just press down on the top clip.

    If you look at the picture on step 19, you will see the corresponding release clip (just behind the middle of the orange ribbon cable) but it's not immediately obvious to see unless your looking for it.

    Tahir Khan -

  19. rOygQQdDgn25RUAX
    rOygQQdDgn25RUAX
    bWOmnduJRXkiVVIV
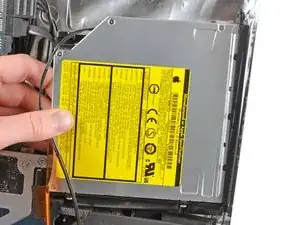
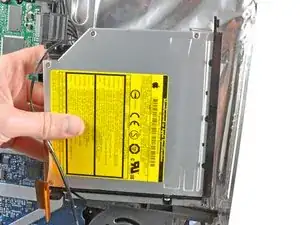
    • Ruotare l'unità ottica leggermente verso il bordo inferiore dell'iMac mentre lo si estrae dal case posteriore per sganciare la linguetta di fissaggio inferiore.

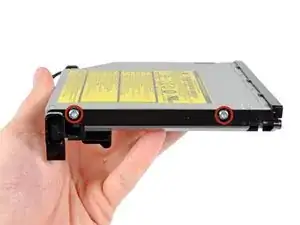
    • Estrarre l'unità ottica dal lato destro del case posteriore e rimuoverlo dall'iMac.

  20. LbDINRbJLnXABnWA
    • Rimuovere le due viti Torx T6 che fissano il cavo dell'unità ottica a quest'ultima.

  21. fZ6SgtiQAn3UCkx1
    • Inserire l'estremità piatta di un inseritore nello spazio fra il connettore del cavo dell'unità ottica e quest'ultima.

    • Ruotare l'inseritore per separare il connettore dall'unità ottica.

    • Ripetere la procedura su entrambi i lati del connettore.

  22. Vofqnp4ARZUBuF3d
    • Estrarre il connettore del cavo dell'unità ottica da quest'ultima.

  23. xOBMKWAoU5Kj2UgN
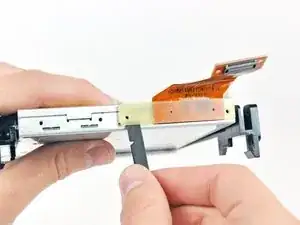
    • Mediante l'estremità piatta di uno spudger, rimuovere le parti di schiuma EMI dal lato inferiore dell'unità ottica.

    • Non dimenticare che devono essere trasferite alla nuova unità.

  24. EPQVTkpQ4cJkANM2
    • Rimuovere le due viti Torx T10 dal lato dell'unità ottica.

  25. AHGdNJBCV53VJAS6
    • Rimuovere le due viti Torx T10 dal lato dell'unità ottica.

  26. OdxKWp2liV2ubDEQ
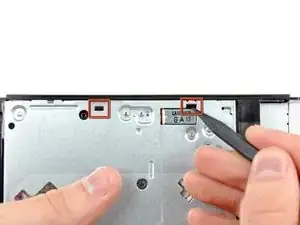
    • Mediante la punta di uno spudger, premere le linguette delle due staffe dell'unità ottica fuori dai rispettivi slot, nella parte superiore dell'unità stessa.

  27. tDZhsC3EZZoYWOSF
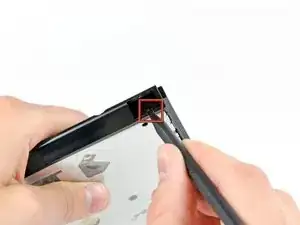
    • Mediante la punta di uno spudger, premere la linguetta della staffa dell'unità ottica fuori dallo slot, nella parte laterale dell'unità stessa.

  28. XCdjnPvLglN6TRFH
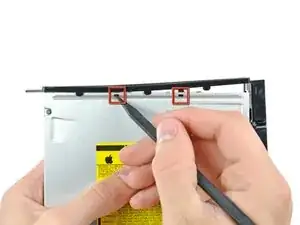
    • Mediante la punta di uno spudger, premere le linguette della staffa dell'unità ottica fuori dai rispettivi slot, nella parte superiore dell'unità stessa.

  29. 4VSMYH5AEEOFYtvy
    • Estrarre la staffa dell'unità ottica verso l'estremità aperta di quest'ultima per liberarla dall'unità stessa.

  30. PQaoZJMwrcBONEdX
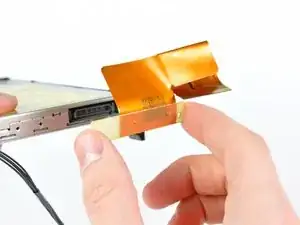
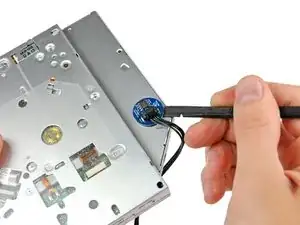
    • Mediante l'estremità piatta di uno spudger, rimuovere il sensore termico dell'unità ottica dall'adesivo che lo fissa all'unità stessa.

    • Non dimenticare di trasferire il sensore termico dell'unità ottica nella nuova unità.

    • Se c'è un disco o altro bloccato nella tua unità ottica, abbiamo una guida per risolvere la situazione.

  31. jOcWYAYFKKAeGTKe
    • Rimuovi le tre viti con testa a croce Phillips n. 0 da 3 mm dal case dell'unità ottica.

    Hello, is the sata & power cabla from the mac can directly feet inside the SSD?

    Roman Quenin -

    plug in the back of the ssd

    Roman Quenin -

    I'm trying to find out as well. I read elsewhere you need something like this without the bracket: http://www.amazon.com/gp/product/B0056OB...

    However I have NOT confirmed this.

    Allen Borza -

    If I understand you correctly; the enclosure allows you to use the existing iMac optical cable. Also the enclosure allows for a safe fitting of the optical drive. In my newer machine I had to double side tape the SSD to the back of the iMac and buy a special cable. Note: this was not an optical drive replacement scenario or I would have done exactly as this tutorial suggests.

    EkDor -

    I bought another caddy, not the one from the description. i had to extract the plastic adaptor from the optical drive and put in on the new caddy 12,7mm

    Cristian Pizarro -

    The SDD caddy I purchased was 22 pin SATA both inside and outside so that the optical drive cable (13 pin) would not fit. Does anyone know where I can find a SDD caddy with 13 pin SATA outside for the optical cable and 22 pin SATA inside for the SDD?

    benja.mcg -

  32. VaI5SLkgrwPSJqPx
    VaI5SLkgrwPSJqPx
    j1FOJyLgUP1DEQHO
    yviIbTmuZ3vDVDMj
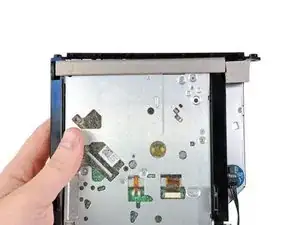
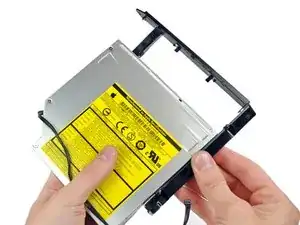
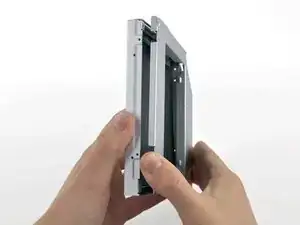
    • A partire dal bordo sinistro, apri delicatamente il case dell'unità ottica.

    • Continua ad aprire le due metà del case fino a separarle.

    This is the 12.7mm caddy.. but, the caddy 9.5 mm fit fine as well? or it doesn't fit on imac mid 2010

    Cristian Pizarro -

    My caddy (ordered 5/2019) had two additional screws that needed to be removed from the sides for it to open.

    mr.kaufman7 -

  33. AggSHSpIQC1DHPDo
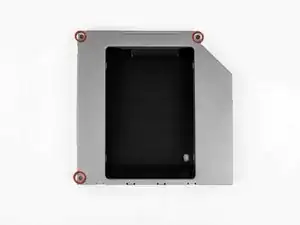
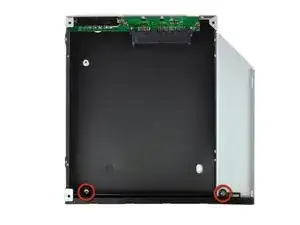
    • Rimuovi le due viti con testa a croce Phillips n. 0 da 3 mm che fissano la mascherina al case dell'unità ottica.

  34. mKipidMkqiDyZSan
    mKipidMkqiDyZSan
    SSLXJwuMeUfXP2Or
    LoVNiaoxGeH4pDaB
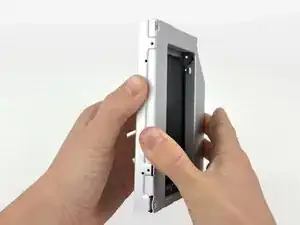
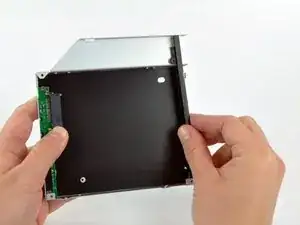
    • Solleva la mascherina in plastica nera dal case dell'unità ottica.

    • La mascherina e le due viti con testa a croce che la fissavano non saranno più necessarie. Conserva questi componenti nel caso tu intenda reinserire la mascherina nel case.

    • Riassembla il case dell'unità ottica senza la mascherina, riutilizzando le tre viti con testa a croce da 3 mm originali per preservarne l'integrità.

    Just curious, why is it necessary to remove this black plastic faceplate from the enclosure? It doesn't appear to serve any function in or out of the enclosure.

    Nic Johnson -

    Maybe because it would interfere with the bracket you have to put back on in step 21?

    Jeff Dickson -

    So I'm confused about the Optical Drive Bracket, the one that originally held the DVD-CD drive. I had an awful time remounting the kit into that bracket as the screws didn't line up correctly. I finally got everything to fit, less one of the four holding screws. Did anyone else experience this problem? I would have expected a much better alignment for this assembly considering the quality of the iFixIt site.

    For the record, the upgrade went fine with a SanDisk Extreme II 480GB SSD, but that one step was next to impossible, and not covered in any detail by the instructions.

    Ron Lockhart -

    Yep, I had exactly the same problem. The alignment was way off.

    olafgoy -

    My kit also did not line up correctly. I had to put all four screws in at an angle cross-threaded to mount the unit.

    Kevo -

    Same here. managed to get two screws in at a decent angle on one side and couldn't get the others in. Felt solid enough once I'd screwed the original ODD casing back onto the iMac.

    Monkeyrebirth -

    I had the same alignment problem, too. I ended up removing the rubber grommets from the plastic enclosure, widening the holes with a small file, then replacing the grommets. All four screws went in, but not in perfect alignment. Should be ok, though.

    nickmalmquist -

    Another possibility is the part has been designed to be used with different types of iMac and some utilise this component. In this case it apparently doesn't.

    EkDor -

    I bought a different enclosure than the one recommended ($18 instead of $39) and it came with new screws because the old screws were too big to fit in the holes for the new enclosure.

    Keith Mewis -

    Hi. Which enclosure did you buy? link please.

    Alex -

    Where did you get the alternative enclosure from?

    Walter Poole -

    I completed this guide last night on my iMac and it all worked great until I got to step 26 and none of the holes on the 12.7 mm PATA Optical Bay SATA Hard Drive Enclosure lined up with the black plastic faceplate. Just like what is being commented on by previous fixers, I could only get 2 screws on one side of the enclosure in, but they were crooked and unable to screw in all the way. It was crude, but it worked.

    The rest of this guide works flawlessly. This is a great site!

    Marc -

  35. ySbhhMVKBuFHSDNG
    ySbhhMVKBuFHSDNG
    aHs6MiBJaKCuCAoK
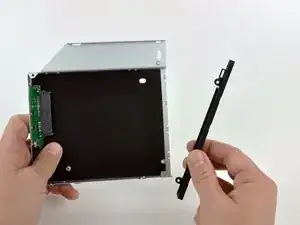
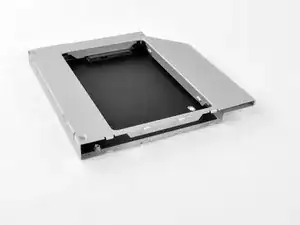
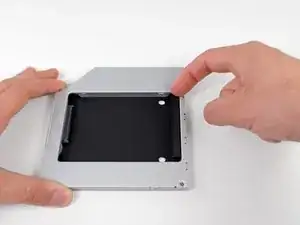
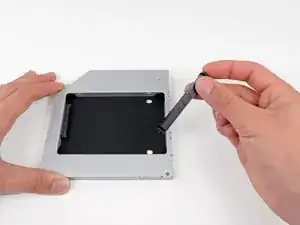
    • Rimuovi il posizionatore di plastica dal case del disco rigido dell'alloggiamento ottico, premendo una delle clip poste lateralmente e sollevandolo dal case.

    What’s the switch for on the inside of the caddy? What position should it be in? Mine came switched to the right (towards SATA connector that disk inserts into).

    Robert Lord -

  36. pdKbwqliykNfMTgW
    pdKbwqliykNfMTgW
    vISgcZ4hSggVMlmG
    5mSbXvoT3JIoq1YV
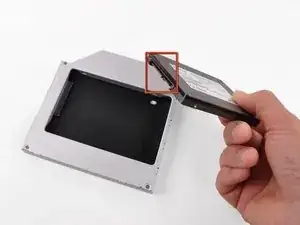
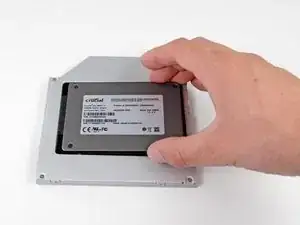
    • Verifica che i connettori del disco rigido siano rivolti verso il basso prima di posizionarlo nel case.

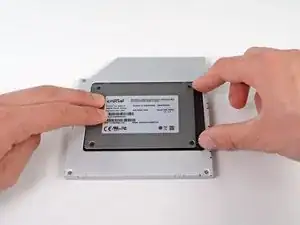
    • Posiziona il disco rigido delicatamente nell'apposito slot del case.

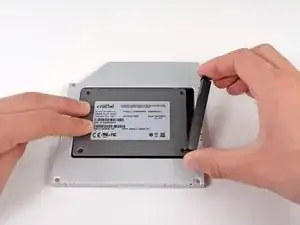
    • Tenendo saldamente il case in posizione con una mano, premi il disco rigido nei connettori del case con l'altra.

  37. ZBHBhNAEYykJGdJd
    ZBHBhNAEYykJGdJd
    aDltJywnnCph3BPj
    • Una volta agganciato il disco rigido, reinserisci il posizionatore di plastica tenendo il disco premuto contro la parte inferiore del case.

    • Ricollega tutti i cavi rimossi dall'unità ottica originale nel case dell'alloggiamento ottico.

    Why no mention of attaching the new hard drive to the Optical Drive Enclosure using the enclosed phillips screws?

    Once you have securely inserted the new hard drive into the Optical Drive Enclosure and replaced the plastic positioner you should attach the drive to the enclosure using two of the provided phillips screws. Two holes on the underside of the enclosure should align with two attachment holes on the underside of the drive.

    nickmalmquist -

    I suspect that the plastic positioner will secure the drive well enough (for this style of adapter). As I mentioned in earlier comment, this should mean you can replace / upgrade the SATA drive later without needing to remove the adapter, skipping many steps.

    Les Kitchen -

    Do you need a sata cable to connect the new drive to the board or does it connect via the optical drive cable that we disconnected earlier?

    Erik Sawaya -

    It does connect to the optical drive cable but if you don't use the optical bay enclosure you'll need a 13 pins to 22 pins sata adaptor (and some tape!)

    The sata cable for the optical drive has 6 + 7 pins while ssd and hhd have 15 + 7 pins

    Graziano Nora -

    Can someone please explain why you need to remove the black plastic faceplate  from the optical bay enclosure. It is designed to receive the standard SSD. What is gained from removing a part of it?

    Peter Bull -

    Thank you! This guy has made upgrading the mid 2010 iMac I inherited from my mom MUCH easier and saved me a lot of time, trial, and error.

    Rob Anthony Dire -

    My Penrynn Super Drive has PATA connector, and now is a fossil grade rarity :-(

    IMI Comp -

    I'm a little confused. Do I need the enclosure from ifixit or am I removing the optical drive and installing an ssd in the preexisting op drive enclosure? If using the already existing enclosure what type of ssd do I need as for Sata connectors?

    danielpainter65 -

Conclusione

Per riassemblare il dispositivo, seguire queste istruzioni in ordine inverso.

Brittany McCrigler

Membro da: 05/03/12

88905 Reputazione

0 commenti