Introduzione

Aggiornamento del disco rigido con un velocissimo SSD.
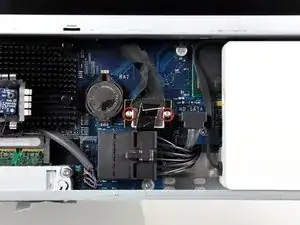
  1. LL6ZKkaC1k3fjQpN
    LL6ZKkaC1k3fjQpN
    JFgfEOMMil6Wa6MI
    • Allentare le due viti con testa a croce che fissano lo sportello di accesso all'iMac.

    • Entrambe le viti restano all'interno dello sportello di accesso.

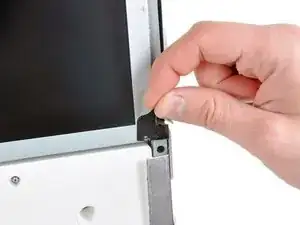
    • Rimuovere lo sportello di accesso.

  2. BMJL1RwW1UZLer3v
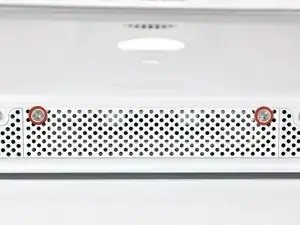
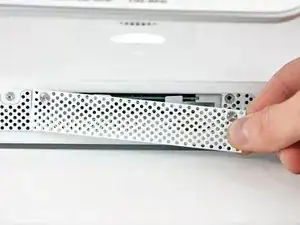
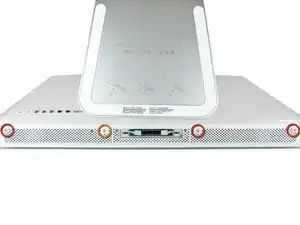
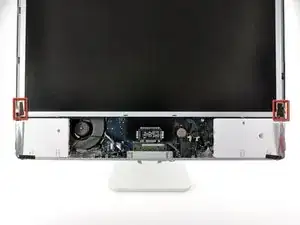
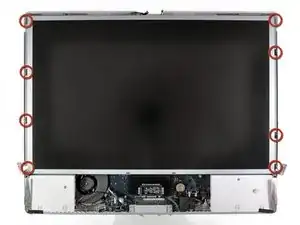
    • Rimuovere le viti seguenti lungo il bordo inferiore dell'iMac:

    • Tre viti Torx T8 da 6 mm

    • Una vite Torx T8 da 8 mm

    My iMac had four 6mm T8 Torx screws (so not one 8mm screw)

    floor -

    My late 2006 iMac24 also has only 4, 6mm long T8 screws here.

    JC Gidley -

  3. y5CssgvFJhbaVMYI
    y5CssgvFJhbaVMYI
    drlImZCRxMNH1lyG
    • Poggiare l'iMac dal lato della staffa su una superficie piatta.

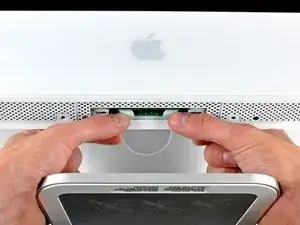
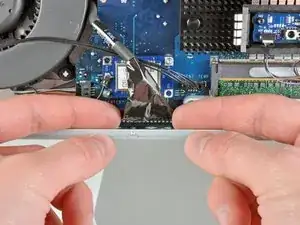
    • Per sollevare la mascherina anteriore dall'iMac, eseguire queste operazioni contemporaneamente:

    • Premere con i pollici le alette della memoria RAM e tenere l'iMac verso il basso.

    • Tirare con gli indici il piccolo ponte sulla mascherina anteriore verso di sé.

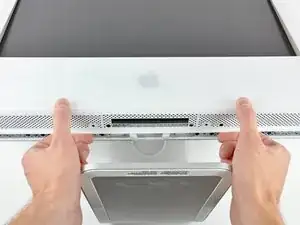
    • Tirare la mascherina anteriore verso l'alto con gli indici.

    • Dopo che il piccolo ponte ha liberato le alette della memoria RAM, sollevare la mascherina anteriore dal bordo inferiore, quanto basta a liberare il bordo inferiore del case posteriore.

    My iMac did not have the "small bridge of material" mentioned, however the bezel just lifted off easily.

    maccentric -

  4. XF5OJ1jfbYqZF6ih
    XF5OJ1jfbYqZF6ih
    le4ypK11ghkRxDiZ
    GfGw4oMrNjgaLQ6x
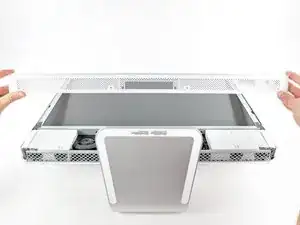
    • Sollevare la mascherina anteriore dal case posteriore e ruotarla per rimuoverla dal bordo inferiore dell'iMac. Attenzione: i cavi del microfono e della fotocamera sono ancora collegati al bordo superiore.

    • La terza immagine mostra le staffe superiori della mascherina anteriore e delle relative fessure intagliate nel bordo superiore del case posteriore dell'iMac.

    • Non rimuovere completamente la mascherina anteriore, poiché è ancora collegata tramite i cavi della fotocamera/microfono.

  5. GSfpKTBUIFGSkjyO
    • Se occorre, rimuovere il nastro che copre il connettore del cavo del microfono.

    • Il connettore del microfono si trova vicino alla parte interna del bordo superiore dell'iMac.

  6. pRRiD1ryQ2F5BETU
    pRRiD1ryQ2F5BETU
    AQWEuC2Se1pw6ah4
    v3MxvKvMpHYtvEM4
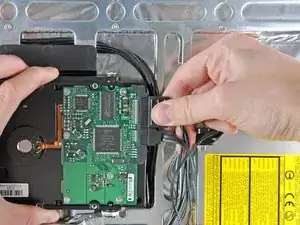
    • Scollegare il cavo del microfono.

    • Scollegare il cavo della fotocamera estraendone il connettore dal connettore femmina sulla scheda della fotocamera.

    • I due connettori del cavo della fotocamera sono delicati e si piegano facilmente. Rimuoverli con attenzione.

    I found it easier not to remove the cables connecting camera and microphone, but rather to lean the plastic frame agains a pile of books so that it could rest almost vertical avoiding the need to disconnect those two sensitive cables.

    Stefano C -

    I agree that for a simple, quick battery change, don't risk damaging those delicate wires. Ignore Step 6 and instead of disconnecting the mic and camera wires, keep them in place and just have a friend hold the plastic frame up while you change the battery, or prop it up as mentioned by Stefano C above.

    WT Kwok -

    Make sure you double check the new logic board for the presence of the GPU assembly before installing. I stupidly installed a new board without moving the GPU from the old one first. So i guess you can say this guide worked for me twice. :)

    Trevor Kearsey -

  7. uUBGquKPbFhpIIxR
    uUBGquKPbFhpIIxR
    MdWgVt3W1b2D1t3a
    • Sollevare le due linguette della schermatura EMI evidenziate dal telaio dell'LCD.

  8. TTTVsccSkGIwqT1W
    • Rimuovere le due viti Torx T6 che fissano il cavo dati del display alla scheda logica.

    Wait, we need a T6 screwdriver as well?

    I purchased the T8 and T10 from your site as per the parts list above and now am here with an opened iMac on the dining room table unable to continue :/

    Stephen Alianiello -

  9. ex542vRRKQ6cnl55
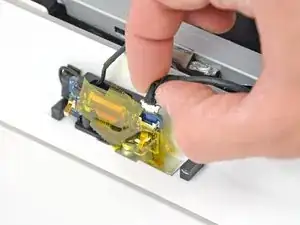
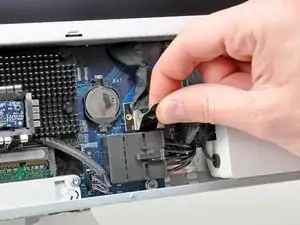
    • Tirare la linguetta di plastica nera collegata al connettore del cavo dati del display per scollegarlo dalla scheda logica.

  10. lUe11GfWiaoilYqg
    lUe11GfWiaoilYqg
    AamxNAPKOZH2agn4
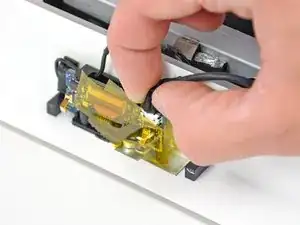
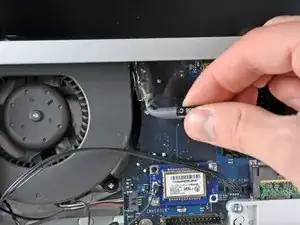
    • Mediante la punta delle dita, tirare entrambi i lati del connettore largo del cavo dell'inverter per estrarlo dal connettore femmina sulla scheda logica.

    • Estrarre il cavo dell'inverter dalla posizione accanto alla ventola della CPU.

  11. lxXhlNXHYirstgFx
    • Prima di tentare questo passaggio, si consiglia di appoggiare l'iMac con la parte della staffa rivolta verso il basso su un tavolo, per impedire la caduta del display.

    • Rimuovere le otto viti Torx T8 che fissano il gruppo del display al case posteriore.

    • Può essere utile adoperare un cacciavite magnetico per rimuovere le viti.

    It would be useful to use a torx screw driver with a long, narrow shank… some of these screws are in tight places.

    Joe Liscouski -

    It may also be useful to prop up the back so it is level. This will prevent the screws from falling inside. They can be retrieved once the scene is off.

    John-Francis mergen -

  12. YmtqPI1UP1aEZ3pX
    • Rimuovere il gruppo del display dall'iMac.

  13. 4mkNRRdIsu6vNZXC
    4mkNRRdIsu6vNZXC
    pnrnfx3XNNKUbQi4
    • Scollegare i cavi dati e di alimentazione SATA estraendone i connettori dal disco rigido.

  14. DXgcjws6YBPb5Kut
    • Rimuovere il cavo dal sensore termico collegato alla parte laterale del disco rigido.

    Since you're going to transfer this to the new drive, I found it easier to disconnect the other end of the temp sensor cable, on the edge of the mobo.

    maccentric -

    Agree 100% with maccentric. Disconnecting the other end of the temp sensor cable is a much easier way to go on this step.

    phil -

  15. PNpmLMqN4SWB5EwT
    PNpmLMqN4SWB5EwT
    bVoflBb3OESqPYPX
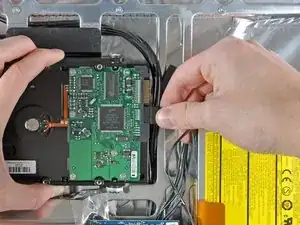
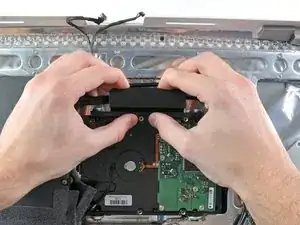
    • Comprimere l'elemento di fissaggio di plastica del disco rigido premendolo verso il bordo inferiore dell'iMac.

    • Tirare il bordo superiore del disco rigido, allontanandolo leggermente dal case posteriore.

    I found it easier to take out the two torq screws on the plastic holder, in stead of compressing it.

    eriktar -

  16. BRXSgAEZuEBMdY62
    • Sollevare il disco rigido dai punti di fissaggio inferiori e rimuoverlo dall'iMac.

  17. pcTARLvqqLeDgiLG
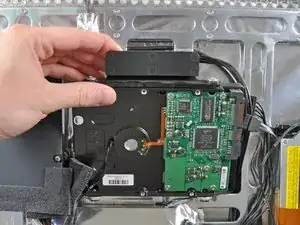
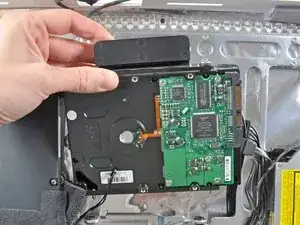
    • Rimuovere le due viti Torx T8 che fissano la staffa del disco rigido alla parte laterale di quest'ultimo.

    • Rimuovere la staffa del disco rigido.

  18. xqEIZMdBByLiXK6J
    • Rimuovere i due punti di fissaggio Torx T8 dall'altro lato del disco rigido.

  19. NpQGCVLwHkLe4gSy
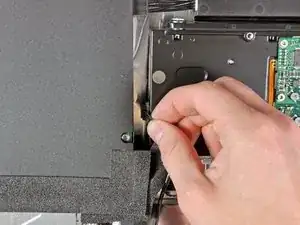
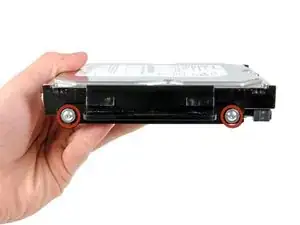
    • Mediante l'estremità piatta di un inseritore, rimuovere il sensore termico dalla parte laterale del disco rigido.

    • Il disco fisso resterà invariato.

Conclusione

Per riassemblare il dispositivo, seguire queste istruzioni in ordine inverso.

Andrew Bookholt

585555 Reputazione

7 commenti

Does the T8 Torx have to be security type? In the guide it only says remove T8 torx screws. But never says if they are security type or not.

Evan Lewis -

Not necesary to be secured

David Medrano -

Is it possible to replace it with an SSD? If yes which are compatible and what about the termal sensor?

Jelle V -

Watch that LCD temp sensor cable guys, it's a !@#$% to repair or replace. It runs around the monitor housing and can get severed by a bezel screw if not hidden carefully before attaching the outer housing of the iMac. If you tear it, here's the part number and discussion of this very issue: https://discussions.apple.com/message/24... Apple Part Number: 922-8236

Giles Dickerson -

The T8 Torx does *not* have to be security type. However it is critical to have a long, thin, dedicated T8 screwdriver, not one that is part of a kit with interchangeable tips (and thus a thick collar that won't fit into the narrow slot). I got the kit, it didn't work, returned it and got an unmagnetized T8 with 2.5" length. I then magnetized it with a strong refridge magnet (which didn't work well), so better yet after I removed the 8 screws (Step 11), I magnetized the screws themselves, which worked great.

WT Kwok -

Could the author add a few notes about how to clean off any remaining adhesive on the HD Temp. Sensor and what type of adhesive to use in re-attaching the HD Temp. Sensor to the new drive? In addition; a note on how to locate the sensor on the drive chassis, if using the original location, but on the new drive, is not possible.

Gary Gauthier -

To remove the excess of adhesive you may use isopropyl alcohol. To reattach the sensor try to use kapton tape.

David Medrano -