Introduzione

Questa è una guida per uso interno e privato, utilizzata come prerequisito
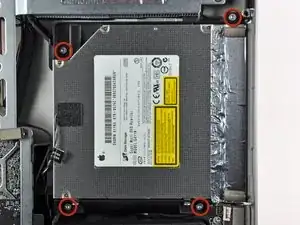
  1. jJhwSRnKSjThYh5y
    • Rimuovere le quattro viti Torx T10 che fissano l'unità ottica al case esterno.

    Is it possible to use the DVD drive after installing the SSD, or is there no space left?

    Joel -

    Yes, it is possible. The SSD fits below the dvd drive; it doesn't replace it

    Dan -

  2. DgBKVDwBG5aVgdNS
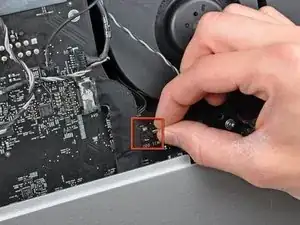
    • Scollegare il connettore del cavo del sensore termico dell'unità ottica dal connettore femmina sulla scheda logica.

    This step is not necessary. I have problems with the pulling out, and found that it's not necessary to out it in this case.

    Steve -

    Agreed. Leave it plugged in and peel the buffer tape and temp sensor off the optical drive assembly while it's still in the computer.

    John Lavenia -

    What problems did you have?

    Toni Marmol -

    Don't do that! It's not necessary to pull the sensor cable out. And it cost me an hour to find out that it was this sensor cable and not the LCD sensor cable that made the fans spin at 3000+rpm. The less sensor cables you remove, the easier to find the culprit if you stumble into fan issues.

    bhager -

  3. GVsLm2KxXMKTOIUq
    GVsLm2KxXMKTOIUq
    awAqRpRHhQhBTtqU
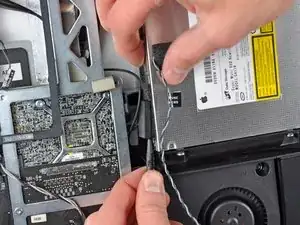
    • Inserire un inseritore fra il connettore dell'unità ottica e quest'ultima.

    • Ruotare l'inseritore per separare leggermente il connettore dall'unità ottica, quindi estrarre il connettore dall'unità con le dita.

    Hello, is the sata & power cabla from the mac can directly feet inside the SSD?

    Roman Quenin -

    Can the superdrive connector cable (possibly just SATA and SATA power bundled) be used for SSD? I wanted to replace the superdrive completely with an SSD, and thus having in total 2 SSDs and one HDD inside the iMac. Thanks in advance.

    Krisna -

    There is another SATA connector on the back side of the logic board for an SSD.

    Neal Sofge -

  4. q53pwUVhpfY1CeWA
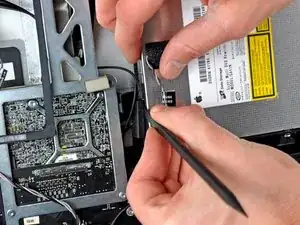
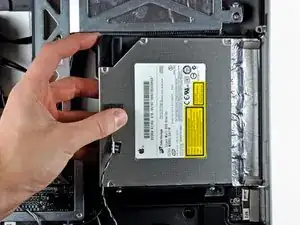
    • Sollevare leggermente il bordo sinistro dell'unità ottica ed estrarla dal lato destro del case esterno.

    • Durante il rimontaggio, ricordati che ci sono due fori nella placca del lettore CD, nei quali si devono infilare due perni in plastica per posizionarla correttamente.

Conclusione

Per riassemblare il dispositivo, seguire queste istruzioni in ordine inverso.

Walter Galan

693762 Reputazione

0 commenti