Introduzione

Solo prerequisito

  1. 1MlcYZV5nCLr264K
    • From here, the repair will be easier if you flip the computer around so the base is facing you.

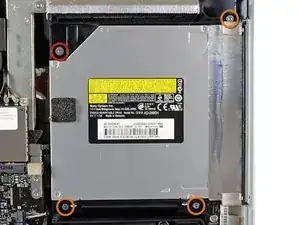
    • Rimuovere le quattro viti seguenti:

    • Una vite Torx T10 da 9,3 mm a testa grande

    • Tre viti Torx T10 da 9,3 mm a testa normale

    In my case the red screw was on the lower left side near the power-data cable!

    sefw4t2efwef -

    Same here. There are different versions delivered

    Tai -

    Same for me.

    davidevismara -

  2. NrlVDiD4WEMZqEUh
    NrlVDiD4WEMZqEUh
    ANsIDp5OYAQRLAkJ
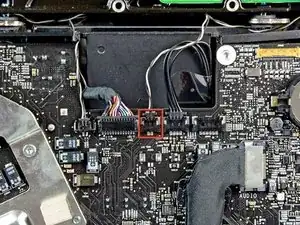
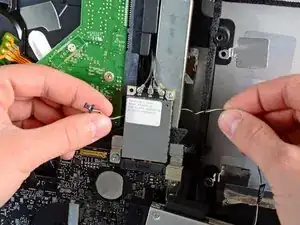
    • Scollegare il connettore del cavo del sensore termico dell'unità ottica dal connettore femmina sulla scheda logica.

    No need to remove the thermal sensor connector from the motherboard - refer to Step 17 to remove the sensor from the optical drive instead

    osienna -

    The thermal sensor connector shown in the red box is the one for the hard drive, not the optical drive. The optical drive sensor attaches to motherboard near bottom left of optical drive fan.

    Reiner Friedel -

    The guide was correct in my case that this is the Optical Drive sensor. The board has “ODD Temp” written on it. Original HD has it’s own built in temperature sensor without a separate cable to the Motherboard, which is why OWC sells a special “In-line Thermal Sensor” SATA cable with a Temp. sensor that attaches to any new hard drive itself.

    amiller770 -

    When I was removing the optical drive cable sensor the connector came loose from the board. Is there any way to repair this?

    Paula McCaulla -

  3. OUOqmArdw3JCHpHY
    OUOqmArdw3JCHpHY
    eRYpgV2Q3dj6tAFh
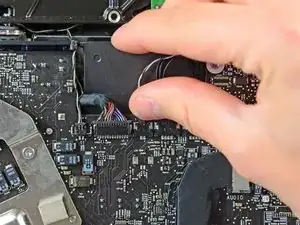
    • Sollevare il bordo interno dell'unità ottica e spostare il connettore dietro al telaio della GPU collegato alla scheda logica.

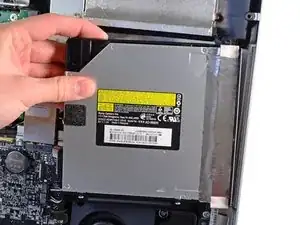
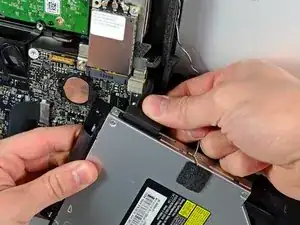
    • Estrarre con cautela l'unità ottica dai piedini di montaggio sul lato destro del case esterno, affinché sia possibile scollegare il cavo dell'unità.

    • Lasciar pendere l'unità ottica mentre si sposta il connettore del sensore termico dell'unità ottica dalla parte posteriore del dissipatore della GPU.

    On the reassembly, I found threading the optical drive cable back under the GPU frame trying. Here’s some advice: Take some dental floss, form a loop, and feed that loop under the GPU frame. Put the cable into the loop of floss, tighten the loop, and pull the loop back through. This is much easier, faster, and far less frustrating.

    Albert Einsrein -

  4. kP2lxo3pOV4F4Bxg
    • Scollegare il cavo dell'unità ottica estraendone il connettore.

    • Rimuovere l'unità ottica dall'iMac.

    I have already installed the second SSD drive, but due to the size of the drive I need to change it with another SSHD 1 TB drive. Am I right that I have to follow the instructions up to Step 18? Because The SSD is already behind the optical drive, so what I need to do is remove it and install the new SSHD drive and put everything back again. Please confirm.

    Mohamed Kamal -

    This was my only error on reassembly. The SATA cable must be under the black plastic prong. I did not want to pull to logic board again. I managed to bend the black plastic bits and get the cable in the right place.

    Terry Creasy -

Conclusione

Per riassemblare il dispositivo, seguire queste istruzioni in ordine inverso.

Walter Galan

693762 Reputazione

0 commenti