Introduzione
Sostituisci la batteria del tuo MacBook Pro Unibody da 13", versione metà 2010. Se la tua batteria è gonfia, prendi adeguate precauzioni.
-
-
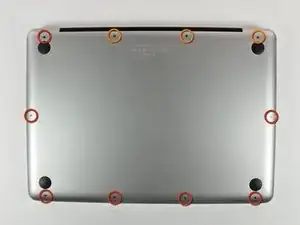
Rimuovi le dieci viti seguenti, che fissano il case inferiore al MacBook Pro Unibody da 13":
-
Sette viti con testa a croce da 3 mm.
-
Tre viti con testa a croce da 13,5 mm.
-
-
-
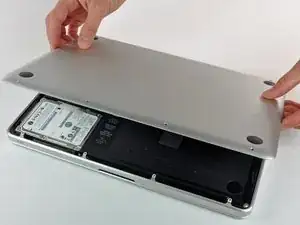
Solleva leggermente il case inferiore e spingilo verso la parte posteriore del computer per liberare le linguette di montaggio.
-
-
-
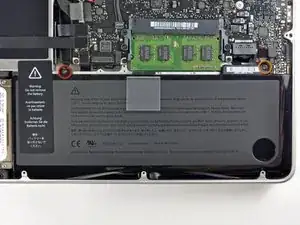
Svita le seguenti viti tri-point che fissano la batteria al case posteriore:
-
Una vite tri-point da 5,5 mm
-
Una vite tri-point da 13,5 mm
-
-
-
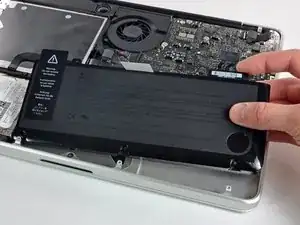
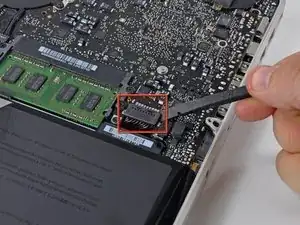
Con l'estremità piatta di uno spudger solleva il connettore della batteria verso l'alto dal suo zoccolo sulla scheda madre.
-
-
-
Solleva la batteria dal case superiore.
-
Carica al 100% e poi tieni sotto carica almeno altre due ore. Quindi stacca l'alimentazione e usa il laptop normalmente per farlo scaricare. All'avviso di batteria in esaurimento, salva il lavoro corrente e tieni acceso il MacBook finché non si iberna perché è scarico. Aspetta almeno altre 5 ore, poi carica il laptop ininterrottamente fino al 100%.
-
Se noti qualsiasi problema o comportamento inusuale dopo l'installazione di una nuova batteria, può essere necessario resettare l'SMC del tuo MacBook.
-

Per rimontare il tuo dispositivo, segui queste informazioni in ordine inverso.

26 commenti
You guys are awesome! My granddaughter spilled a whole coke on the Mac and it went fizz! After some weeks I took it to the Apple store where it was declared it dead. They offered me a refurbished machine for $800, but insteaed I came home, took the disk out and hooked it via a USB carrier to another Mac which proved that the disk had not been harmed. I put it back in the machine and booted up at which point it became obvious that the battery was dead. One pass at Google turned up IFixIt where I found the battery and the correct, goofy tri-point screwdriver. The battery arrived a bit ago and the Mac is up and running as if nothing happened . . . a tidy savings of $650!
Thanks so much1
amzbay -
This was a total life saver! A few weeks ago my house was hit by lightning and even though my computer wasn't plugged in (thank God!) my charger was completely fried. I ordered a new charger but my computer still wasn't working- Apple said my computer was done for. A friend said it was probably my battery and told me about ifixit.com. I was able to buy a new battery and change it myself (it was so easy!!!). Saved me from spending a bunch of $$ at the Apple store. I move out of the Country in a few weeks and didn't know what I was going to do without a computer. Thanks ifixit!!!
talithab -
When I followed this exactly, I booted up my MacBook to see that my battery had an x through it with the no battery availible popping up when I scrolled over it. I (stupidly) left the computer on while I browsed for a solution. The whole time my charger showed a green light. Suddenly the computer turned off and hasn't been able to be turned back on since despite switching to another battery and another charger. The charger still shows a green light, which means the battery is either fully charged or installed incorrectly. I don't understand how it can be installed incorrectly when the only part to put it into the computer is the plug in. Please someone help me, I have no idea how to fix it and have made multiple forums on here asking for help, to no avail.
I think you are SOL. I had same problem a few days ago. I have attempted everything I could find from online resources. Bottom Line: ship it to an Apple authorized repair shop or an Apple Store. Battery replacement Cost is now only $130, which isn't much more than iFixIt cost.
gkofga -
Your connector or socket may have broken. Open the Mac and check if you missed something.
Compare the short screws carefully before reinstalling them. The shouldered screws go in the holes on the front edge.
David Kilbridge -
Before I started removing any screws I took a piece of paper and drew the bottom of the laptop and put a piece of double-sided tape in the spot where each screw goes. That way when I took out the screws, I could put them on the tape so I knew exactly which screw went in which spot. I did the same thing for dismantling the inside on another sheet of paper, then a third sheet for the screen after getting the front glass off.
mastover -
I use a similar technique: I print out the iFixit manual for the job, and Scotch-tape down the screws/brackets/cables I remove at each step next to the component descriptions. That way, when I'm reassembling, the bits are taped right next to the photo of where they came from.
adlerpe -
That's exactly what I do for all my repairs! It's the best way to keep track of all of the parts ' original location and to make sure that you don't miss any parts during reassembly.
joyitsjennie -
Great idea and one I use often
Thomas Overstreet -
Excellent idea! Thanks for sharing it here.
Laura Sharkey -
I used a 00 that fit but the screws were very tight so I used a tiny paintbrush with some wd40 on it and put it around the edges of the screws. Worked like a charm
valentinedhdh -
I use a magnetic mat and place the screws in order on that :)
Cary B -