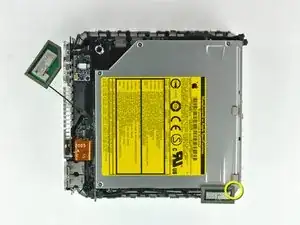
Introduzione
L'accesso alla memoria RAM richiede la rimozione del telaio interno.
Ricambi
-
-
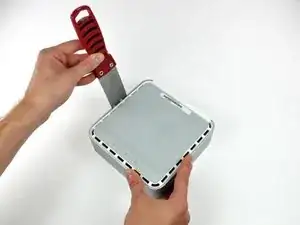
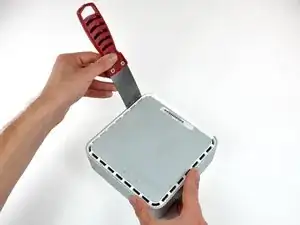
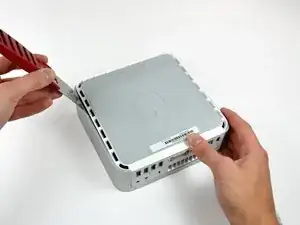
Per aprire il case, occorre una spatola. Una spatola sottile da 3,81 cm è l'ideale, tuttavia occorre levigarne il bordo. Strofinare il bordo corto della spatola in avanti e all'indietro su un foglio di carta vetrata a grana grezza (da 100 è ottimale) finché non si ottiene un bordo levigato.
-
-
-
Inserire con attenzione una spatola nella fessura fra il coperchio superiore e l'alloggiamento inferiore. Iniziare dal lato sinistro. Premere la lama finché non si avverte una certa resistenza (circa 0,95 cm).
-
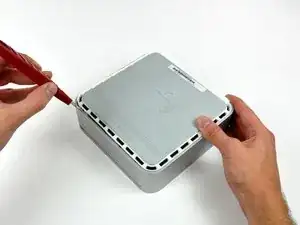
Allargare delicatamente la fessura facendo leva sul manico della spatola verso il basso e lontano dal Mac mini.
-
-
-
A questo punto, inserire la spatola nella fessura sul lato dello slot dell'unità ottica del computer.
-
Far pressione sulla spatola verso il basso, mentre si opera lungo il bordo del Mac mini, finché l'alloggiamento inferiore non si separa ulteriormente da quello superiore.
-
-
-
Ripetere la medesima procedura indicata nei passaggi precedenti per il lato destro del Mac mini.
-
Capovolgere il Mac mini.
-
-
-
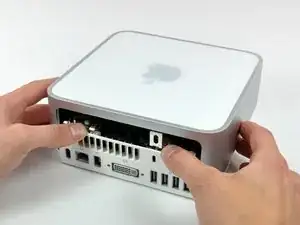
Premere leggermente le due linguette di fissaggio l'una verso l'altra e sollevare l'antenna AirPort dal proprio alloggiamento.
-
-
-
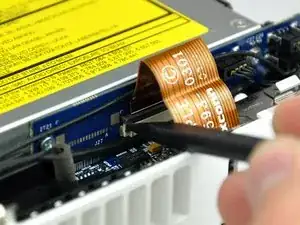
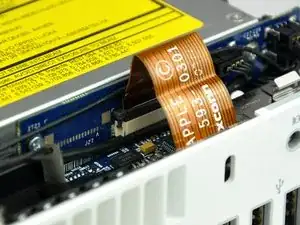
Utilizzare la punta di un inseritore per sollevare leggermente il lato sinistro del bloccacavo ZIF dal rispettivo connettore femmina.
-
-
-
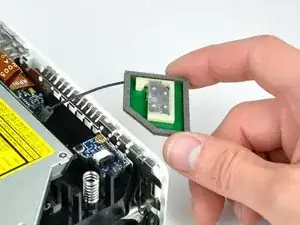
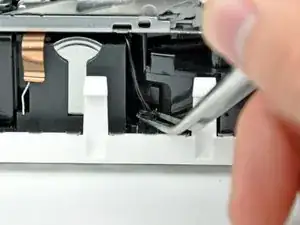
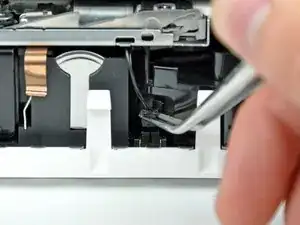
Mediante un paio di pinzette, sollevare connettore del cavo del sensore termico del disco rigido dal connettore femmina sulla scheda logica.
-
-
-
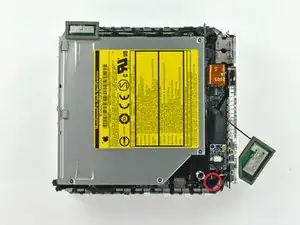
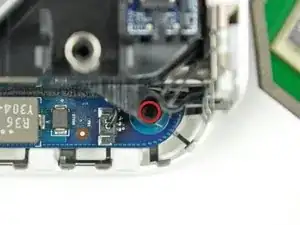
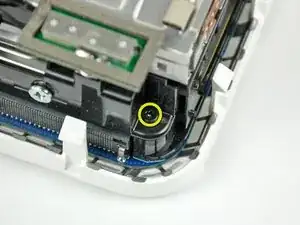
Rimuovere la vite con testa a croce incassata accanto al pulsante di alimentazione, che fissa il telaio interno all'alloggiamento inferiore.
-
-
-
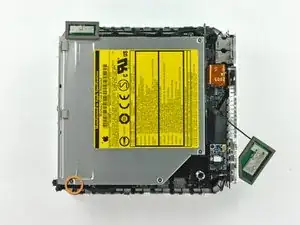
Rimuovere la vite con testa a croce incassata accanto alla spia della modalità sospensione, che fissa il telaio interno all'alloggiamento inferiore.
-
-
-
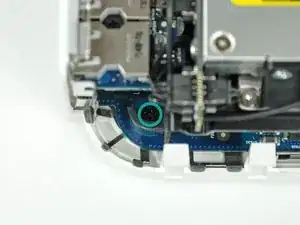
Rimuovere la vite con testa a croce dal telaio interno, in prossimità dell'antenna Bluetooth.
-
-
-
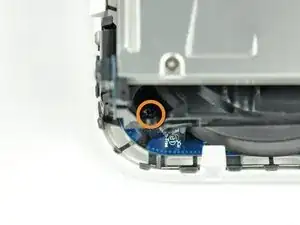
Rimuovere la vite con testa a croce accanto alle porte audio, che fissa il telaio interno al case inferiore.
-
-
-
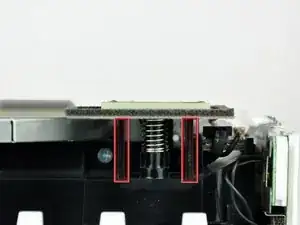
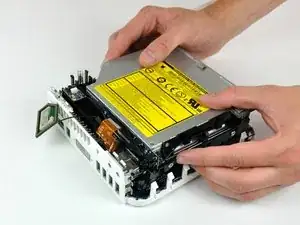
Sollevare delicatamente il telaio interno dall'alloggiamento inferiore, facendo attenzione a non incastrare il cavo dell'antenna AirPort o altri cavi.
-
-
-
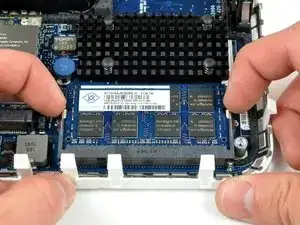
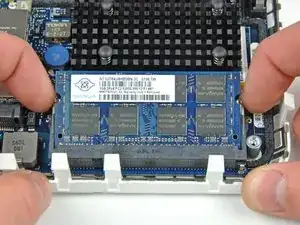
Estrarre contemporaneamente le linguette su ciascun lato del chip di memoria RAM, allontanandole dal centro. Queste linguette bloccano il chip in posizione. Sganciandole, il chip "salterà" fuori.
-


Per riassemblare il dispositivo, seguire queste istruzioni in ordine inverso.

19 commenti
As a quick warning for noobs (that'd be me before I attempted this repair :P ), you need a matching pair of RAM (two chips the same size and spec). Otherwise, the computer won't boot up. ^_^
There were 2x 1GB chips in my 2007 mini. I bought 1x 2GB chip, because I read somewhere that model only would allow 3GB. After replacing a 1GB chip with the new 2GB chip, the system is only showing 1GB RAM installed. Is this what you’re talking about? If I buy another 2GB chip, will it work? PC2-5300 2 GB RAM Chip
Jeff Box -
That is not always true. Often, perhaps…60/40, ish? My 2007 mac mini 2,1 is running one 1gb stick and one 2gb stick, a 500gb Kingston SSD and a salvaged superdrive from a MBP. I am tempted to try a core 2 quad or Xeon in it. For no particular reason than to see if it runs. anyone tried that one? I also had a 2008 mac pro 3,1 running four 2gb and four 4gb of under spec ram without issues.
In the 25 years i’ve been hanging out in server rooms, the client side of the working guidelines for ram matching has become less strict., but still, I believe, the ability to mix is in the manufacturing process. there’s no way but experience to be able to confirm that different makes, speed or size will function together. Unless of course stated in manufacturers documentation. The quality of the individual components will decide.
It will either work or it wont.
If you don’t have ram laying about, then your 100% right, buy matching pairs. otherwise, try it 'till it fires!
I successfully run 3GB in my A1176 Minis. When I put the 2GB chip in the bottom slot with the 1GB chip in the top slot, the machine would not boot and the power LED would blink continuously. When I put the 1GB chip in the bottom slot with the 2GB chip in the top slot, the machine works perfectly and sees all 3GB of RAM. (I don’t know if this is a rule or not, this is strictly my anecdotal experience.) I have *not* experienced installing 3GB and having the Mini run and only report 1GB. If you do that, I’d recommend checking to assure that the 2GB stick is seated properly.
I’ve also used 4GB without any trouble in A1176 Minis, but this model can only address a maximum of 3GB RAM. I have run performance comparisons between one equipped with 4GB and equipped with 3GB RAM and they measured identically. If you’re upgrading an A1176 from 2GB (equipped with a pair of 1GB chips) to 3GB, you can save a few dollars by just buying a single PC2-5300 2GB stick.
Mark B -
Thanks a lot, 1Gb -> 4Gb is done !
This was easier than it looked, the only thing I had trouble with was getting the cover off (tried to use a flexible palette knife, bad idea) and getting the little sensor plug back in (it's SO tiny.) Oh, and one screw I had trouble getting back into the hidden recessed hole because my screwdriver isn't magnetized.
Speaking of which, size of screwdriver matters, I bought a set with a size 0 and size 000, but no 00, neither worked. Fortunately I had one of those cheap eyeglass repair kits, and the Phillips screwdriver worked perfectly.
Alexa -
The covers are the Worst….then and Now!!!
I used a tool for opening the back of watches to replace the battery (the type that have the non screw-on backs). Worked fine!
Mike Haines -
IMHO there are many steps not necessary. The guide is very good but i can't find the reason for steps 7-15. It is all about freeing the internal frame. As far as i know it is enough to remove the antennas and the 4 screws holding the optical drive?!?!
Markus Obdenbusch -