Introduzione
L'aggiornamento della memoria RAM garantisce un immediato aumento della velocità. I modelli EMC 2133 utilizzano la memoria RAM PC2-5300, mentre i modelli EMC 2210 utilizzano la memoria RAM PC2-6400. Per entrambi modelli, la quantità massima di memoria RAM è pari a 6 GB.
Strumenti
Ricambi
-
-
Allentare la vite con testa a croce al centro dello sportello di accesso.
-
Rimuovere lo sportello di accesso dall'iMac.
-
-
-
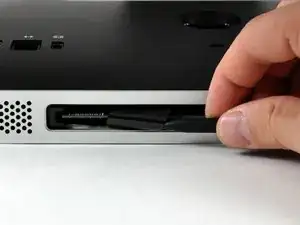
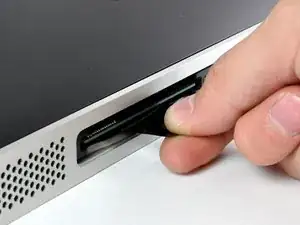
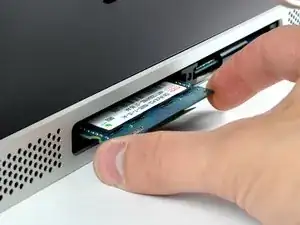
Mediante la punta di un inseritore, estrarre le linguette di plastica nera della memoria RAM dall'apposito alloggiamento.
-
Tirare la linguetta di plastica nera dall'iMac per espellere il chip di memoria RAM.
-

Per riassemblare il dispositivo, seguire queste istruzioni in ordine inverso.

12 commenti
I currently have a 4GB memory module installed on an EMC 2210 in one of the memory slots. Can I still install the original 1GB ram in the other slot making it 5GB total memory?
[|It depends on the model. Check here:] https://support.apple.com/en-us/HT201191
Alex Nos -
I installed 2GB x2 to mine to upgrade from 1GB x2. It took just minutes and I used a regular philips screw driver I found around home. Pull hard on the black straps to get the memory out. It is working great with no problems. Good luck!
1tom2go -
Thank you for the guide. I had 2GB. I took out 1 module to add a 4GB module. So easy and now my 2133 iMac is jaw dropping fast.
Garison
garison -
Hi Garison,
.
I hope you can answer my question. I have an iMac, medio 2007, Intel 20" EMC 2133.
.
RAM: (1GB + 1GB) 667 MHz DDR2 SDRAM.
.
I would like to make my iMac "jaw dropping fast" as well ;-)
.
Is it PC 5300 or PC 6400 I should buy?
.
And what setup wold you recommend? (1GB + 2GB), (1GB + 4GB), (2GB + 2GB) or (2GB + 4GB)?
.
Thanks,
Mikkel
isn't it actually pc2-5300s ?
grze -
It is for the 2133, the 2210 uses 6400
maccentric -
There are comments elsewhere in this step by step re. the bezel removal. That step does NOT show how to remove it. Well, take the 5:39 secs to watch the above video. It clearly shows how the aluminum framed bezel easily comes off once you've seen it done. To whoever decided to preface these instructions with that video, thank you.
ECJohansen -