Introduzione

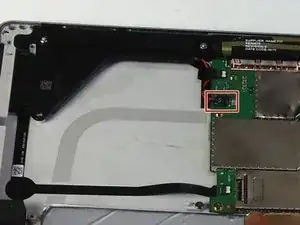
Questa guida ti mostrerà come sostituire l'altoparlante sinistro di Microsoft Surface Pro 4. I pulsanti di accensione e di controllo del volume sono integrati in questo altoparlante, quindi sarà necessario rimuovere questo altoparlante anche per sostituire uno di questi pulsanti.

  1. dUYbLHliwTRZhXVq
    dUYbLHliwTRZhXVq
    onEMUqL6yZJOgcdt
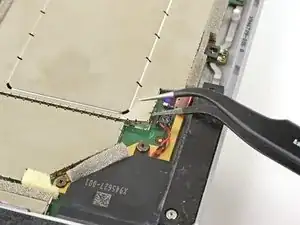
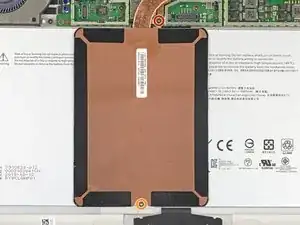
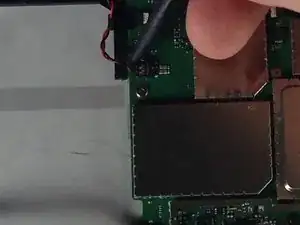
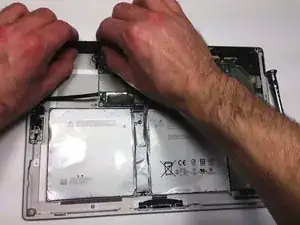
    • Infila una punta di un paio di pinzette appuntite in una fessura nell'angolo della schermatura EMI che copre il dissipatore.

    • Usa le pinzette per fare leva e sollevare la schermatura EMI dalla scheda madre il più possibile senza piegarla. Per ora non rimuoverla.

    • Stai attento a non forare la batteria con le pinzette mentre lavori sulla schermatura.

  2. vp4BAvM4Rl14TAXP
    vp4BAvM4Rl14TAXP
    3YQubJkMWeQXcguh
    YAOmpCXIJODw6e1N
    • Ripeti l'ultimo passaggio in diversi punti attorno al perimetro della schermatura EMI che copre il dissipatore.

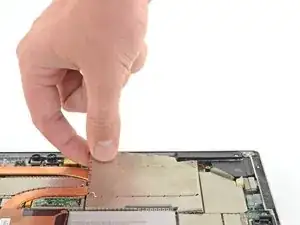
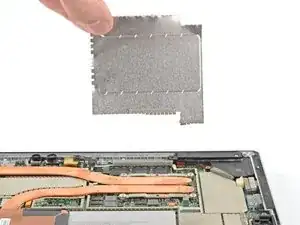
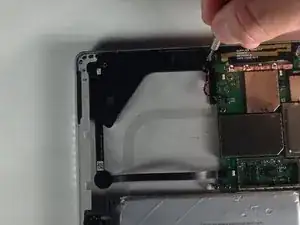
    • Rimuovi la schermatura della CPU.

  3. itBNsQWgtBqPkghl
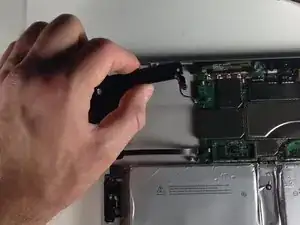
    • Usa un cacciavite Torx T3 per svitare le due viti dal dissipatore:

    • Una vite da 2,4 mm lungo il bordo superiore della placca rettangolare che copre la batteria

    • Assicurati di non perdere questa staffa, poiché potrebbe separarsi dal dissipatore di calore.

    • Una vite da 2,2 mm lungo il bordo inferiore della placca rettangolare che copre la batteria

    La première vis de 2,4 est une Torx 4, pour ce qui me concerne et non pas une Torx 3.

    Attention la deuxième vis est bien une TORX 3

    Remarque : La boite à outil "Essentiel electronics Toolkit - Grade B (ref EU145571-1)" ne contient pas l'embout T3

    Pour ma part j'ai utilisé donc le T4 en forçant un peu. Pas cool ;-(

    Jean-Claude Guinel -

  4. VPDxJO1w2MUgwXSl
    • Il dissipatore è saldamente fissato alla ventola.

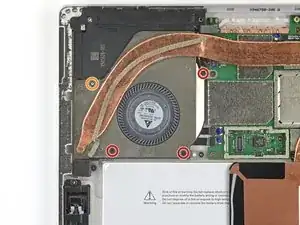
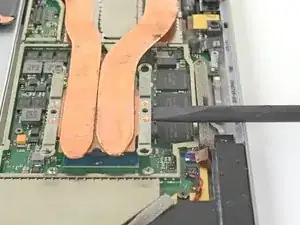
    • Usa un cacciavite a croce Phillips per svitare le tre viti da 2,4 mm che tengono ferma la ventola.

    • Usa un cacciavite Torx T5 per svitare l'ultima vite da 4,4 mm che tiene ferma la copertura della ventola.

    These screws were in a different area on my Surface, Pro 4 bought at release. The fan was visible and attached to the heat sink. Remove the two torx screws on the fan housing. No need to remove the Philips head screws that secure the fan.

    mike_mcquillan -

    My Surface Pro 4 has a fan here. Remove the screws around the fan and the whole heatsink including the fan can now be lifted off. DO NOT try and remove the heatsink from the fan as it is glued on.

    Andy -

    Sorry I’m super brand new to the game. I don’t know the difference between 1.5mm Torx T4 and 3.0mm Torx T4. I look under tools I need to buy, and the tool kits only say Torx T4 or T5, without the milimeters dimensions.

    MInh Le Nguyen -

    Je fais écho au commentaire de vennic, les longueurs indiqués en mm sont les longueurs des vis et n’impactent pas les tournevis à utiliser. Bien ranger les vis par longueur permets de mettre les bonnes vis aux bons endroits lors du remontage de l’appareil.

    Cajuteq -

    MInh Le Nguyen, the mm size refers to the length of the screws, not the size of the bit driver

    vennic -

    Don’t forget to unplug the fan (if present) before yanking on the heat sink! It’s just a small grey clasp that needs to be lifted up.

    vennic -

    The fan connector on mine was held in place by a white clamp on the side closest to the middle of the chassis. The long edge toward the middle flips up to vertical. That frees up the fan connector. Likewise for the black “wire” connector right beside it.

    David Hill -

    As previously mentioned, the fan should be disconnected (look at step 36) BEFORE you remove the fan/heat sink assembly. Ive done DOZENS of these repairs and the fan has always been part of the heat sink assembly.

    Gregg Stanley -

    I did all of this, now surface won't turn on. Any ideas?

    AlejandroC -

  5. pURRx6qUDI3rTwuI
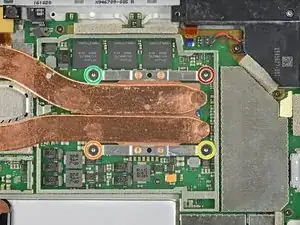
    • Usa un cacciavite Torx T5 per svitare le viti del dissipatore attorno alla CPU nel seguente ordine, un giro alla volta, finché non sono svitate:

    • Vite 1

    • Vite 2

    • Vite 3

    • Vite 4

    • Durante il rimontaggio, usa lo stesso metodo per avvitare queste vite, avvitandole una giro alla volta finché non sono salde.

    These screws were T5 Torx in mine, not T3 as in the instructions.

    Joshua Snavely -

    T5 Torx screwdriver is correct.

    Majid Mazouchi -

    T4 Torx for me.

    Geert Timmermans -

    What does one turn at a time mean?

    Fernando Ramirez -

    One turn for the "red" screw, one for the orange, one for the yellow, then green and now again one turn red, orange, yellow, green ... This cross pattern distributes the pressure evenly .

    VauWeh -

    I think I need a T6 torx screw the screwdriver is not working for these screws

    Hassan Ali -

  6. R6S1FsIVpbm3i4Xf
    R6S1FsIVpbm3i4Xf
    WPhHPU1QrNnbZBfW
    • Usa la parte piatta di uno spudger per sollevare delicatamente il dissipatore dalla CPU.

    • Stai attento a non ammaccare o piegare i tubi del dissipatore durante la rimozione.

    Hallo, kurze Frage ist der Kühlkörper also die Kupferstücke innen hohl?

    Peter Pyzik -

  7. Z5d3N3xpAaWDwGWl
    Z5d3N3xpAaWDwGWl
    kk2qocM3FcWKYnRp
    gdHWq1GOxGUnaFOu
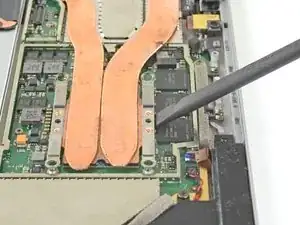
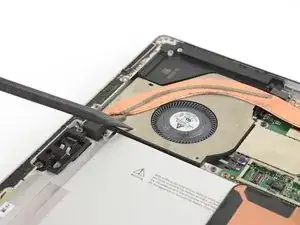
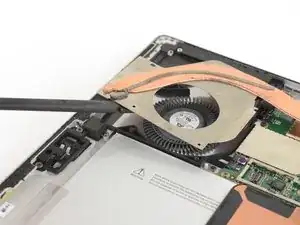
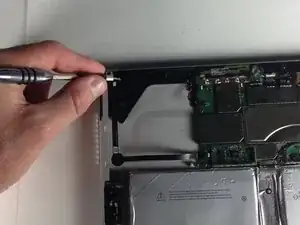
    • Infila la punta di uno spudger in un foro delle viti nella copertura della ventola e sollevala per separarla dalla ventola.

    • La copertura della ventola è tenuta ferma con del leggero adesivo.

    • Stai attento a non ammaccare o piegare i tubi del dissipatore durante la rimozione.

    The fan should be disconnected (look at step 36) BEFORE you remove the fan/heat sink assembly. Ive done DOZENS of these repairs and the fan has always been part of the heat sink assembly.

    Gregg Stanley -

    I'm not sure if adhesive was involved or if time and heat had caused the protective plastic film under the top section of fan to stick to the heat sink, but I had to use the Spudger to separate the heat sink from the plastic film to get it out.

    Ryan -

    These instructions were correct for my Surface. The fan cover was attached to the heatsink but the fan was not.

    Eddie McGlone -

  8. 1LjnVE6mJFbPgnCK

    Fan assembly may be taped to heat sink so fan screws and ribbon cable can be disconnected to remove as one with heat sink.

    Matt Dove -

  9. fZTsXEuaGplumIqC
    fZTsXEuaGplumIqC
    4vGbDE2YqpKEp6Sd
    • Scollega il connettore dell'altoparlante dalla scheda madre.

  10. OXMX4BxjbbglKPfn
    OXMX4BxjbbglKPfn
    4jyKsEsYr5Kfx15s
    NVfdELky5T3ZSQU1
    • Rimuovere le viti dall'altoparlante.

    • Vite Torx T5 da 2mm.

    • Vite Torx T5 da 3mm.

  11. YTQFjOAY3YAKpt1M
    YTQFjOAY3YAKpt1M
    bKwaGjpmwv5vOcwG
    XB1ZoYMTMcAcEitr
    • Libera l'altoparlante con le dita.

    • L'altoparlante è saldamente incastrato nel telaio ed è difficile da rimuovere.

  12. BbaHWNlqPuObJUH6
    BbaHWNlqPuObJUH6
    4BLBhpDsRr13oBpP
    uL2QruFGXNXGCaAR
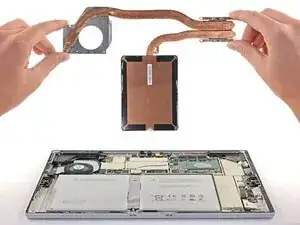
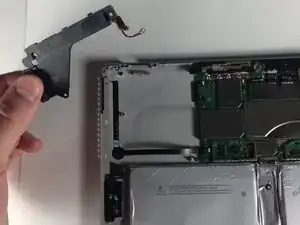
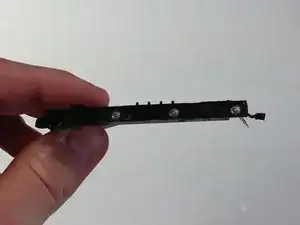
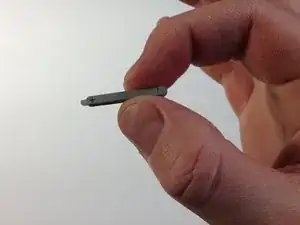
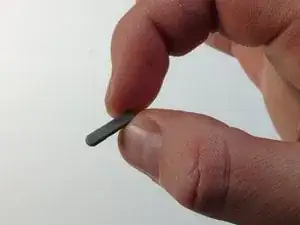
    • Rimuovi l'altoparlante, il pulsante del volume e il pulsante di accensione dal Surface Pro 4.

Conclusione

Per rimontare il tuo dispositivo, segui queste istruzioni in ordine inverso.

Sam Omiotek

Membro da: 25/02/19

71875 Reputazione

0 commenti