
Introduzione
This guide provides step-by-step instructions to update the firmware of your Mitsubishi Hands Free Module (HFM). By keeping your HFM's firmware up to date, you ensure optimal performance, compatibility with new devices, and access to the latest features.
Note that once the update is completed, the system will be reset and the following information will be deleted:
- Phone book data
- Pairing data
- Voice Recognition data
Strumenti
-
-
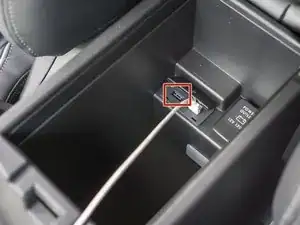
Turn the Ignition switch to the ACC or ON position.
-
Switch off the radio and CD player by py pressing on the PWR/VOL knob.
-
-
-
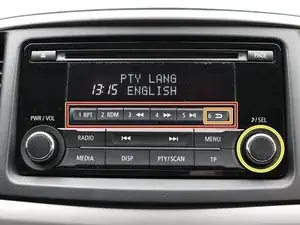
Press the following buttons in that order within sixty seconds from Step 1:
-
The 1 RPT button.
-
The ⏮ button.
-
The ⏭ button.
-
The 4 ⏩ button.
-
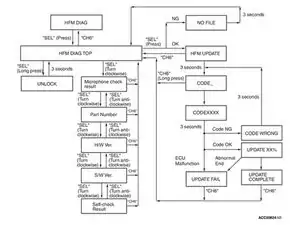
The display should now read
DIAG MODE.
-
-
-
Turn the ♪/SEL knob clockwise to display
HFM DIAG. -
Press on the ♪/SEL knob to display
HFM DIAG TOP.
-
-
-
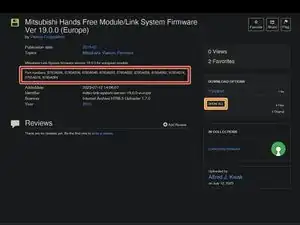
Check if the Firmware Version works with your device.
-
Download the Firmware for your device.
-
Press on SHOW ALL.
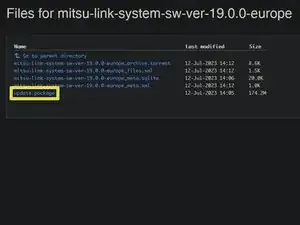
-
Download update.package.
-
-
-
Re-enter the HFM DIAG-Section of the Diagonstic Menu by repeating the previous steps or pressing the 6 ↩ button while displaying the Version Number.
-
Initiate the Update by pressing on the ♪/SEL knob.
-
-
-
When the display reads
CODE_, enter the Security PIN using the number buttons. -
Perform the following steps to remove your Security PIN, if you have forgotten it:
-
Return to
HFM DIAG TOPby long pressing the 6 ↩ button. -
Forecefully remove on the Security PIN by long pressing the the ♪/SEL knob until the display reads
UNLOCK. -
The display will return to
HFM DIAG TOPafter 3 seconds. You can now proceed by repeating Step 9.
-
-
-
The update will start 3 seconds after you entered the correct Security PIN.
-
Wait for the update to finish.
-
Once the update is completed the display will read
UPDATE COMPLETE.
-


Drive safe!