Introduzione

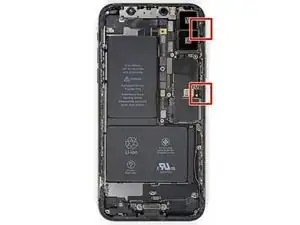
Guida solo prerequisita per aprire un iPhone X. Questo permette l'accesso a componenti interni da riparare o sostituire.

  1. Whblnhy2uvYmFjIL
    Whblnhy2uvYmFjIL
    4URQtwUtqSQUKdHH
    NgjPkqJtEMhTXkd3
    • Se il tuo iPhone ha uno schermo crepato, evita di peggiorare la situazione e di tagliarti: usa del nastro adesivo per coprire le crepe.

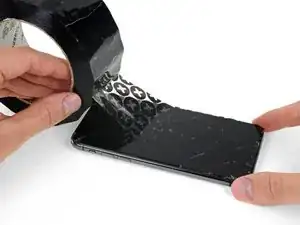
    • Attacca diverse strisce di nastro adesivo da pacchi trasparente sopra lo schermo finché non è completamente coperto.

    • Indossa occhiali di protezione per proteggere gli occhi dal vetro che potrebbe liberarsi durante la riparazione.

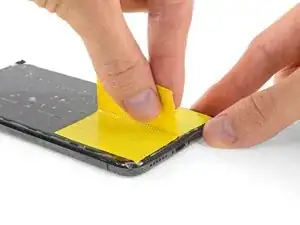
    • Se nei prossimi passi non riesci a far aderire la ventosa, piega un pezzo di nastro adesivo resistente (come del nastro americano) a forma di maniglia e usa quello per sollevare lo schermo.

    • Se non funziona nulla, puoi incollare la ventosa allo schermo con della supercolla cianoacrilica.

  2. aaO4KYlBJShASHjk
    aaO4KYlBJShASHjk
    1r6VLlUjodppndSN
    BMhMJ35CLUOmyNqB
    • Le tre fasi successive mostrano come si utilizza l'Anti-Clamp, uno strumento che abbiamo progettato per facilitare la procedura di apertura. Se non stai utilizzando l'Anti-Clamp, salta i tre passaggi successivi per un metodo alternativo.

    • Per istruzioni complete sull'uso dell'Anti-Clamp, consulta questa guida.

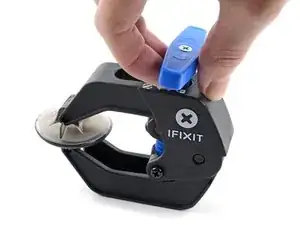
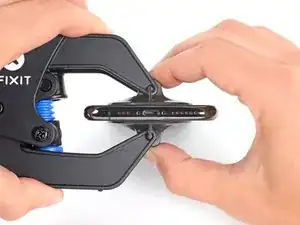
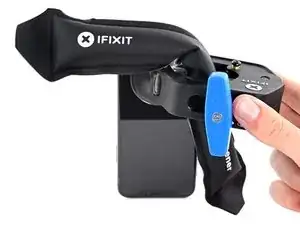
    • Tira indietro la maniglia blu per sbloccare i bracci dell'Anti-Clamp.

    • Fai scorrere i bracci oltre al bordo destro o sinistro dell'iPhone.

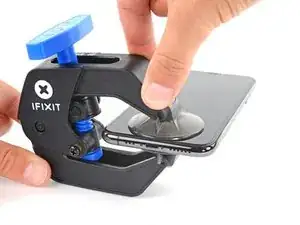
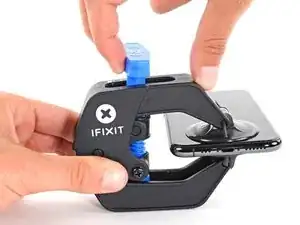
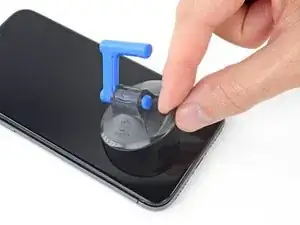
    • Posiziona le ventose vicino al bordo inferiore dell'iPhone: una sulla parte anteriore e una sulla parte posteriore.

    • Premi le ventose nell'area di interesse.

    • Se la superficie del dispositivo è troppo scivolosa per consentire all'Anti-Clamp di aggrapparsi, è possibile utilizzare del nastro da imballaggio per creare una superficie più aderente.

  3. fm1Txb6ZWoZVRccg
    fm1Txb6ZWoZVRccg
    ASYBeEfJh2IqKXlL
    qYIoimNJqUrEuJAT
    • Spingi la maniglia blu in avanti per bloccare le braccia.

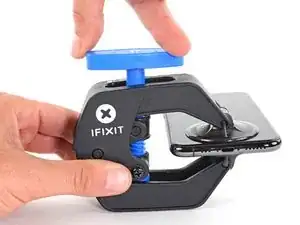
    • Gira la maniglia di 360°, in senso orario, fino a quando le ventose non aderiscono all'iPhone.

    • Assicurati che le ventose rimangano allineate tra loro. In caso contrario, assicurati di riallinearle, allentando le ventose.

  4. fqtITHlwZLOFLmTY
    fqtITHlwZLOFLmTY
    321YFxdKNFRFVwk3
    YctteqQxMcE3kxyP
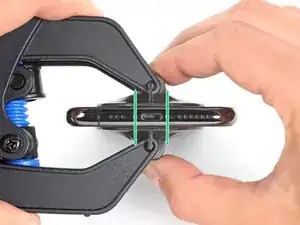
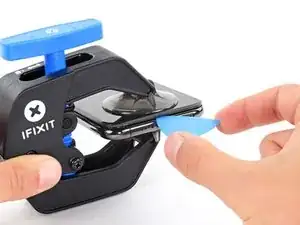
    • Spingi la maniglia blu lontano dalla cerniera per attivare la modalità di apertura.

    • Si può anche usare un asciugacapelli, una pistola termica oppure una piastra riscaldante. Si ricorda che temperature troppo alte possono danneggiare il dispositivo, in particolare lo schermo e la batteria. Procedi con cautela.

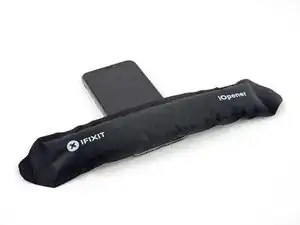
    • Piega l'iOpener in modo che sia appoggiato sopra il lato inferiore dell'iPhone.

    • Attendi un minuto per dare tempo all'adesivo di staccarsi e creare un'apertura.

    • Inserisci un plettro sotto lo schermo e la scocca di plastica, non solo sotto lo schermo.

    • Se l'Anti-Clamp non crea uno spazio sufficiente, applica più calore all'area e ruota la maniglia di 90 gradi in senso orario.

    • Non girare più di 90 gradi alla volta e attendi un minuto tra un giro e l'altro. Aspetta e lascia che l'Anti-Clamp faccia il lavoro per te.

    • Salta i prossimi tre passi.

    DO NOT separate the glass from the plastic bumper or rim around it. These instructions don't clarify that the pick has to be inserted between the plastic rim and the metal body. It is likely that the glass will lift slightly off the plastic surround before the plastic will lift out of the metal body. I had success sliding a card or pick back and forth along the bottom edge of the plastic rim while pulling on the suction cup. Eventually there was a space large enough for the pick to go under the plastic rim.

    Anessa -

    Thanks for pointing this out! I'll revise this step to clarify this point.

    Arthur Shi -

  5. JYhTvDYuGLQw3jiI
    • Il riscaldamento del bordo inferiore dell'iPhone aiuta ad ammorbidire l'adesivo che blocca il display, semplificando l'apertura.

    • Usa un asciugacapelli oppure prepara un iOpener e applicalo per circa un minuto al bordo inferiore dell'iPhone per ammorbidire l'adesivo sottostante.

    General tip regarding heating necessary to remove adhesive:

    consider using a heated tip of a small screwdriver or metal spudger (not the one made of plastic, provided in kit), rather than to heat the device itself.

    Uri -

    You then need to be careful about the temp of the tool which if hot enough can melt plastic components or harm them. Keeping the heat source (heat gun) far enough away from the object that you’ll eventually melt the glue but would be much harder to melt components. I try to keep 4” or 5” gap between the source & object

    Sandman619 -

    Thanks for the info. Could a air convector do the job

    dominique.br -

    When opening a device that has previously been worked on, and on which the adhesive might not have been replaced, be extremely carful when opening the phone. It will open much more easily than expected. If you’re not careful you might rip a cable.

    jonpol -

    Is this tool required or can I just use the Anti-Clamp by itself.

    Mikail -

    If you have a 3d printer, heat the bed to 80c and put the phone screen side down on it for 30 secs

    philip.joseph123 -

  6. qXGGZ2MpZIYeQjKI
    qXGGZ2MpZIYeQjKI
    tGDwxj5neYkh3MDh
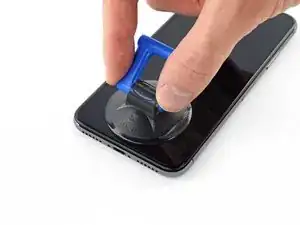
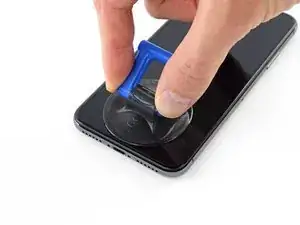
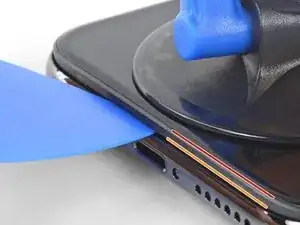
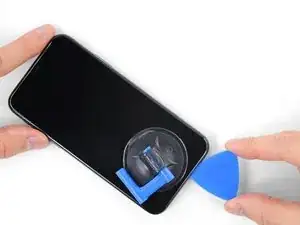
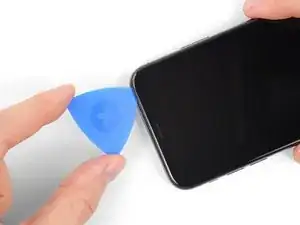
    • Se usi una sola ventosa, applicala sul bordo inferiore del telefono evitando la parte curva del vetro.

    If you were using some form of screen protector, it may come off first as soon as you pull on the suction cup. Do not be alarmed. That is normal behavior.

    Alain-Daniel Wa-Baguma -

    3m VSB double stick tape will stick to the screen when the suction cups fail (see my comment on step 1)

    Tawan Khamapirad -

  7. uTXCGQFa5j4E5T3Y
    uTXCGQFa5j4E5T3Y
    DWfsuj4RCooAtKRa
    Zw4PcEZSTKHaLcqq
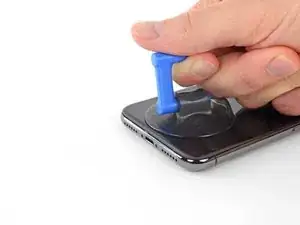
    • Tira la ventosa applicando una tensione forte e costante fino a creare una piccola fessura tra lo schermo e il resto dell'iPhone.

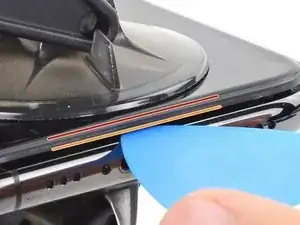
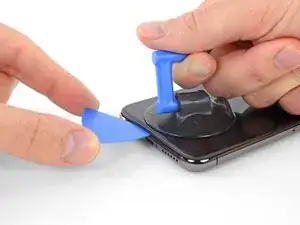
    • Inserisci un plettro nella fessura sotto la scocca di plastica, non sotto lo schermo.

    • L'adesivo impermeabile che tiene in posizione lo schermo è molto tenace. La creazione di questa fessura iniziale richiede l'applicazione di una forza piuttosto elevata. Se hai difficoltà nell'aprire una fessura, applica altro calore e muovi lo schermo su e giù per indebolire l'adesivo finché non riesci a infilare lo strumento di apertura.

    In addition to safety goggles, I would recommend you also wear good gloves to avoid getting cut with the glass as you try to pry it open.

    Alain-Daniel Wa-Baguma -

    The top about applying more heat and gently rocking the screen up and down to weaken the adhesive did the trick for me. Thank you!

    Monil Shah -

    There needs to be more clarity on where to shove the opening pick into. There is actually two openings that the pry tool can be forced into: one below the black plastic bezel, and one above the black plastic bezel. When I heated my screen with a warming pad and pulled up the suction cup, it actually pried apart above the black plastic bezel which removed the touch screen from the display panel. With this being the first newer iPhone I'd opened since the 3GS, I didn't realize that I was opening the wrong opening as the directions only mentioned one opening and did not warn of this. I was pretty disappointed in the lack of mentioning this, as I was taking my time and following it to the tee. As a result, it destroyed my original iPhone screen.

    Caleb Davison -

    DO NOT separate the glass from the plastic bumper or rim around it. As someone else noted, these instructions don't clarify that the pick has to be inserted between the plastic rim and the metal body of the phone. When pulling upwards with the suction cup, it is likely that the glass will lift slightly off the plastic surround before the plastic will lift out of the metal body. I had success sliding a card or pick back and forth along the bottom edge of the plastic rim while pulling on the suction cup. Eventually there was a space large enough for the pick to go under the plastic rim.

    Anessa -

    Thank you for pointing this out! I've updated the step to reflect this.

    Arthur Shi -

    The suction cup doesn't work at all... The minimum force I apply to lift it up, it comes off completely. This is very frustrating!!!

    Mario Silva -

  8. QE4lOUoglbyWQUwm
    QE4lOUoglbyWQUwm
    cHHBBJPBr4bVv24U
    agDTTsHWFYyI2WBC
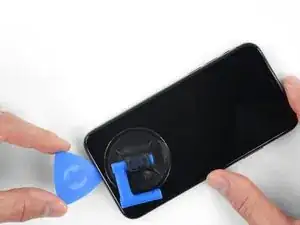
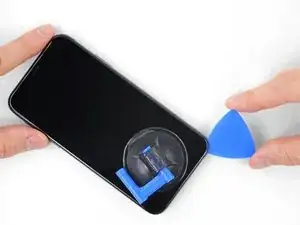
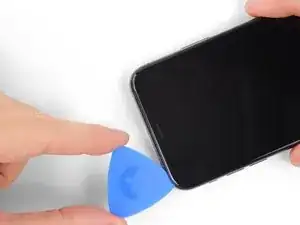
    • Fai scorrere il tuo attrezzo attorno all'angolo inferiore sinistro e lungo il bordo sinistro dell'iPhone per rompere l'adesivo che tiene in posizione il display.

    • Non inserire il plettro più di 3 mm all'interno del dispositivo. Andare troppo in profondità potrebbe danneggiare dei componenti interni.

  9. mkLvBfvMoYsfQbGS
    • Ci sono dei cavi delicati sul lato destro dell'iPhone. Non inserire il plettro all'interno di questo lato, poiché potresti danneggiare questi cavi.

    Wouldn’t it be better to put this part BEFORE the step where you have to pry open the phone?

    Jan D. Höllwarth -

  10. OEUEsoSAmOAWxAMR
    OEUEsoSAmOAWxAMR
    YOhTValkxrevLipu
    aSZ2MAdtw4ZImiCD
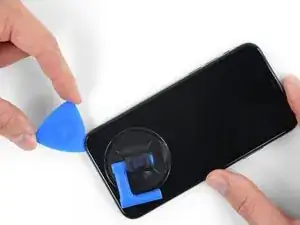
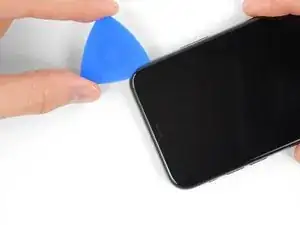
    • Inserisci nuovamente il tuo attrezzo nell'angolo inferiore destro dell'iPhone e fallo scorrere lungo il lato destro del telefono per separare l'adesivo.

    • Non inserire il plettro più di 3 mm all'interno del dispositivo. Andare troppo in profondità potrebbe danneggiare dei componenti interni.

    If you have flat feeler gauges (for adjusting engine valve tappet clearance, ignition points … old school) the .003” thick gauge goes right in. Work your way up in thickness until you can get the pic or supplied pry tool in. Don’t insert metal feeler gauge in too far, just enough to hold crack open. I didn’t need to use the suction cup. I used a hot/cold gel pack heated in microwave to heat edges to soften glue a bit. Made sure it wasn’t so hot I couldn’t stand it on my skin.

    William Olstad -

  11. WfcjjEBfMZqEySEf
    WfcjjEBfMZqEySEf
    PCXKpWMWg6GWEViY
    McqYslJ4vV1SOOnm
    • Il bordo superiore del display è fissato sia con la colla sia con delle clip.

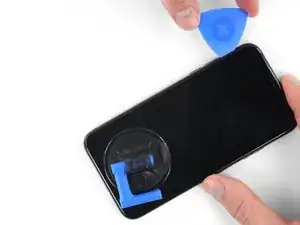
    • Fai scorrere il plettro sotto il bordo superiore del display, mentre muovi o scuoti delicatamente il display verso il basso, in direzione della porta Lightning.

    • Se ci metterai troppa forza, le clip si romperanno. Lavora con cautela e pazienza.

    • Non inserire il plettro più di 3 mm all'interno del dispositivo. Andare troppo in profondità potrebbe danneggiare dei componenti interni.

    • Fai scorrere il plettro nell'angolo opposto e taglia tutto l'adesivo rimanente.

    These are the best instructions I’ve ever read for anything.! Thank you!

    Peter Andrew -

  12. GnieimxVeXdJJobM
    • Tirare la piccola linguetta della ventosa per rimuoverla dal pannello anteriore.

  13. XFu5RLJA6ncMAhxo
    XFu5RLJA6ncMAhxo
    nCGOAuVQLFmYsrOd
    XjQSuyqDe1k51mua
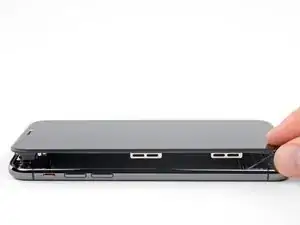
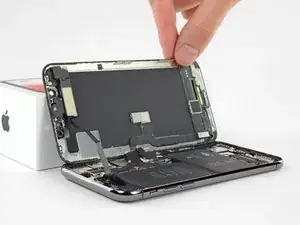
    • Apri l'iPhone sollevando il display dal lato sinistro, come per sollevare la copertina posteriore di un libro.

    • Non cercare di staccare del tutto il display, perché questo è ancora connesso alla scheda logica dell'iPhone da diversi fragili cavi piatti.

    • Come indicato nell'immagine, accertati che il telaio venga via assieme allo schermo e non resti incastrato nel dispositivo.

    • Appoggia il display contro qualche tipo di supporto per mantenerlo aperto mentre lavori sul telefono.

    • Durante il rimontaggio poni il display in posizione, allinea le clip lungo il bordo superiore e premi delicatamente il bordo stesso per metterlo in posizione prima di reinserire tutto il display. Se non si incastra facilmente fino al clic, controlla le clip lungo il perimetro del display per assicurarti che non si siano deformate.

    My phone came apart in a different way and looks not right the little box at the top of the display as actually bolted to the top of the frame body I think something went really wrong when I opened it.

    Mike Kostersitz -

    It opens like a book but be careful not to open it all the way — only as far as shown in the photo. Otherwise it will strain the thin cable that connects the sensor module and then no more FaceID for you (or, as it turns out me). This could have been made more explicit in the instructions.

    Richard Tucker -

    It opens like a book but be careful not to open it all the way  … the small stainless steel tabs that hold the screen around the metal frame, that are on the bend place (right side of the phone)… are tend to bend, you can straighten them back to 90 deg. but the plastic base that they are on? very fragile- watch out not to break the plastic bezel … it may come apart of the glass.

    dabur872 -

    Advice for re-assembly: Before closing up the phone with the seal, check if phone is powering up again and speaker, mic and sensors are still working. If done this check even before installing the board connector bracket in Step 13.

    Alexander Nowak -

Conclusione

Per rimontare il tuo dispositivo, segui queste istruzioni in ordine inverso.

Jeff Suovanen

Membro da: 06/08/13

426762 Reputazione

0 commenti