
Introduzione
Questa procedura si applica a tutti i modelli del MacBook Pro da 13" e 15" del 2016 e probabilmente del 2017 (non abbiamo provato). Le informazioni sono state adattate ed aggiornate dalla fantastica risposta di @thebookyard ad una domanda simile.
Leggi la guida prima di effettuare la procedura!
Strumenti
-
-
Prima di iniziare, LEGGI TUTTA LA GUIDA. Questa procedura è poco pratica e dovrai vedere la parte inferiore del tasto prima di iniziare (passi 8 e 9). Se non stai attento, danneggerai la barra spaziatrice, che è molto difficile, se non impossibile, al momento, da ottenere come ricambio singolo a causa della giovane età del portatile.
-
-
-
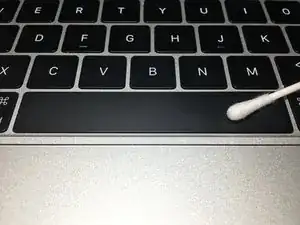
Spegni il tuo MacBook Pro e pulisci attorno alla barra spaziatrice usando un cotton fioc e dell'alcool isopropilico. Questo eviterà di far cadere troppa sporcizia sotto la barra spaziatrice, che è la causa del problema.
-
-
-
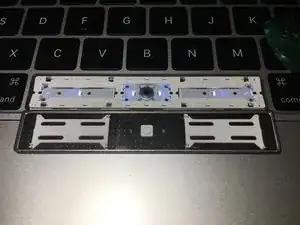
La barra spaziatrice sul MacBook Pro 2016 ha 3 strati: Quello superiore nero (la copertura del tasto), uno intermedio in plastica bianca (il meccanismo a forbice) e quello inferiore (la base della tastiera). Lavoreremo tra la copertura e il meccanismo, in questo modo la copertura potrà essere rimossa, pulita e sostituita senza danni.
-
-
-
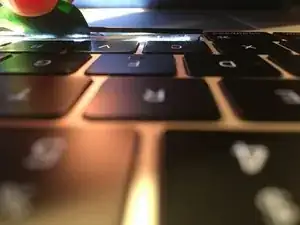
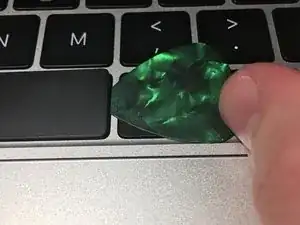
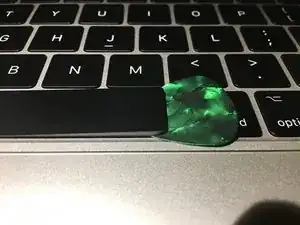
Infila un plettro sottile o una scheda (non una carta di credito: molte sono troppo spesse) in verticale sotto il bordo destro del tasto.
-
-
-
Spingi il plettro a destra e verso il basso dal suo bordo superiore. Questo dovrebbe sollevare il bordo destro della copertura del tasto. Assicurati di non spingere ancora il plettro a sinistra (verso l'interno, sotto il tasto). Se spingi il plettro troppo presto, finirà sotto il meccanismo a forbice.
-
-
-
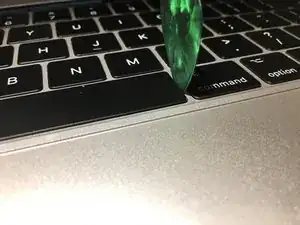
Una volta che il plettro è orizzontale, spingilo verso il centro del tasto. Dovresti sentire più resistenza. Ruota il plettro e il primo gancio dovrebbe rilasciarsi con uno scatto. Questo passaggio non richiede molta forza.
-
-
-
Continuando sul bordo superiore del tasto, ripeti la procedura per gli altri 3 ganci sotto il tasto. Una volta fatto ciò, questo tasto sarà appeso al bordo inferiore ma libero su quello superiore. Dovresti poter ruotare il tasto in modo che sia quasi verticale e sollevarlo senza alcuna resistenza.
-
-
-
Usando un coton fioc e dell'alcool isopropilico, pulisci sotto il tasto. Rimuovi qualsiasi briciola con un paio di pinzette sottili.
-
Sì, lo so, il mio portatile è acceso. Fai come dico, non come faccio!
-
-
-
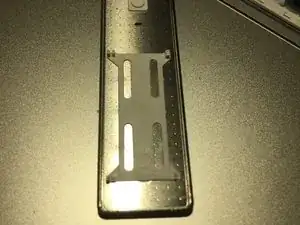
Fai caso ai diversi tipi di ganci sul tasto. Quelli sulla destra nell'immagine sono quelli del bordo vicino al trackpad, dove risiedono in dei piccoli fori. Inserisci il bordo inferiore del tasto, assicurandoti che siano inseriti nei fori.
-
Puoi capire dalla forma dei ganci sulla destra perché hai dovuto separare prima il bordo superiore del tasto. Se ci provi dal bordo inferiore, romperai i ganci come come puoi vedere che mi è capitato per quello in basso a destra nella foto.
-
Non preoccuparti troppo per i ganci rotti. La mia barra spaziatrice funziona ancora nonostante si siano rotti 3 ganci su 8 mentre scrivevo questa guida. Speriamo che tu abbia più successo con le conoscenze appropriate pregresse.
-
-
-
Infine, premi lungo il bordo superiore del tasto per ricollegare i quattro ganci. Hai sostituito il gancio.
-

14 commenti
This does not belong on teardowns, it belongs in repairs.
I agree too.
Will this work for other keys on the keyboard? My “A” key has something stuck underneath it.
I’d use one of the many video guides on YouTube for that. The normal keys are easier than the space bar, but it’s basically the same; there are two clips at the top of the key that you can undo with a pick and two hooks at the bottom that allow you to remove the key once the clips are out.
I have a special problem with the keys. Some keys are significantly brighter than others in my 2017 MBP. I suppose that the keycap has the diffusor layer what can cause this phenomenon. Am I right? Because in this case the replacement will solve this problem…
Gabor -