Introduzione

Segui questa guida per rimuovere il gruppo della scheda madre nel tuo Samsung Galaxy Watch Active2.

  1. PpZOv4HwIXocgyLa
    PpZOv4HwIXocgyLa
    URGisUyoLxnnOdxd
    • Spegni il Galaxy Watch Active2 tenendo premuto il tasto inferiore per circa 3 secondi. Dovresti sentire una breve vibrazione.

    • Quando compare il simbolo "Spegni", premi il centro dello schermo per farlo spegnere. Dovresti sentire una vibrazione più lunga come conferma.

  2. uu5BVXM3mPVqtxCV
    • Usa un cacciavite Tri-Point Y00 per svitare le quattro viti da 4 mm sul retro dell'orologio.

    Y1.5 works just as good

    BRIAN MIRANDA -

    Bekomme ich nicht auf … Schrauben zu fest

    Tino Wehner -

    The screws are attached to the cover. So you just need to loose them, not remove them.

    Yonic Surny -

    Any tips for a too tight screw ?

    Daisy Doune -

  3. gaLLXZL6PtTfeKTr
    gaLLXZL6PtTfeKTr
    R12EOStuFS1gSrnJ
    pEvRLZfPye6TlF5x
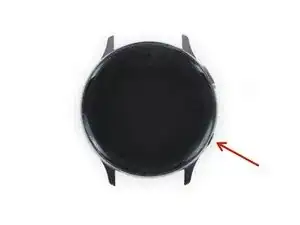
    • Posiziona un plettro tra la copertura posteriore in plastica e la cassa in metallo vicino ai tasti.

    • Spingi il plettro nella fessura per separare la copertura posteriore dalla cassa.

    • Non rimuovere ancora del tutto la copertura posteriore. C'è un cavo che la collega alla scheda madre.

    There is a glue-ish gasket keeping it closed. I used an exacto knife to start it opening.

    BRIAN MIRANDA -

    This was super helpful thank you! Perfect timing

    this is trash -

    Waarmee kan ik de achterste oplaadplaat weer vast lijmen op de achterste behuizing

    Ilona Smit -

  4. bpWZC4dQSQhyoeRG
    bpWZC4dQSQhyoeRG
    HBeHnBVjm3DQi5vK
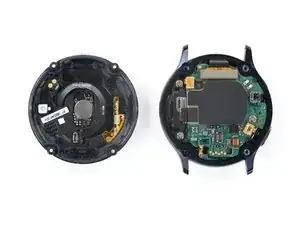
    • Solleva attentamente la copertura posteriore per accedere al connettore del gruppo dei sensori.

    • Usa un spudger per scollegare il gruppo dei sensori dalla scheda madre.

    Ou je peu me procurer le tourne vis tri point 000

    grenierlulu -

  5. IgBIqAvjWTgdSyaX
    • Rimuovi la copertura posteriore.

    Where would you recommend buying a new back panel/charger?

    Nathan Williams -

  6. hLMRrQcln2F44EQC
    hLMRrQcln2F44EQC
    nO2YThO42whDToCV
    J1U56kAhiy32Q3hP
    • Usa uno spudger per scollegare il gruppo dello schermo e l'altoparlante.

  7. ZyS3IXZroO6LiUpm
    ZyS3IXZroO6LiUpm
    vZEaGvB25hI1MnBW
    edFTAGtRlQHABfbw
    • Usa uno spudger per scollegare il sensore barometrico, i tasti e il microfono.

  8. 4qX2lhcADWyrkPW6
    4qX2lhcADWyrkPW6
    Ti3ToIYjPAZSBcck
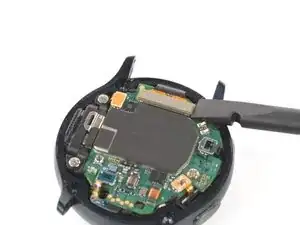
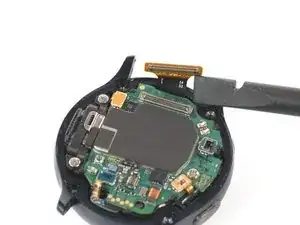
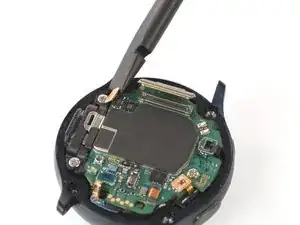
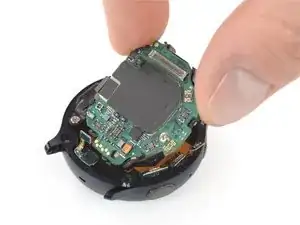
    • Infila uno spudger sotto la scheda madre in alto a destra, accanto al connettore dello schermo.

    • Ruota leggermente lo spudger per rilasciare il gruppo della scheda madre.

    • Leggere i commenti sotto questo passo e il successivo potrebbe aiutarti se stai avendo difficoltà.

    I would not suggest to do so. There are components underneath the motherboard as well. There are none in this specific corner, but the core assembly does not come out that easily and people might try other corners and positions. Rather unscrew the motherboard and remove the battery from the core assembly directly.

    Nicola Tambascia -

    Yes! I was unable to remove the motherboard as pictured unless the screw was removed (Step 12). I suggest a re-ordering of steps in this guide.

    Jerry Rattanong -

  9. yUc2Y4nQihhPqWvT
    yUc2Y4nQihhPqWvT
    QNKTxIJwKFhonAco
    sdqNalvtlsoNgOk3
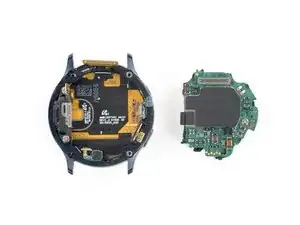
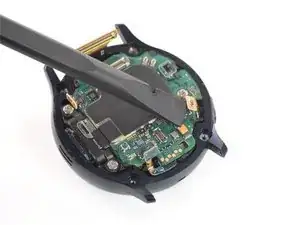
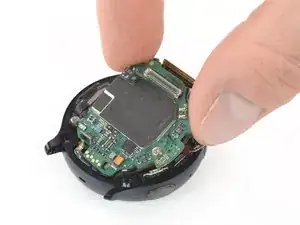
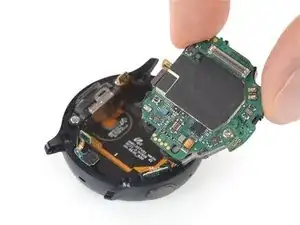
    • Prendi il gruppo della scheda madre e sfilalo attentamente da sotto i cavi.

    • Rimuovi il gruppo della scheda madre.

    I had to remove that screw on the core assembly using a Phillips 000. When I initially tried lifting, the core assembly started to bend. Mine also has a connector under the core assembly near the thumb in the picture. The connector goes from the underside of the core assembly to the screen/body. It prevents me from removing the core assembly as I'm not sure how it should be removed examining it

    Louis Finney -

    This step is really difficult, and I'm still not sure it was necessary. The core assembly is really packed in there, and it took me several attempts, lifting from various corners. Don't pull by the circuit board. It will bend if you're not careful. You've got to get under the core assembly. I had the most luck starting next to the display connector at the top, then moving to the sensor on the other end of the board (barometric sensor), then moving to the speakers on the left, and finally lifting from multiple points once it was out far enough. In really hoping I didn't damage anything.

    Karl Arp -

    I think the comments here should be added to the step before.

    Nicola Tambascia -

    I would be very careful following Louis Finney's advice above. They are describing detaching the motherboard from the core assembly which also includes the battery and internal frame. Removing the motherboard from the rest of the core assembly exposes a very delicate looking ribbon cable that I nearly tore by trying to remove the screw holding the motherboard in place.

    As Karl Arp notes, trying to pry the core assembly up by the motherboard feels like it puts a lot of strain on the circuit board, so it might be necessary to go at it from multiple angles.


    Removing the whole core assembly was very difficult, and required a lot more force than I was expecting, and I had the luxury of being able to approach it from both sides, as the screen had already detached from the device (hence the need to repair), and still found it very challenging.

    I would advise, at a minimum applying mild heat to the metal outer frame to hopefully cause it to expand and give some additional clearance.

    Philip Hickey -

Conclusione

Per rimontare il tuo dispositivo, segui le istruzioni in ordine inverso.

Tobias Isakeit

Membro da: 31/03/14

116550 Reputazione

0 commenti