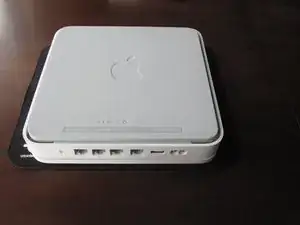
Introduzione
Questa guida ti mostrerà come aprire il tuo Time Capsule per la prima volta. Prenditi tutto il tempo necessario per il primo passaggio, specie se il tuo Time Capsule ha qualche anno: l'adesivo può indurirsi parecchio.
Strumenti
-
-
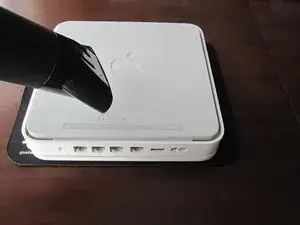
Apri il Time Capsule esponendo le viti che lo tengono insieme. Le viti sono nascoste dalla base in gomma, che è la faccia infeeriore del dispositivo.
-
Usa una pistola termica o un asciugacapelli per scaldare la base in gomma, per ammorbidire l'adesivo che la tiene ferma.
-
Iniziando in un angolo, solleva attentamente la base in gomma evitando che si trappi. Puoi usare un plettro o un piccolo righello in plastica per separare la gomma dal metallo.
-
-
-
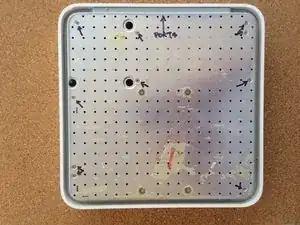
Una volta rimossa la base in gomma dal dispositivo, svita le 8 viti Philips PH00 che fissano la scocca inferiore in metallo alla scocca superiore in plastica.
-
-
-
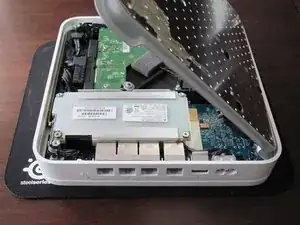
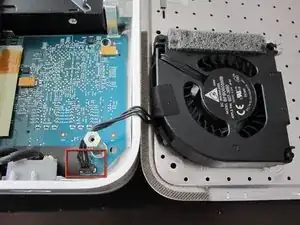
Solleva il bordo sinistro della scocca in metallo e ruotalo lentamente attorno al bordo destro del dispositivo.
-
Poiché in molti hanno rotto il cavo della ventola, è consigliato NON fare leva sul connettore per scollegarlo. Sii MOLTO attento con questo connettore: è molto delicato. Se devi scollegare la ventola dalla scheda madre, usa uno spudger o delle pinzette stando MOLTO attento.
-

Per rimontare il dispositivo, segui le istruzioni in ordine inverso.

7 commenti
I accidentally edited this page, instead of the fan. Could anyone tell me how to reverse that/reverse it for me? Thanks!
Just un-edit the page to what it used to be.
cann anyone tell me what kind of screws the timcapsul has on the bottom, I kind of lost them and need to get replacement screws but io can not find anything under PH0 Screws online…
ginol95 -
Slowly start peeling at one corner... worked better than shown on the pictures.
Markus -
Slow down particularly near the bottom label where it is stiffer. Either that or I needed to give it more heat. Going too fast can risk tearing the rubber base if the adhesive is strong.
ElvinC -
If you are wondering if the Time Capsule will still work as a router if you remove the HDD and leave it out, the answer (according to another webpage I read) is YES, it will still work. Apparently, you get a warning with the AIrPort Utility about a missing HDD, but it still works. I wanted to keep and reuse the 1TB Hitachi HDD for offsite data backup.
CraigH -
Use an iron instead of a heating gun or hairdryer!
Gradually raise the temperature while checking for separation, while moving over the rubber. I first cleaned the rubber with some soap, to avoid scorching dust or grease. The setting for synthetic fabrics seemed to do the job with my Tefal iron; probably a little over 100 degrees centigrade. No steam off course!
Worked like a charm without leaving almost any residual glue.
Sticking the rubber sole back after the repair was also successful.
Frits de Bruijn -
Thanks for sharing this.
kenatkenichikato -
Adhesive tape used is Nitto No. 5015. I found a piece of a back-paper left underneath the rubber…
vesa -
Is there a possibility to change an already changed 2TB SATA to a bigger one? Mine is full. because I added another MacBook Pro, but I’d rather not buy a newer TimeCapsule
Bette Rose -
I have a heater plate from my beer fermenting days. Sat the router on this rubber side down for an hour or so and the rubber came off easily and cleanly. A pet bed heater may work just as nicely.
publiclee -