Introduzione

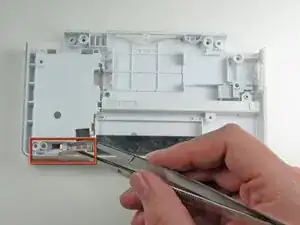
Sostituisci l'interruttore del volume sul DS Lite.

  1. VAkqhUG2ctFuiKKh
    VAkqhUG2ctFuiKKh
    eIKe4YBYXvQpmQZa
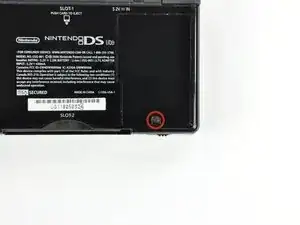
    • Svita la vite a croce Phillips che fissa il coperchio della batteria al case inferiore.

    • La vite rimane ancorata al coperchio della batteria.

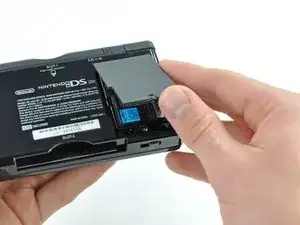
    • Solleva il coperchio della batteria verso l'alto con uno spudger o un'unghia e solleva il case inferiore.

    A Phillips #000 (PH000) seems to give a more secure fit (no slipping) than the stated Phillips #00.

    Ritchie -

    This will be good for mods

    Matthew Bevins -

    I'm having a problem getting the screw to unscrew. I have the right Phillips ( it was included with all the stuff I got this) Any tips. it doesn't look like the screw is spinning but i haven't played my Nintendo DS Lite for 3 years.

    whittlegirls -

    bonjour j’ai une petite question pour vous fais trés longtemps que j’ai pas utiliser mon nintendo ds lite et quand je le branche il allume 1 fois orange après il s’enteint même s’il est brancher ça veux tu dire qu’il faut que je change de batterie ? Merci

    Marie-Julie Richer -

    Soit un changement de batterie, soit la carte-mère a peut-être un court-circuit :/

    Polaris -

  2. 25sZ5YeYaes4dCMx
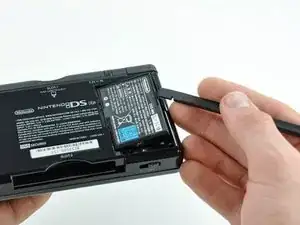
    • Incunea il bordo di uno spudger tra il lato della batteria e l'alloggiamento nel case inferiore e fai leva verso l'alto per rimuovere la batteria.

    • Rimuovi la batteria dal DS Lite.

  3. TgU6hRLWjWFK4TCK
    TgU6hRLWjWFK4TCK
    CMk1E2IEHDrjmKjB
    • Usa la punta di uno spudger per staccare entrambi i piedini in gomma dal DS Lite.

  4. 5mujrSp3TuXlBfCh
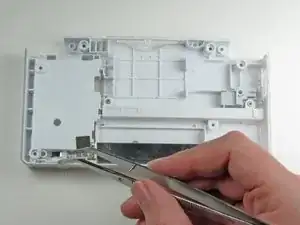
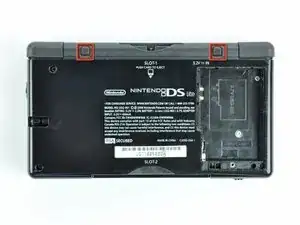
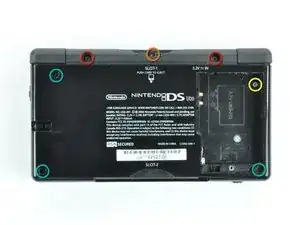
    • Rimuovi le seguenti viti che fissano il case inferiore al corpo del DS Lite:

    • Due viti a croce Phillips dorate da 4,3 mm

    • Una vite Tri-Wing nera da 3,9 mm

    • Una vite a croce Philips cromata da 3,3 mm

    • Tre viti Tri-Wing cromate da 5,5 mm

    Not mentioned is to remove the jumper/connector below the word "SLOT-2". Case WILL NOT separate otherwise.

    Kayla -

    In the separation step below, the third picture show the case with the jumper/connector removed.

    Kayla -

    I cannot remove the tri-wing screws.

    Zach Smith -

    Same to me. I tried opening the case by force. Broke several parts of the motherboard…

    Leon -

    I can't remove the final tri wing screw in the battery section and it looks like I grinded the screw out too much for any screwdriver to work.Is there anything I can do?

    Quintin Harbin -

    From what I know, the only solution is to drill the screw out with a very small-headed drill :/

    Polaris -

  5. wZxqpiHuTIdWhnk5
    wZxqpiHuTIdWhnk5
    RKCEoKJwEHK44LCO
    pSLANlQhrJj1jOZH
    • Rimuovi la cover dallo slot del Game Pak prima di continuare.

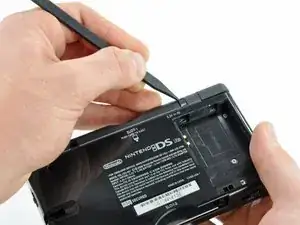
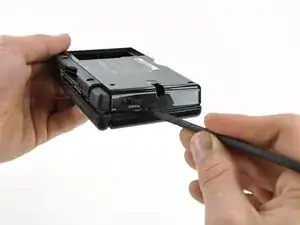
    • Inserisci il bordo di uno spudger tra il case inferiore e quello superiore vicino all'angolo superiore destro del DS Lite.

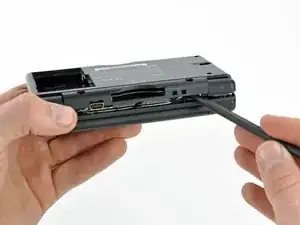
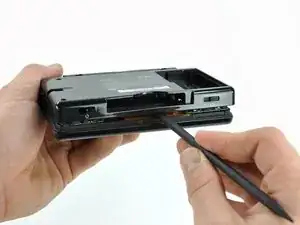
    • Fai scorrere con attenzione lo spudger lungo il bordo destro del DS Lite, creando nel frattempo un'apertura.

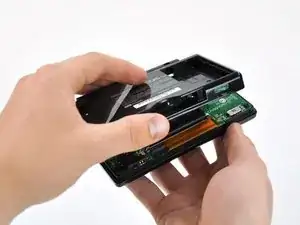
    • Continua a far scorrere lo spudger lungo il retro del DS Lite finché la maggior parte del case inferiore è stato separato da quello superiore.

    Don’t forget to remove the GBA cartridge placeholder before removing the backside

    Cees Jan de Boer -

    You forgot to mention to remove the battery compartment Phillips screw.

    nathan lowe -

  6. ogeB4h5PpuF5FBNh
    • Solleva il case inferiore dal resto del DS Lite.

    • Tira con attenzione. Alcune unità sono sigillate con adesivo e tirare troppo forte può danneggiare l'interruttore dell'alimentazione.

    • Durante il riassemblaggio, assicurati che l'interruttore di alimentazione e il cursore del volume siano correttamente allineati con i rispettivi interruttori sulla scheda madre.

    When you reassemble, make sure that you have the volume and power buttons in place, and make sure they are in the right position to line up with the switches on the motherboard. If they are not aligned, you risk snapping off the tiny switches on the motherboard (in which case, you are in for some soldering work).

    Eric -

    I should have read the comments first - broke off the power switch because I didn't know about aligning it. No way I can do soldering, guess it's for the dustbin :-(

    Emma -

    Whoops, remembered the power button but forgot the volume slider.

    I'll do it later.

    analbonghits -

    There is no way that the fact you have to line up the volume and power switch toggles upon reassembly is not in this guide. I just carefully followed this guide to replace the shoulder buttons but ruined my DS lite because I didn’t read these (practically hidden comments due to the design of the website) comments and broke the power switch. Thankfully there are 150 million DS I can buy second hand but “repeat the steps backwards” wasn’t sufficient in this repair. And that’s what this website is for.

    Ryan -

  7. 32wAE6IOt1DGiUu4
    • Usa con attenzione un paio di pinzette per rimuovere l'interruttore del volume.

Conclusione

Per riassemblare il tuo dispositivo, segui queste istruzioni in ordine inverso.

Philip

Membro da: 21/01/10

570 Reputazione

0 commenti