Introduzione

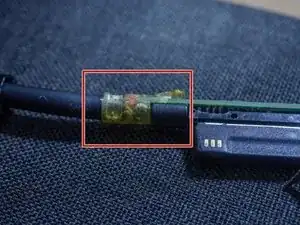
A causa di scelte di progettazione, il connettore del Microsoft Surface Pro (3 e successivi) è incline a dare problemi. I cavi del positivo e del negativo fanno corto circuito, rendendo l'adattatore inutilizzabile.

Fortunatamente, il circuito è ben progettato e può resistere ad un corto circuito, quindi è sufficiente rimuovere il corto circuito per far tornare a funzionare l'adattatore. È semplice da riparare!

  1. Cv323yaamVBDVeUX
    Cv323yaamVBDVeUX
    HQ1Jfm6DRABkCVFY
    edxMVJcNIPuXnGVL
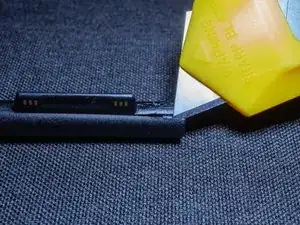
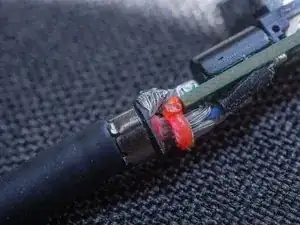
    • Apri il connettore infilando una lama nelle due rientranze all'estremità.

    • Alcuni punti sono incollati per tenere insieme la copertura esterna del connettore.

    • Separa la colla con la lama e procedi con il prossimo passaggio.

  2. XDt6pHS1WS66gFlW
    XDt6pHS1WS66gFlW
    bNuIvBLORQZSS4nU
    • Sfila la copertura esterna del connettore verso il cavo per scoprire il connettore stesso.

  3. KRQ6Q6x2e4beG4rW
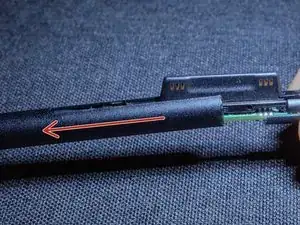
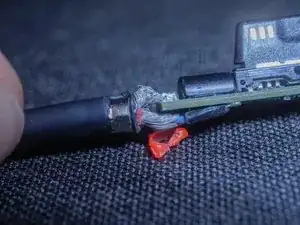
    • Con l'aiuto di un taglierino o un paio di pinzette, rimuovi la resina per scoprire i cavi.

    • Sii delicato!

  4. RGpwEc62EenVktIj
    RGpwEc62EenVktIj
    ZaVr2qLEMvO1SFBk
    6kcOQKB4BjSaQMZy
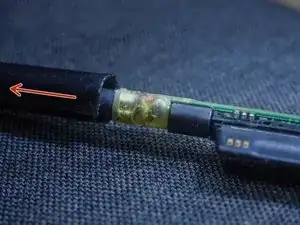
    • Microsoft ha inserito questo distanziale protettivo per evitare dei corto circuiti tra i cavi positivo e negativo.

    • Sfortunatamente, in molti casi, non è sufficiente. Lo sostituiremo con un distanziale più spesso nel prossimo passaggio.

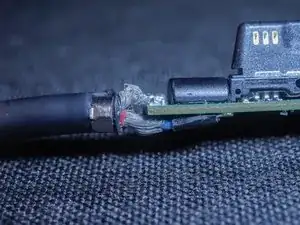
    • Rimuovi il distanziale rosso.

  5. oelnEHx33OlJNDnL
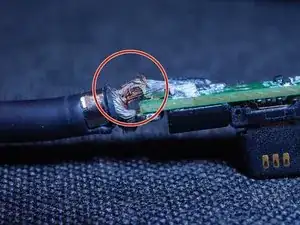
    • Ecco il corto circuito! Alcuni fili del cavo sono bruciati. Se non sono una porzione importante, questo può essere ignorato.

    • I due cavi si sono toccati qui: puliamo questa zona e rimuoviamo ogni rimasuglio.

    perfect resolution.

    i did the same and booom its working

    aman Singh -

  6. XJiiAVvKvnysb1WK
    XJiiAVvKvnysb1WK
    MpCpQ3WquBSaYanr
    yPgKT4WojZt2Nx21
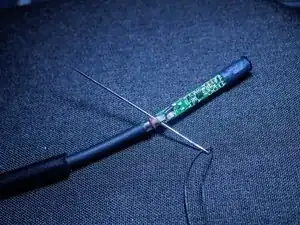
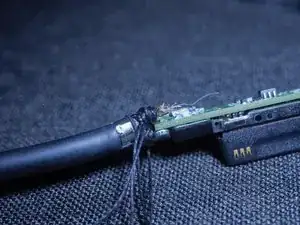
    • Dopo aver pulito il connettore da ogni filo che possa toccarne un altro, usa un ago da cucito e un filo in cotone per isolare per bene i due cavi.

    • Fai più giri per assicurarti che i due cavi non si tocchino più.

  7. FccZcxsqdHXr2DfK
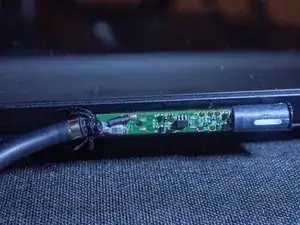
    • Prova l'adattatore per controllare che funzioni prima di richiuderlo. Il LED bianco dovrebbe accendersi quando collegato al tuo Surface Pro.

Conclusione

Per rimontare il tuo dispositivo, segui le istruzioni in ordine inverso.

Valerio Nappi

Membro da: 01/05/21

855 Reputazione

18 commenti

Nice guide for fixing the Surface Pro charger that I’ve used to fix SP6 charger that was intermittently charging at first and not charging at all later.

Andres Attemann -

Was, wenn das Kabel beschädigt ist? Kann man das selbst reparieren? Danke, Oskar

oscargogl -

I don't think so, unfortunately! You can cut some sections and resolder it to the end connector, but that is an advanced repair, and only works if the damaged end is on the connector side

Valerio Nappi -

I've replaced my charger 3 times, twice with cheap off-brand replacements. These instructions let me avoid a 4th! My cheap replacement charger had even less insulation than the original. Yikes!! But now it's working great again! Thanks so much! I will check this site before replacing my stuff in the future. :D

Libby -

Thank you, thank you, thank you for this tutorial! It worked perfectly and saved me quite a few bucks for a new charger, much appreciated!!

Amber G -

Thank you! This is the only solution that works for me! All the other official solutions posted on the Microsoft site were useless.

Li Z -

Instructions working perfectly with a surface laptop 4 charger as well. Thank you very much.

Mike Pikurni -

Very good, thanks so much!!!

D B -

Thank you so much! I manage to fix the %#*@ charger and the problem was exactly what you pointed! You're guide is excellent, even if I'm really bad at sewing and I managed to use some tape, but now it works! Thank you!!!

maxxvolta -

This is brilliant! It worked. Thanks so much

Paul A Skinner -

I listened to a podcast recently where the founder of this website was interviewed and I thought, huh, I didn't know this community existed. And after two failed chargers and going no where with the Microsoft customer service to try to have my laptop repaired I thought I give this a try. I wasn't expecting anything as repairing something when it's broken has never registered in my millennial brain. BUT! This worked like a charm!! I cannot express how grateful I am for people in this community who advocate for repairs rather than replacement. I was so ready to fork out another $1000 for a new laptop and raise a complaint ( even thought about legal action against Microsoft) with ACCC on Microsoft's refusal to have this repaired even though a defect like this should have been covered under Australian Consumer Law. To be honest, I probably still should raise a complaint. It's outrageous how big companies just blatantly ignore the law and tell me that I am not entitled for repair.

Yachee Tang -

Why do you use a cotton wire to insulate? It could absorbs humidity from hair, and becoming conductor

roberto.danzo -

I did not have any problems with that, but of course you're free to use whatever you prefer. If you find that something that is readily available works better, you can update the guide to include also that option

Valerio Nappi -

What a good solution!

Using a needle and thread to insulate is very simple, although I'm a bit afraid that it will short-circuit again and spark (I don't think it will catch fire because being strongly encapsulated it won't be able to burn).

The definitive solution would be to unsolder the cable and reassemble it, leaving more of the inside insulation, but that is much more complex and risky.

It is incredible that Microsoft manufactures a power supply with such good quality (and high price), having such a weak point. Knowing that the cable causes problems, I have treated it with the utmost care from the first day, but I have not gotten rid of it stopping working.

German Bordel -

This was a life saver! I was ready buy a new adapter when I found this. Hard to believe that design flaw exists. Thanks for a great guide!

rbolling -

Hi, Thanks for the tutorial. I had 2 power supplies with this issue. One with a short as described on the tutorial and other with a short 1 cm down the connector due an internal broken isolation caused by the metallic washer holding the cables.

Instead of a cotton line, I cut the isolation of another cable and inserted it between the positive and negative cables, then encapsulated everything with a self fusing tape. It is trick to get the right diameter to fits the casing back. So far it has worked well. Thanks again for pointing to the right direction.

Cheers

Silvino Almeida -

I could but believe it but this actually worked! Thanks so much!!!!

Michaela Pagel -

Works perfect, really appreciate your support!

Kind regards

Heinz (Germany)

HeinzS AusT -