Introduzione

Se il tuo lettore DVD non si apre quando è vuoto ma funziona bene quando c'è un gioco all'interno, ci sono buone probabilità che la cinghia slitti o che sia sporca (o entrambe le cose). Questa guida vi mostrerà come risolvere questo problema.

  1. xKmNcNgQwqdYVXaB
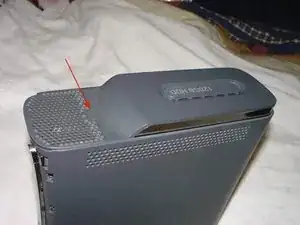
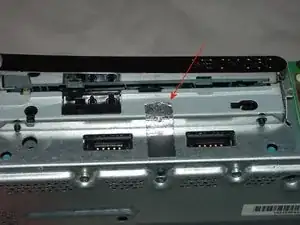
    • Il primo passaggio consiste nel rimuovere l'hard disk, se presente. Premete il bottone indicato dalla freccia rossa e sollevate l'hard disk per rimuoverlo.

  2. IaNH5WrrKKKMZTMN
    IaNH5WrrKKKMZTMN
    alDHErFeBLYWIDFK
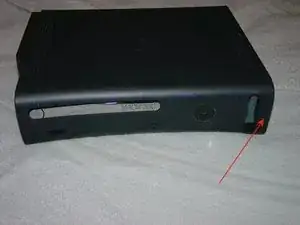
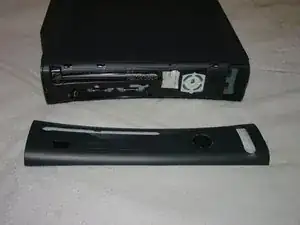
    • Il prossimo passaggio consiste. nel rimuovere la cover frontale. Fate forza sul lato destro (dove ci sono le prese USB). Ci sono delle clip che fissano la cover, bisogna soltanto farle uscire dalle loro sedi.

  3. lMNWbGmhJCyGBGpL
    lMNWbGmhJCyGBGpL
    dGHCPpP35vMMWKnU
    PRns1KWDnueUtiZX
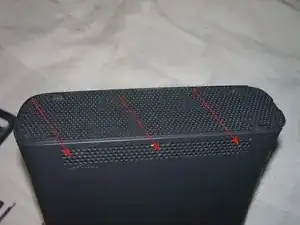
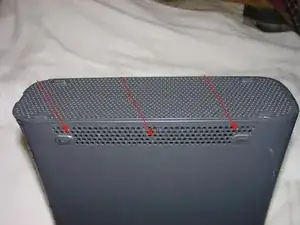
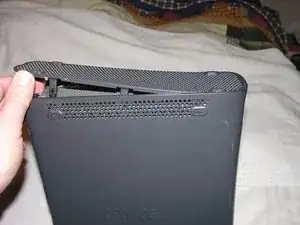
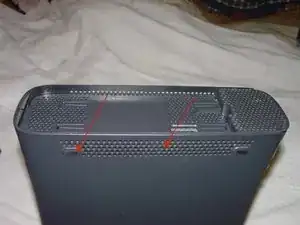
    • Ora rimuoveremo la cover inferiore, quella di raffreddamento. Ci sono tre linguette su ogni lato, utilizzando l'attrezzo Xbox, o la parte appuntita di uno spudger, sbloccatele una per volta e fate forza partendo dalla parte frontale, come si vede nella fotografia numero 3.

    don’t use the tip of your spudger. it’ll bend/go blunt and break

    M1ghty boy -

    alternatively use a 000 phillips if you dont have the xbox tool

    M1ghty boy -

  4. ZkEWpTXhaXqtRLwh
    ZkEWpTXhaXqtRLwh
    vNXgWeFreNHXCBll
    pRPx2yJyRnokXJnF
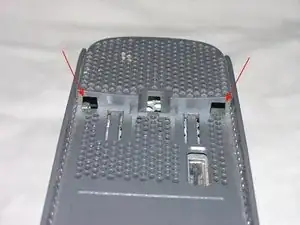
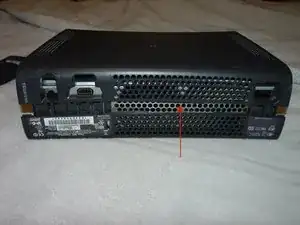
    • Sull'altra griglia di areazione ci sono due fori nella parte anteriore. Inseritevi l'attrezzo Xbox o la parte appuntita di uno spudger e sbloccate le clip frontali. Ci sono due ulteriori clip sui lati, sollevate la parte frontale mentre le sbloccate. La clip posteriore si trova sotto al piedino in gomma.

  5. AudrJTSqjINjDGHy
    AudrJTSqjINjDGHy
    Al3LHQJVipYplK3T
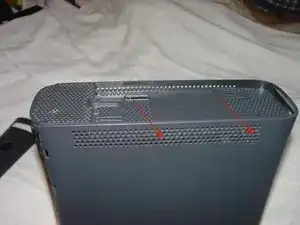
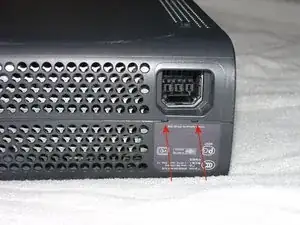
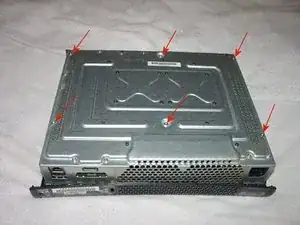
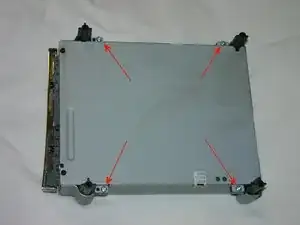
    • Per aprire la parte frontale dovete staccare o tagliare l'adesivo Microsoft. QUESTO INVALIDERÀ LA GARANZIA DELLA XBOX. Capovolgete la Xbox, sbloccate le quattro clip indicate dalle frecce e sollevate la parte frontale cover inferiore.

  6. UdMjB4wqQXf6ZTvm
    UdMjB4wqQXf6ZTvm
    wTbNQptqfX2fLvvp
    kSTLwH6JmONAOtBk
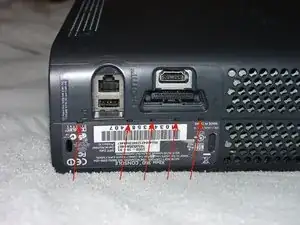
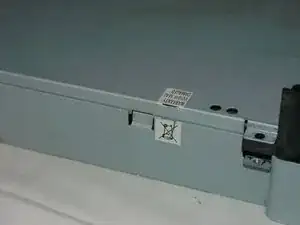
    • Utilizzate l'attrezzo Xbox e sbloccate le cinque clip sotto all'etichetta che contiene il serial number e iniziate a sollevare la cover da quel lato. C'è anche una clip centrale che dovrete sbloccare. Quindi, utilizzate l'attrezzo Xbox per sbloccare le ultime due clip vicine alla presa di alimentazione. Togliete il coperchio inferiore della Xbox.

  7. tntRgbfwrYxtKfTX
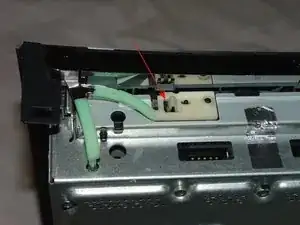
    • Rimuovete il bottone di apertura del lettore DVD sbloccando la clip e sollevando il blocco dalla parte frontale della Xbox. Questo ha un perno sul quale scorre, quindi dovrete insistere un po'.

  8. bfwgKWOU3eKStqDA
    bfwgKWOU3eKStqDA
    QL2QCpIXZgQ4lAaL
    • Dovete svitare le sei viti Torx #10 che fissano il coperchio superiore. Quindi capovolgete la Xbox e togliete il coperchio.

  9. EBX6B6tn2eqfGYt1
    EBX6B6tn2eqfGYt1
    pHGoNnUL5KmbjFjC
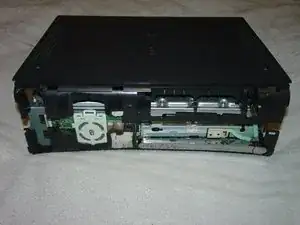
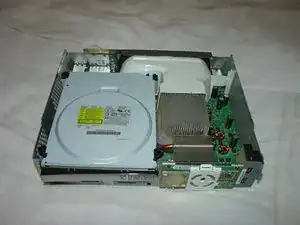
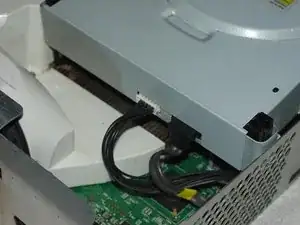
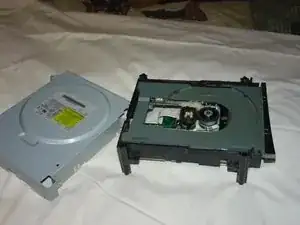
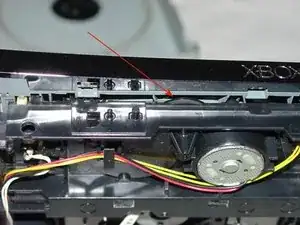
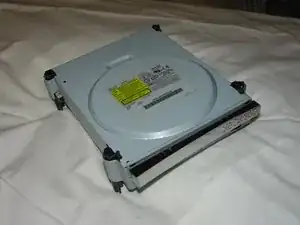
    • Sulla parte frontale del lettore DVD dovete staccare parte del nastro che vedete indicato nella prima foto, quindi fate scorrere un po' il lettore in modo da accedere alle connessioni sul retro. Scollegate l'alimentazione e il cavo dati e togliete il lettore DVD.

  10. 5VBF25JyKIFUCcFA
    5VBF25JyKIFUCcFA
    ZO1NNC2yuIJGtXXR
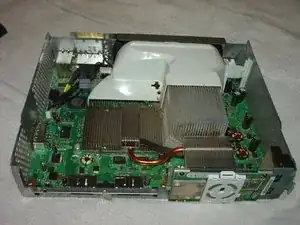
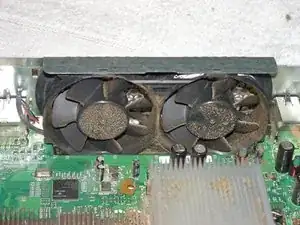
    • Approfittatene per fare un po' di pulizia. Il coperchio delle ventole ha una clip che potete sbloccare con l'attrezzo Xbox. Togliete il coperchio. Le ventole hanno due clip, una su ciascuna ventola. Sollevate leggermente la paratia in metallo per sbloccarle. Ora scollegate il cavo di alimentazione. Pulite le ventole e rimontatele.

  11. YPxUGASxaPXXIuUo
    YPxUGASxaPXXIuUo
    Oy2BtUEQiRNecXna
    ov5oDT4NPD1pAR5d
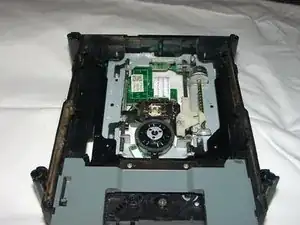
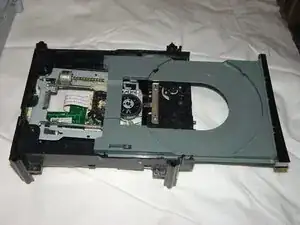
    • Rimuovete le viti e staccate l'adesivo di sicurezza sul lato del lettore DVD (anche questo invalida la garanzia). Quindi togliete i coperchi superiore e posteriore.

  12. YEE6mUHPuqHNaXWP
    YEE6mUHPuqHNaXWP
    N3ED4IrRekEhNUoA
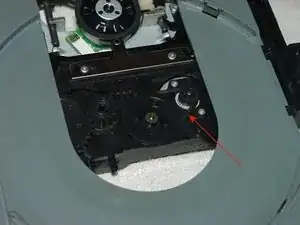
    • Per aprire il cassetto, date un'occhiata alla parte frontale. C'è una ruotina che può essere ruotata con l'attrezzo Xbox tirando da destra verso sinistra (cioè, guardando dall'alto, in senso orario). Questa abbasserà il sensore laser e vi permetterà di far scorrere il cassetto. Pulite la cinghia di gomma con dell'alcol o sostituitela se necessario.

    Knowing where this wheel is (to raise and lower the laser assembly) is the most useful part of this guide - even after disassembling, cleaning, and re-assembling my Xbox tray wouldn't open, but moving the wheel every time I need the tray to work does the trick. Learn where the wheel is, and watch where it ends up when the box is reassembled.

    Freddy Fred -

    Freddy Fred, it sounds like you need to replace the belt..it's simple to do, and you can get them for a few cents each...I bought 100 of them for 2 or 3 bucks.

    ehart13169 -

    I'd suggest rubbing alcohol on the gears adjacent to the belt drive as well. This was needed on my drive. Both the gears and belt needed cleaning.

    retrogamerarities -

    if you’re having issues with this and it wont open (probably because the belt is loose), shine a torch on the left side and youll see a gear. turn that gear anti-clockwise with a screwdriver or pokey stick and itll open

    M1ghty boy -

    Excellent overall instructions. The only discrepancy I encountered is that the rotation direction specified in Step 12 to unlock and open the tray is opposite that of the XBox 360 E that I just serviced. To lower the laser assembly and unlock the tray, I had to rotate the indicated pulley from left to right, i.e. counter-clockwise when viewed from above the DVD drive.

    pf burris -

  13. bPwoIKFdCOlncFJo
    bPwoIKFdCOlncFJo
    JZDbOXrRBCSOuAmP
    TSs5HNWkVIR4fvcH
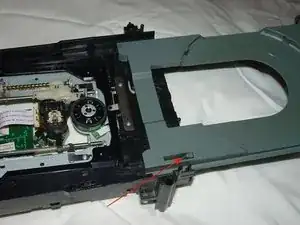
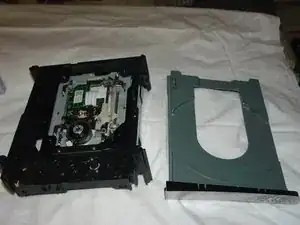
    • Pulite le guide sulle quali scorre il cassetto con dell'alcol. Se come questo è molto sporco, potete rimuovere il cassetto per una pulizia più approfondita. Sbloccate il perno indicato dalla freccia e tirate il cassetto verso l'esterno e lateralmente.

    How do you release that clip? Do you push on the clip or pull it upwards?

    Steve Sobs -

    Hello, You pull up on the clip. I'm doing mine right now. I also, after getting the side with the clip on it past the plastic piece with white rubber around it, had to gently, but firmly pull on the opposite side without a clip. I pulled that side towards the side with a clip and it came out, although it took a little more force than I thought it would.

    Hope this helps!

    Daniel -

  14. mKcMppANFExLHslu
    mKcMppANFExLHslu
    xK4D2ABRXJPXWFBq
    • Dopo la pulizia, reinserite il cassetto nel lettore DVD e assicuratevi che scorra perfettamente. Se lo spingete dentro completamente, dovrebbe tornare al suo posto. Rimontate il lettore DVD, così è pronto per tornare dentro alla Xbox. Rimontate la Xbox seguendo i passaggi in ordine inverso e siete pronti per giocare!

    Fantastic easy to follow guide

    Mike Heeley -

Conclusione

Per rimontare il dispositivo effettuate i passaggi in ordine inverso.

ehart13169

Membro da: 10/01/13

3102 Reputazione

16 commenti

This works great nice job on the guide thanks!

Severe -

Very great guide! My cousins Optical Drive wouldn't open at all, so I followed the guide, cleaned everything, and reassembled it. Now it opens if you give it a little love tap after pressing the eject button. Otherwise, if a disc is in it, it works great!

Simbad -

I started down this process when the drive would not read a game disc or a regular music CD. Cleaning the drive out did not help, but it was good to figure out how the laser lens assembly works and how one can get the drive to eject. In my case, the laser assembly needed adjustment (by decreasing the resistance of one of the two potentiometers).

Thomas -

How did you fix this issue

avickers902 -

Awesome guide. 100% fix for me. was able to fix tray not opening and disc not reading all in one walkthrough. follow steps, be gentle, clean belt, clean eye, reverse steps, BAM GAME ON!

neal -

Great guide. My son's Xbox 360 tray jammed and a disc was stuck inside of it. I was able to follow this guide and clean the tray and put the cd tray back together and it ejects discs again. I am letting him mess with it for a few days before I put it back together otherwise I will clean it some more. Thank you for this helpful guide.

Racheal -

Outstanding instruction and pictures. I really screwed up my xbox trying to take it apart to replace the drive belt. On my second xbox was fortunate to find you on ask.com.

Awesome! I will pass this on to my friends.**********

Joe Roscoe -

Good tutorial.

Although I found it hard to pry it open in the back. I found that there are clips below the openings, and to open them you have to press the screw drive forwards and then down. It will damage a bit the openings and the clips, but nothing very noticeable. It will be just a bit coarse. The price of dealing such a abnoxious case.

Miguel -

I love this article. Any suggestions on "exact" type of replacement parts. Like the rubber ring? If its stretched too much, can i get any old rubber band replacement say from local hardware store etc? Or do i have to order a specific part# from M$? TIA.

Chris Fisher -

This didn't work it still won't le me open the tray all the way. Can anyone help me please?

makayla.miles -

My lense won't come up when reinserting the tray, like it's not fitting the teeth when pushing the tray... HELP!

Alejandro González -

Had used the card trick to pop it open but it’s constantly jammed again. There was a little dust lurking and I didn’t think this this was going to do it, think it was the rubber belt cleaned that did it. Thanks for this solution, as good as new now! Saved me €€

George Hurley -

Still didn't open, its not even attempting to open anymore

Tiffany Baril -

Been about 15 years since I last opened a 360, had one in the shop today with a sticky drive and this was exactly what I needed! Those rear clips however that secure the 2 halves of the shell are an actual nightmare, nearly snapped the lot off lol, ended up doing it with a metal ruler all the way along. Anyway, Thanks very much for the guide, invaluable!

Matt LRG -

Very good guide. I was able to dismantle the xbox360 and clean the 2 pulleys and rails. I am 76. Thanks, Lowry

Lowry Shaw -

This worked! Thank you! Mine wasn’t even very dirty, but I cleaned out all the areas I could. The band in mine looked fine, I cleaned it anyway. I thought maybe something else was wrong with mine but it worked and my 8 year old is happy.

Kadence -