
Introduzione
Strumenti
-
-
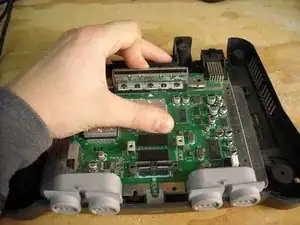
Stacca lo slot corrente dalla scheda madre. Per fare ciò, tira semplicemente lo slot della cartuccia situato al centro nella parte posteriore della console. Oscillalo avanti e indietro e tiralo verso l'alto finché non si stacca. Fare attenzione ai pin collegati in basso. Questi dovranno essere collegati alla scheda madre, quindi non danneggiarli.
-
-
-
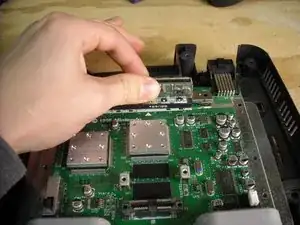
Una volta disconnesso lo slot, inizia il processo di saldatura. Ci vorranno 30-40 minuti poiché ci sono 44 connessioni da scheda madre a pin da effettuare. Ci sarà una connessione di filo da 2 pollici per pin (2 pollici x 48 pin = 96 pollici), quindi taglia il filo in 48 sezioni di 2 pollici ciascuna.
-
-
-
Inizia saldando un'estremità del filo da 2 pollici al pin più a sinistra sullo slot della cartuccia disconnessa e l'altra estremità del filo al punto di contatto più a sinistra sulla scheda madre. Ripetere questo passaggio per ogni punto di connessione da pin. C'è una fila anteriore e posteriore, ciascuna con 24 punti di contatto.
-
-
-
Quando tutte le connessioni sono state effettuate dovresti avere un gruppo affollato di fili. Posiziona lo slot della cartuccia collegata in posizione in modo che rientri nella sua posizione originale quando il coperchio del Nintendo 64 viene rimesso in posizione Testare la sua funzionalità inserendo una cartuccia nello slot e accendendo il sistema
-

Per riassemblare il tuo dispositivo, segui queste istruzioni in ordine inverso.
8 commenti
This has some additional details: http://bitfixgaming.boards.net/thread/99...
japunto -
Thanks for the guide and appreciate the details.
Is it possible to just replacement the cartridge holder unless the through hole connections are broken? This adds many wires which could cause problems such as shorting, electrical hazard, etc... Maybe a continuity test between each corresponding through hole connection and point could determine the problematic pins so that only a few wires need soldering and attaching.
Warning 1:
If soldering, ensure each wire has plenty of insulation left so that event with movement of the wire, electrical shorts are not possible.
Warning 2:
Also, ensure the n64 is unplugged and the power supply is fully disconnected from the back of the unit before attempting this for electrical safety and to prevent damage to the unit. Additionally, wait a while to ensure any capacitors are discharged before disassembly as well for the same reasons (not sure how long). The unit unplugged is shown here.
My funtastic pal N64 has a removable cartridge slot that's held in with friction, no soldering required