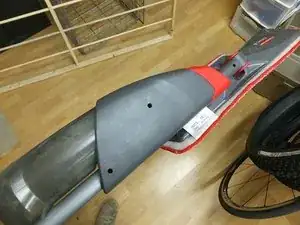
Introduzione

Questo è un fantastico progetto ma con un difetto cruciale. Se vai sul sito Rubbermaid e cerchi le recensioni degli utenti per il Reveal, la maggior parte apprezzano il mocio ma hanno lo stesso problema: il dispositivo smette di spruzzare. Spesso viene accusato il manico/grilletto, ma in realtà è il pistone della pompa che si incastra nel suo cilindro. Dovrai aprire la copertura della pompa e tirare fuori il gruppo. Una volta rimosso vedrai che in realtà è abbastanza semplice senza molte parti di cui preoccuparsi. è un po' fastidioso da rimontare, ma non complicato. Aggiornamento: Molte persone hanno chiesto della guarnizione ad anello che cade sul contenitore del fluido. Finalmente ho avuto lo stesso problema e ha aggiunto il passo 7 per risolverlo.

  1. FVoXOeAVHlIdmfXs
    FVoXOeAVHlIdmfXs
    achX2VRuTL4aIqZk
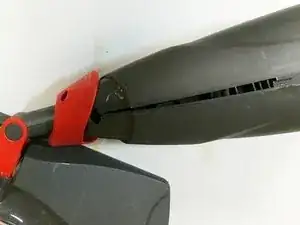
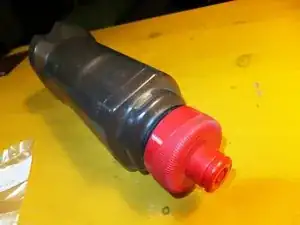
    • Il grilletto inizia ad avere problema: fa resistenza, si rilascia lentamente o non viene rilasciato del tutto. Non esce il vapore dal beccuccio del mocio alla base della camera della pompa.

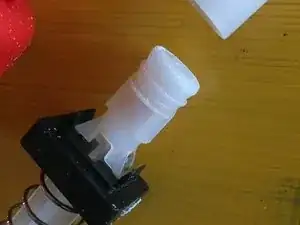
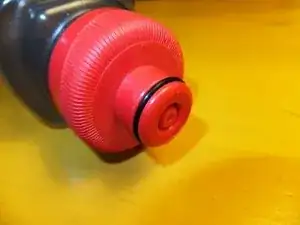
    • Nella seconda immagine vedi la copertura rossa della pompa e il piccolo foro del beccuccio.

  2. 4YeiePC6qchvQqrJ
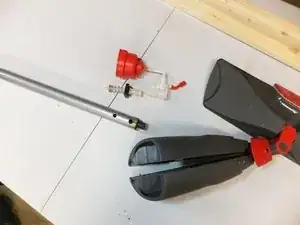
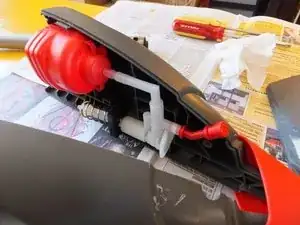
    • Ti servirà un cacciavite a croce Phillips lungo e sottile. Il Reveal ha 3 viti che tengono fermo il corpo della pompa. Puoi vederne facilmente 2 sul corpo ed 1 dove il manico incontra la testa girevole del mocio.

    UPDATE: The second mop repaired had 4 screws. Unscrew all of them and move the red sleeve down so you can open the main pump body.

    Leonard -

    One of the 4 screws may not be visible until the nozzle casing sleeve (red) is slide down.

    alanhaddow -

    Hi

    My pump body did not come with screws. Can you please help me by telling me the size and type of screws.

    Thank you

    Shama Llama -

    Hi Shama. I avoid buying mops or other such devices that can’t be repaired … in other words have no screws. I can say the screws that assemled the one in this tutorial are small-medium sized and the head requires a phillips/star screw driver. Good luck :)

    Leonard -

    I have 1 screw on the mop and while it turns it does not loosen, I can not get the gray housing to slide off the red casing

    Gregory Seraydarian -

  3. JUSVYWhRhRdykfD4
    • Una volta rimosse le viti, il corpo della pompa può essere aperto. Usa uno spudger in metallo o un cacciavite a testa piatta procedi lentamente: aprirlo in fretta potrebbe danneggiare delle componenti.

    • Stai molto attento alle componenti interne. Dovrai far scorrere verso il basso la copertura rossa del beccuccio che tiene anche insieme le due metà della copertura della pompa.

    • Ricorda! Non devi separare la copertura della pompa fino a dove il manico incontra la testa girevole rossa. La vite rossa qui presente deve essere svitata giusto il necessario per lasciarti separare il corpo sopra di essa.

  4. s5DHOiQjSo4PdoEW
    • Appoggia le parti come vedi nell'immagine. è importante capire come queste parti lavorano insieme. Non devi smontare ogni singolo pezzo.

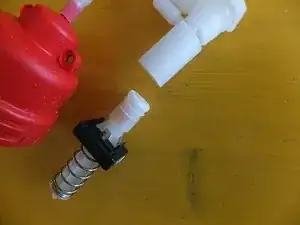
    • Sapere che il cono rosso si attacca all'esterno del contenitore del liquido (dove inserisci la soluzione per la pulizia) è utile.

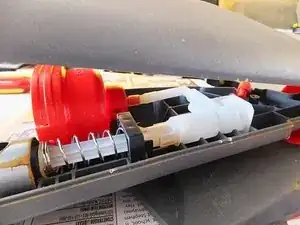
    • L'asta argento con 2 fori è nel manico. Si collega al pistone della pompa. Ricordati queste cose per il rimontaggio.

    UPDATE: Be sure to not pull the rod inside the handle out too far (thx to J.Hill for the tip)

    Leonard -

  5. eVvq2ZA4sAKiVJFi
    eVvq2ZA4sAKiVJFi
    QgaPoSaIoYRtVZkm
    • Il problema è che il pistone della pompa in plastica si incastra nel cilindro. usa una carta vetrata 120 e passala in EGUAL MISURA sulla circonferenza del pistone e le due sporgenze sottostanti. Continua finché il movimento è più fluido, ma prima di perdere il sigillo con il cilindro.

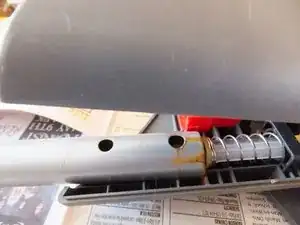
    • La seconda immagine mostra il pistone già passato e che funziona senza problemi nel cilindro senza aver rimosso molto materiale: non devi rimuoverne troppo. Non serve essere troppo precisi, ma un pistone ruvido e asimmetrico non manterrà il sigillo con il cilindro. Rimuovi poco alla volta e prova il pistone dopo ogni passata.

    • Quando sei soddisfatto, applica una piccola quantità di vaselina attorno alla testa e alle sporgenze del pistone.

    Instead of sanding it my husband sprayed it with Teflon spray and now it works like new

    Lois Hoffman -

    I found broken tube and replaced it with tube of matching diameter from generic spray bottle. 😊

    Chuck Berry -

  6. WLDu5Mrqc4UoApMp
    WLDu5Mrqc4UoApMp
    FTE3JmHTaYKW2fMJ
    cDwxtLIn3BosAd3h
    • Tieni la copertura del corpo della pompa aperta e allinea le parti della pompa nelle rientranze all'interno. Questo passaggio non è difficile e capirai come fare man mano che le infili: prendi il tempo necessario.

    • Osserva l'asta del mocio (che collega il manico al corpo della pompa) nelle ultime 2 immagini. Ha un'altra asta all'interno che si collega al pistone per farlo muovere in alto e in basso nel cilindro. Questa deve essere attaccata correttamente sopra il cilindro E inserita correttamente nella copertura della pompa.

    • Prova la tua riparazione semplicemente richiudendo le due metà della copertura del corpo della pompa. Dovrebbero richiudersi saldamente e il grilletto dovrebbe muoversi liberamente.

    • Una volta soddisfatto di come vanno le cose, rimonta la copertura della pompa, stando attento ad allinearla in modo che si chiuda senza aperture e che l'intero gruppo della pompa sia chiuso saldamente. Stringi le viti.

    My problem was that pump got stuck and wouldn't budge. I wouldn't play with the repair as suggested. It was simple to return the jammed unit to Home Depot.

    Syed Munir Zaidi -

    Hey Syed. Totally agree … if your mop (or anything else for that matter) is not working properly and still under warranty simply return it.

    Leonard -

    Could it have anything to do with the o ring on the bottle? Mine is broken.

    Joan Becich -

    See step 7 for o-ring update :)

    Len -

    Could A failed o ring affect the suction it generates?

    Joan Becich -

    Sorry for the late reply. We’ve had the O-ring fail and it’s a different malfunction.

    Len -

    Followed your directions and it fixed my sometimes jammed pump - many thanks for this helpful info!

    frieders3 -

    awesome! thx for sharing frieders3

    Len -

    The small silicone valve inside the lid is missing, do yiu know where I can find a replacement?

    Deborah Taylor -

    I gotta tell you. I spent 2 hours putting it back together. The inside handle bar did not reach the component inside. The slots all matched up but… Ugg, I give up

    Mind The Bar -

    I completed the entire repair process, and then during reassembly, the head of one of the middle screw broke off! Oh well, I sort of had fun working on it :-) I think I deserve a new spray mop anyway!

    lynn BRIDWELL -

  7. DLSctDMGLirH14gr
    DLSctDMGLirH14gr
    AOusYBDA33jq4L1C
    D5MylNKaTbeBRODr
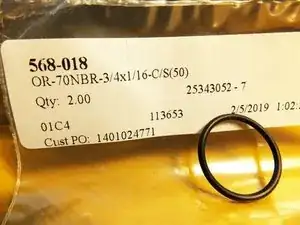
    • LA guarnizione ad anello per il tuo dispositivo specifico può essere diversa (alcuni commenti hanno delle differenze discutibili nei modelli). Misurala o falla misurare da qualcuno.

    • La guarnizione ad anello utilizzata in questa guida è una 568-018 / OR-70NBR-3/4x1/16-C/S(50) e funziona perfettamente!

    Could not remove the screw on the single screw version, but I tried squirting a few drops of WD40 Into the hole that the bottle screws into and it works well now.

    gidgetgoes -

    I cannot get the bottle to fit into the tight enough to not leak fluid out the oring is not snapping into the base I need help

    gonepishing56 -

    bottle oring will not snap into the lower body tight enough to not keep leaking out fluid

    gonepishing56 -

    My question is WHY has this issue not been fixed? I have thrown away one or two of these mops. I now rely on Google to provide some self help guidance. Trouble is, there are TOO many issues to try and repair the mop. Getting things back as there were is tricky. Question: WHEN IS RUBBERMAID GOING TO REALLY FIX THIS ISSUE, NOT ME THE CONSUMER?!

    I see it as MORE SPACE/EARTH/SEA JUNK.

    Pina Lucia Pace Buono -

Conclusione

Hai salvato il tuo mocio dalla discarica. Ho provato questa riparazione da circa 6 mesi e funziona ancora senza problemi. Buona spazzata!

Len

Membro da: 24/04/15

862 Reputazione

62 commenti

the phillips head does not work, there is some specialty screw head in there. My unit only has one screw, not two. I am stuck and cannot dissassemble this pos.

Fred -

Can I drill the screw hole bigger so that I can use my drill to try different drill bits to get this taken apart? I dan't return it because of the model change. I hate products like this that are a good idea with lousy execution.

Fred -

Hi Fred. Sounds your model, with one screw, is designed different than the one I repaired. At this point, if I were you I'd go for it as it's garbage otherwise. Also, if your model is different than the one I've provided instructions for you may find they don't exactly work once you've cracked it open .... but the idea/design/function might be the similar? And yeah I agree ... good idea lousy execution (that way we'll have to buy more mops?) .... too bad. Good luck Fred.

Leonard -

Thank you for getting back to me - I really appreciate your follow through! Fred

Fred -

Worked like a charm! Thank you so much!!

iwannabnvegas -

awesome! Mine is still working fine, no problems.

Leonard -

I‘m so thankful for this fix post, it works great now. I love my rubbermaid reveal mop.

Susie Henline -

another mop saved from the garbage! still working fine at this end. Glad it worked for you Susie.

Leonard -

Worked like a charm, thanks. My model had another screw located under the red cone shaped sleeve that needed to be removed.

rlstraughn -

Mine had that extra screw, too, but I found it by forcing it open. No harm, though! Still repaired, reassembled , and working!

mfhowl -

So happy super ☺ thank you so much it worked I fixed 2 mop..

Afsana Rahman -

awesome Afsana .... reminds me I still have one to fix. The original one (featured here) is still working great.

Leonard -

Just finished fixing my mop, SO grateful that you saved it from the landfill! Thanks for your clear instructions and very helpful pictures. One comment: When making sure the rod that is in the handle is seated properly, also try not to let the rod fall out of the handle. It's a bit of a hassle to get it lined up correctly with the trigger again.

J. Hill -

I let it slip out and can't figure out how to reattach it to the trigger. Any hints?

Ashley Stack Almodovar -

Ashley. You may need to go back to Step 6. It might be worth fiddling around for a few minutes first though.

Len -

Removed 4 screws from mine. Removed the right side without dislodging anything. Held pump body in place while operating the spray lever, the plunger moved freely. Disassembled it further by taking all the little valve parts loose from the main body, found no obstructions. Put Vaseline in the pump body and reassembled, still not working. Doesn't seem like the water from the bottle is getting past the little spring valve in the bottle? Anybody have any ideas about that?

slavens001 -

Is the bottle collapsing as you spray? There is a small silicone rubber valve in the cap next to the outlet valve that sometimes gets stuck shut due to dried out detergent. It pops out and can be cleaned with hot water, then popped back on. The main valve has a center post that is pushed in by a corresponding post in the pump body to allow the cleaning solution to flow. Good luck!

Martha Chinery -

Hi slaven001. Also, if you can clean the plastic water feed-line (that takes a 90 degree bend towards the parts repaired in Step 5) as well as the delivery spray line (after the plunger/piston/cylinder) you've eliminated those as possible problems. Stick with it as it is abit fussy and can be frustrating taking it apart a few times to get it right. Good luck :)

Leonard -

Thanks for excellent write up. I have been bothered by this for some time now. I have the 2-screw model. Comparing your solution to mine I'm going to presume our mops have different revision and/or problem.

I didn’t have a Philips long enough to reach both screws. So eventually I sprayed a generous amount of silicon lubricant down the top from the top and bottom of the handle. Waited about 1-2 hours and squeezed the handle a few times to work the lubricant in. This worked surprisingly well and my mop is back in action. No additional tools needed. I chose not to use the standard 10w-d40 as it might hurt the plastic and other materials inside.

Good luck. hope this helps others.

Edward Wagner -

Good idea. I have a model with only one phillips screw and it's really difficult to take apart. Rather than just break it apart, I put silicone down the small hole in the bottle holder using the small straw that comes with the lubricant. Works better than new. Took about 2 minutes to fix. Thanks for the idea!

James B. -

Thanks for your kind words :)

I've noticed that Vidal, Velida (?) ... some other brand in Canada makes a similar product that looks exactly the same as the Rubbermaid ones I have. I know this as we looked for the Rubbermaid recently for mother-in-law and almost bought the look-alike by mistake. I confirmed the screw situation and we bought the Rubbermaid one (Canada) which is identical to the one in this repair.

That said I still have another one to fix!

Leonard -

UPDATE: I repaired another of these recently and all went as outlined above, yeah!

Leonard -

THANK YOU THANK YOU THANK YOU!!! I went through 3 of these before I'm like, "There's gotta be a way to fix it instead of replace it." Your pictures were extremely helpful and your step-by+step was excellent. Mine works like new! THANK YOU!!!

laday2727 -

Hey, thanks for the primer! The unit is actually pretty well thought out, and constructed.

Mine actually had clogged spray nozzle. Just popped the nozzle out, gave it a soak in warm water & put some compressed air to it. Took a while to loosen up, but finally freed it. Saved me $50, what the heck.

I would suggest keeping it loaded with fluid to keep it from clogging.

C Wakula -

I liked my first one so much I bought a bunch of extra bottles and cleaning pads. When the handle broke after a year, I got another one that stopped working after a few months. I didn't want to buy a 3rd one and didn't want to start over with a new product and useless bottles and pads. Thank you so much! Saved time, money, and I feel accomplished.

cindyjedias -

These are great directions!! Unfortunately my mop only has one screw and the pump housing is one piece. There doesn’t seem to be any way at all to get to the problem. I tried pushing the spray dispensing nozzle up further into the casing and it seems to be trying to work……for now.

Dian Matthews -

Thanks for the tutorial! It took my about 5 minutes and now my mop is working great. Didn’t have to ask the husband for help and didn’t have to spend $30 on a new mop!

christjm1 -

5 minutes? That’s pretty speedy ;) Glad it’s working and not in the trash.

Len -

I have the 1 screw as well.  I tried some lubricant too, not sure if that worked but (someone mentioned compressed air but can’t find that comment now)…..I had a straw and blew into the nozzle.  Seems fine now.

nice_ideas -

Got past the fiddly bit of trying to line up the inner sleeve with the long thin tube and BAM - works like a charm now. Thank you so much for posting this fix!

Gkii Huckho -

no problem Gkii. Glad to see it’s still a working fix as I’m sure by now the mop has changed abit. Thanks for the thanks :)

Len -

Mine had four screws. I used 220 fine gri on cylinder head. Works like butter. Thanks for the post.

Mike Diaz -

My Rubbermade mop is a great product but with a flawed design prblem.The squeeze trigger actvating the spray pump does get often stuck and the trigger not returning to its initial position. First i suspected that the return spring is too weak. But after opening the whole thing by unscrewing 3 screws including the one hidden under.thr red collar, i realized that the real culprit is the ribbed cyli der within which the piston goes up and down. After you squeeze the trigger the plunger will goes down that ribbed cylinder which after a few usages will grip the many sprires of the spring. So i used a small file to eat away the 2 ribs which have protruding rounds. I also coat the spring with a bit of grease. The i close the damned mop. It works fine after. The engineer who designed this dhould be fired for not extensively test this mop sold probably in millions.

Syl E -

mine has 4 screws too. One under the red collar. Took them all out except the one closet to the swivel.

sanded and lubed with plumbers silicon grease. back together and it works.

Just need to find a new O ring for the bottle top. The little clear plastic or rubber seal that is inside the bottle top has failed for me in the past and I needed to get another bottle. Wish I could find that part.

winnie -

Hi Winnie. Your post is timely! I was just at a store that supplies such 0-rings and they measured the original I brought in as 568-018. (Here is a website that supplies them and has a great chart https://www.theoringstore.com/index.php?... ) Where I ordered them from here in town I paid about 50 cents for a ring, bought 2 and they are going to mail them too me when they get them in stock. I’ll report back when I try the size out to confirm it fits and works like new.

Leonard -

See step 7 for o-ring update :)

Len -

What is the Tiny clear rubber piece called that keeps it from leaking ? I lose them all the time

cburgess9147 -

good fix! thanks!

john f gamble -

mine was flooding all over the place today. It has a translucent rubber “one way check valve” that fell into the bottle! That’s how I saw what the issue was. It was just floating in the solution and caught my eye. I am presuming it goes on the only spot I can guess it would go. Not a good design at all. Otherwise I like the mop.

seeredsea -

There are 3 screws…one under the red hood…so you neglected to tell people that..when I went to pry apart…it broke…

tmaria1 -

tmaria.

Here is the update to Step 2: “UPDATE: The second mop repaired had 4 screws. Unscrew all of them and move the red sleeve down so you can open the main pump body. Leonard - 02/21/2017“

Len -

Followed the directions and now it works like a charm! My wife and I are thrilled, we love this mop but HATED the sticking handle. I almost was about to trash this one and buy another, so glad I did a quick search and found this. THANK YOU!

Chris Shilling -

I am haven’t taken the unit apart yet. or looked to see if it your model or a different one. When I looked at the cap the air vent inside plastic cover is V shaped & sealed. I perforated the joint completely to allow for air & it gave more spray & better handle return but did not solve it completely. Shouldn’t the air vent be completely open & free for air flow? I am ready to cut the plastic off before I take it apart. What do you think?

Kate

grohefamily -

I am missing the air vent and the liquid pours out of the mop.

Deborah Taylor -

I wasn’t able to unclog mine in spite of the excellent tutorial. Taking the cue from another reader, I called Rubbermaid, explained what was wrong what I had done, and sent a picture. Jackie concurred that this has been a problem and a brand new mop is on its way to replace the one I bought in June. I have never complained to a manufacturer my entire life so was very happy to see they stood behind their product

Wilma Santos -

Thank you so much! Your tutorial with the pictures was great. Fixed the problem of the piston sticking. I wanted to make a note to put the black square part into the notch it was in on the body so the spring has something to work against on the retraction. I missed that the first time and it didn’t retract. Glad I hadn’t put the screws back yet. So I re-seated the assembly and tested while watching it then put the screws back. Thanks again.

Sam -

The small silicone valve inside the lid is missing, do yiu know where I can find a replacement?

Deborah Taylor -

Hi, how do I break the long handle into two separate pieces again? I want to disassemble it and store it.

Hfhfj -

Thank you for this write up. It was excellent- couldn’t bear to contribute to the dumpster when there should be an easy fix and there was!!! Thank you. My partner is deployed and it was great to be able to do this on my own

K Padiso -

Have had my mop for awhile and used it a couple of days ago and found on the floor a little black rubber piece that looks like it should Go over something and if you squeeze the end water would come out in the end all rubber, could be plastic but think it is rubber, soft.

Do not know where it goes. The inside of the red cup where the water bottle goes is 4 screws. Could send a pic but so not know where it would go.

if I had email could send pick with the size.

any help would be appreciated, have had three others. Really like these mops.

thanks for your anticipated help.

B Fudge Nov 3/21

2dabet -

The fix went according to instructions and the pumping mechanism is working fine… not stuck, all good. When disassembled and testing, the piston/cylinder holds suction with a nice pop, (but not stuck either).

My problem seems to be that it appears to lose suction after a few good sprays when assembled. Usually removing the fluid container and really pushing it back in solves it, but that is not fun while mopping… might as well just carry a spray bottle separately!

My black O ring is not damaged (nor the white one inside the lid) and the wee little Si valve inside the bottle is still attached.

Any other ideas?

Tami Wilkins -

This did not work for me. Mine did not have a steady spray. I tried running warm clean water through it but that did not improve the spray. I followed these instructions but found the case did not separate as much as described. I got the parts out in pieces but I found no mineral deposits on the piston, so lubricated it and reassembled. I could not fit the parts back in without more separation of the housing. There is a post at the end of the housing near the mop end that would not budge. I tried working it apart but the case broke. After that happened I still could not get separation so I suspect something has changed in the manufacturing process? I threw it away, but because I like the product I purchased a new one. We’ll see how the next one works out.

davidwaples -

My mop was leaking, my son in law took one look at it, went to the garage, got an O ring, replaced that on the very top of the bottle and I’ve been using it again for about 3 years, and no problems. This mop has lasted longer than any other I’ve ever tried. Hope I haven’t jinxed it for now. Good luck with your repairs.

Barbara Holland -

I purchased this product and after 6 months and using in domestic setting, it stopped working. I complained to Nisbets and told no warranty so could not help.

Very unhappy, as product cost €189. If I try and fix it , I will have no comeback.

Deirdre OKennedy -

I might have a newer model of the same product .. Similar but a few clips , rather than screws makes it more difficult to open.. If I get it open, I will update ..

Edward Pinsent -

Ok.. so, there's a newer model than shown.. and as per David Waples above, it has a compression fitting now.. and taking it apart is much more difficult. You have to push a few clips at the bottom of the unit, and pull the mop mechanism apart. Then you reveal a second screw (phillips) .. and that will allow you to partially 'force' apart the piston assembly.. You have to manipulate the assembly from the case. ( I broke the clip mechanism apparently.. and had to 'mcgyver' a few screws in to put it back together .... sigh) . I was able to take it all apart, silicone the valve / piston parts. Some washers were already worn to a point of failure .. terrible design .. I cut them back but hope they will hold.. TOO many point of failures :-( .. I put the whole thing back together, but it's not simple.. I have a lot of patience.. It's working again, but who knows how long. Another example of a product made to work for a couple of years, and FAIL .. Too bad.. I like the product.

Edward Pinsent -

Help i just need to put batteries but i don't know where or how.

Buddy Boy -

Where do the batteries go and how do you install them

Buddy Boy -

Hi Len, I just fixed my mop with your help! Many thanks for taking the time to post detailed instructions with pics. Yay! One less mop in the landfill. Lesley

Lesley Anne -

Mine sprays okay as soon as I put the bottle into the housing it sprays once or twice theb stops?

Julie Brooks -

Worked flawless! Thank u

weavoak -

Wow, good job, Len! When I'm feeling fairly mechanical I'll try your technique to fix mine. Thank you for posting the details.

- Linda

LINDA SEWELL -