Introduzione
This procedure is relatively straight forward. You should take care to place the display on a soft surface and it is always advisable to use an anti-static bracelet, or an antistatic station to protect delicate circuitry from static discharge.
Ricambi
-
-
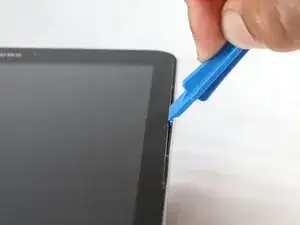
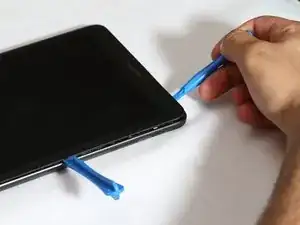
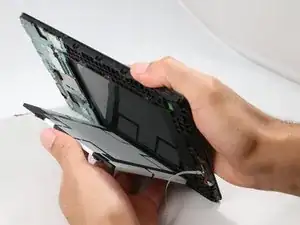
Insert one of the blue plastic opening tools between the glass display and the edge of the tablet's outer shell to break the seal around the display. It doesn't matter where you start the process, but once you form a gap, continue opening the gap around the edge of the device.
-
The display assembly and back casing should gently come apart after a gap is formed around the perimeter.
-
-
-
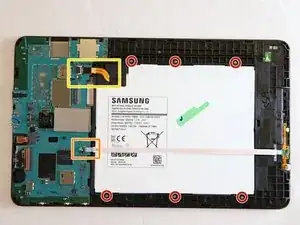
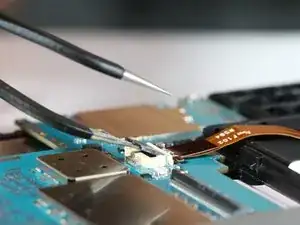
Attached to the back side of the display you will find the all of the primary computer hardware including the battery. You will need to remove six 3-millimeter Phillips head PH000 screws and two ribbon cables.
-
-
-
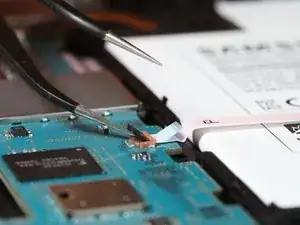
The first ribbon cable to remove is the longer of the two. It overlaps the entire battery. It is marked in orange in the Step 2 image.
-
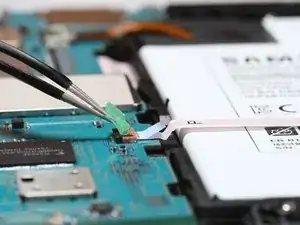
Using the precision tweezers gently remove the green tape over the clip at the end of the ribbon cable.
-
Last, gently lift the clip lever and the ribbon cable should should easily slide out from its slot.
-
-
-
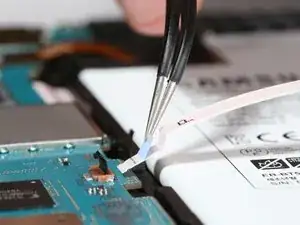
The second ribbon cable to remove is the wider, orange ribbon. The process is very similar to step 2. This ribbon is seen marked up in yellow in the image in step 2.
-
-
-
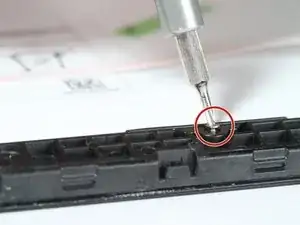
Using the "PH000 driver" to remove the 6 three-millimeter screws around the battery casing. All 6 screws are circled in red in the image seen in step 2.
-
-
-
Once all the 6 screws and 2 ribbons are removed, the battery should come free of the display assembly very easily.
-
With one hand on each side of the tablet simply turn the device on edge with one hand and tilt it over until the battery falls into your other hand.
-
If for some reason the battery does not come out, double check to ensure you have removed and unattached all of the 6 screws and 2 ribbon cables.
-


To reassemble your device, follow these instructions in reverse order.
10 commenti
thanks. busted the screen in 2 seconds flat!
Here are some tips to pry the cover off without damaging the digitizer: the cover is cemented with adhesive tape, making it hard to insert a tool into the seam, so heat the edge only first. Once you have it warm (not hot), use all of your fingers on the power button side to pull the plastic edge, using your thumbs to press on the back - do not try to pry or press against the glass side. Also, do not slide the pry tool under the glass and lift up, you can crack the glass. It takes patience
seadawg -
"Warm, not hot," is roughly between 175 - 200 degrees Fahrenheit. (80 to 100 Celsius).
First step is not easy. Do what seadawg did above. Dont bother with plastic tools. Start near the power button. Dont try to go between the screen and tablet. Pull back the plastic instead. I wish I had read seadawgs advice first, would have saved me a digitiser and a load of time…
*****Please be careful when removing the rear cover. The edge of the screen is very vulnerable and easy to break!!!! *****
Bev -
removing the back can be quite difficult. i found that the tools provided were absolutely useless. A guitar plectrum is much better. be careful on the top edge because the digitiser connector is there and you can easily cut thro it. Apart rom the aforementioned its dead easy.
jim beeby -
I started at the power button. Using a tin metal pry tool you have to push straight down, stop, lever away from the screen a little then push down again until you feel the snap of the back cover come away from the frame. repeat these steps working slow down the tab and along the bottom then up to the top.
vickyjean1007 -
*thin metal pry tool
vickyjean1007 -
Bear in mind that the outer edge of the screen rests on a thin ledge of the back cover so you cannot just pry straight down.
vickyjean1007 -