Introduzione

Questa è una guida pre-requisita per lo scollegamento della batteria del Samsung Galaxy Note 9! Questa guida è parte di un'altra procedura e non è pensata per essere usata da sola.

  1. imr3TvrFDDQ2Smgb
    • Spegni il tuo telefono prima di iniziare lo smontaggio.

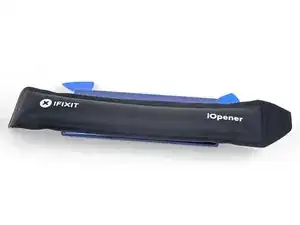
    • Usa un asciugacapelli, una pistola termica, o prepara un iOpener e appoggialo al bordo destro sul retro del telefono per circa un minuto per ammorbidire l'adesivo sottostante.

    If using an iOpener it will need to be fully heated and set on for at least 5 minutes. You’ll know the phone is hot enough when its almost too hot to touch.

    Spencer Barron -

    Just came here to say exactly that. The instructions should be amended to state that: "Get it fully hot and leave it there for at least three minutes solid."

    Mister Fixer -

  2. wK5AZqwWYVFHhdpM
    wK5AZqwWYVFHhdpM
    AiS2h1pqRmiTyrnX
    ijSfEkEAirfgkjyB
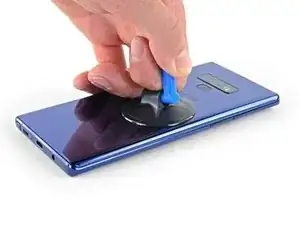
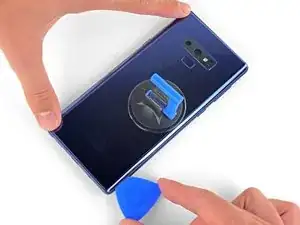
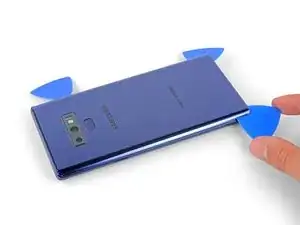
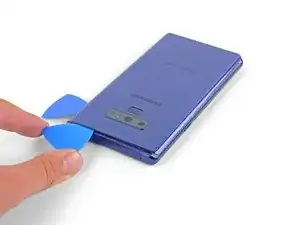
    • Fai aderire una ventosa al vetro posteriore.

    • Solleva la ventosa per creare una fessura tra il pannello posteriore in vetro e la cornice del telefono.

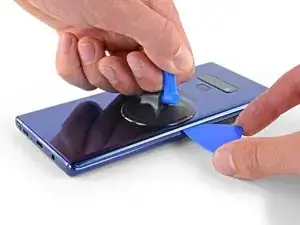
    • Infila un plettro di apertura nella fessura.

    • Se il vetro è rotto, coprilo con del nastro adesivo da pacchi per creare una superficie sulla quale far aderire la ventosa.

    • Se l'adesivo non si ammorbidisce, scaldalo ancora, ma non fare troppa forza: potresti rompere il vetro.

    It takes so much heat that it is concerning that damage might be caused to the internal parts. It is difficult to heat the glue, pull the case apart and insert the pick at same time. May need some more pointers to handle these situations first, to prevent possible damage. Also what about the glue that is heated and then cooled before opening? Does it run inside and cause greater adhesion after it cools? Another thing, the handling may cause the phone to turn back on while working to separate. Don't know that that is of concern.

    Lou Smith -

    Angle the pick up very slightly so the point goes up into the curve of the glass, not down towards the workings of the phone

    Dean Lee -

  3. phWdatcXskIOnRO3
    • Ricorda che c'è più adesivo sotto il bordo superiore e attorno alla cornice della fotocamera che sul resto del telefono.

    • Taglia con molta attenzione sul bordo sinistro vicino al sensore impronte digitali perché c'è il rischio di danneggiare il cavo a nastro sottostante.

    It's extremely easy to crack the back glass when nearing and rounding the corners. It's probably a good idea to soften the adhesive with heat as you go.

    Aaron Peterson -

    Step 5 is NOT "cut through the adhesive", that's steps 5-10. Step 5 is "Begin the careful process of cutting through the adhesive, starting at the right side where you already softened it. Proceed carefully, slowly, and warmly through the following steps."

    Aaron Peterson -

    These comments are spot-on. I never break a phone, and I cracked the back glass following the instructions without seeing these comments first. Heat the back much more than you think you need and go super, super slow.

    Mister Fixer -

  4. YpkbXvVWUIR4Afeb
    YpkbXvVWUIR4Afeb
    FaUbUKoZe6HurIby
    5vZLASPFVpEgMyLC
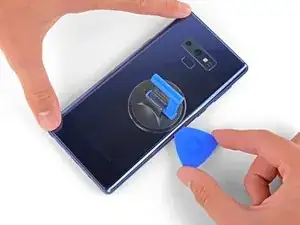
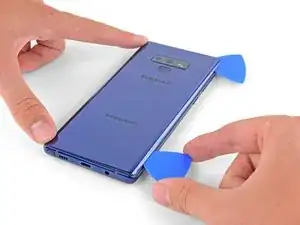
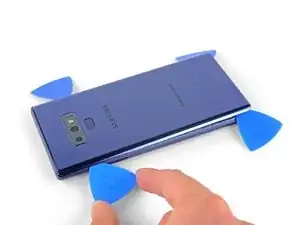
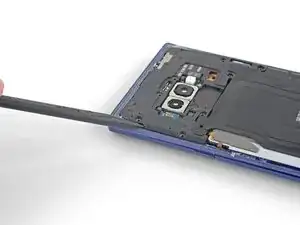
    • Iniziando dal centro, taglia l'adesivo sotto tutto il bordo destro con un plettro di apertura.

    • Non infilare più di metà plettro nel telefono mentre tagli vicino al sensore delle impronte o alle fotocamere, rischieresti di danneggiare i componenti interni.

  5. OFSZgLGgXARkwaWJ
    OFSZgLGgXARkwaWJ
    E6TEFVlXsPNDGGHi
    FFeOmLNySIi2VTct
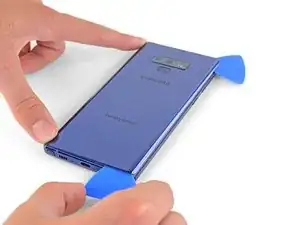
    • Lascia un plettro sotto l'angolo in alto a destra.

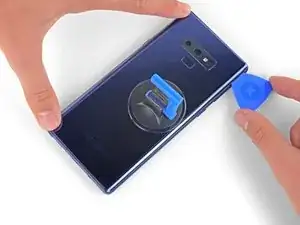
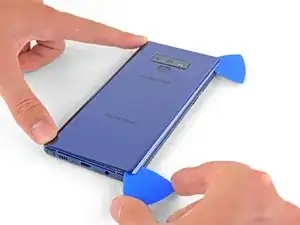
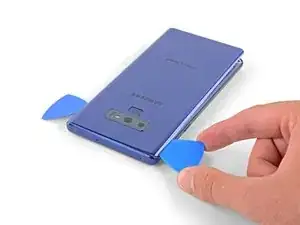
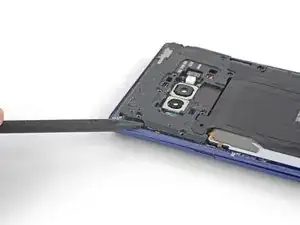
    • Usa un altro plettro per tagliare l'adesivo sotto l'angolo in basso a destra.

    • Lascia anche questo plettro sotto l'angolo appena tagliato.

    • Usa un iOpener, un asciugacapelli o una pistola termica per scaldare ulteriormente dove stai tagliando l'adesivo se necessario.

    There seems to be a lot of glue at the bottom, I broke the glass as I was cutting past the charging port - not sure if it was already fractured or just not enough heat (I used Sellotape so it didn't break up into pieces!)

    I think LOTS of heat & patience is the key!

    Be very careful around the corners and bottom (probably top too, but I didn't have a problem there). Make sure you've cut in far enough down the side first (go in about 1cm) but less round the corners and work in slowly.

    Dean Lee -

  6. 2jDIRHRfM2FgHNFR
    • Usa un asciugacapelli, una pistola termica, o prepara un iOpener e appoggialo sul bordo sinistro del pannello posteriore per circa un minuto per ammorbidire l'adesivo sottostante.

    If using an iOpener it will need to be fully heated and set on for at least 5 minutes. You’ll know the phone is hot enough when its almost too hot to touch.

    Spencer Barron -

  7. 1mtB1lSGkZWyMSrM
    1mtB1lSGkZWyMSrM
    4K246ldIYZVMViQv
    FFMXuXrVm2DpNhZ6
    • Infila un plettro sotto l'angolo inferiore sinistro del pannello posteriore.

    • Usando un altro plettro, taglia l'adesivo sotto il bordo sinistro del vetro posteriore.

    • Non infilare più di metà plettro nel telefono mentre tagli vicino al sensore delle impronte o alle fotocamere: rischieresti di danneggiare i componenti interni.

    • Non preoccuparti se i plettri si sfilano mentre il pannello posteriore si separa.

  8. nNSpwZdhgreWl3rh
    nNSpwZdhgreWl3rh
    DrwI6NpI44hU5bGQ
    6tniPN2RFyvbFgLv
    • Usando il plettro infilato, taglia attentamente l'adesivo sotto l'angolo superiore sinistro del pannello posteriore.

    • Infine, taglia l'adesivo sotto il bordo superiore del telefono.

    • Usa un iOpener, un asciugacapelli o una pistola termica per scaldare ulteriormente dove stai tagliando l'adesivo se necessario.

    Be VERY patient as you slide the opening picks around the periphery of the glass, and use heat very liberally. Make sure the smooth, clear aspect of the iOpener is against the glass, not the rough black portion.

    David Gitlitz -

  9. CFGPd5CUmuDGj14k
    CFGPd5CUmuDGj14k
    XadxJ3X5cMDYZdsS
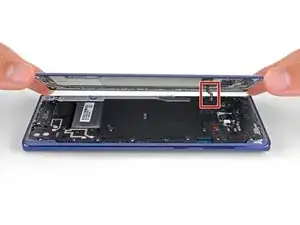
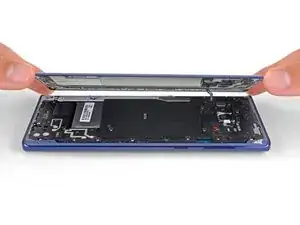
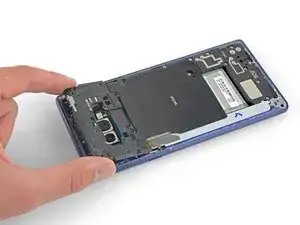
    • Separa prima il bordo destro della cover posteriore.

    • Inclina il pannello facendo perno sul bordo sinistro per accedere al cavo a nastro del sensore impronte digitali.

    • Non scollegare ancora il cavo del sensore delle impronte.

    Thought I'd done something wrong here as there wasn't a cable attached to the back - the fingerprint reader hadn't come away with the back, but had stayed with the phone.

    Dean Lee -

    Exactly the same experience. Made life a little easier.

    Mister Fixer -

    Happened to me as well.

    David Gitlitz -

  10. EOB5BnuPwLiWhRJy
    EOB5BnuPwLiWhRJy
    pvUG6RHyuIevnBsT
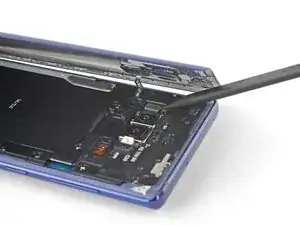
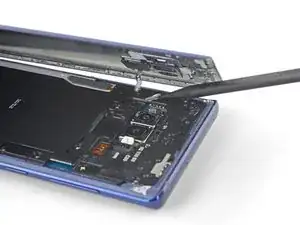
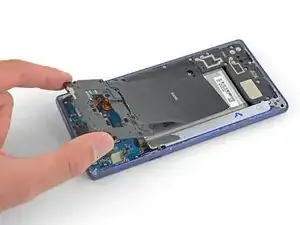
    • Usa la punta di uno spudger per far leva sul cavo a nastro del sensore impronte digitali e scollegarlo dalla sua presa.

    On my phone the fingerprint sensor did not come off with the back cover but stayed on the phone!

    Dean Lee -

  11. fxtTpIwKVs1XBASZ
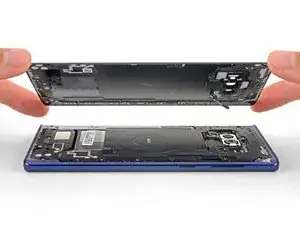
    • Rimuovi la cover posteriore.

    • Per installare la cover posteriore:

    • Usa delle pinzette per rimuovere qualsiasi adesivo rimasto sul telaio del telefono. Quindi pulisci le aree dove era presente l'adesivo con dell'alcool isopropilico (>90%) e un panno senza lanugine per preparare la superficie al nuovo adesivo.

    • Applica attentamente il nuovo adesivo al vetro posteriore. Quindi allinea un bordo della cover al bordo del telaio del telefono e premilo con decisione sul telefono.

    • In alternativa, puoi reinstallare il pannello posteriore senza sostituire l'adesivo. Rimuovi ogni grosso pezzo di adesivo che potrebbe impedire al vetro di stare piatto. Dopo l'installazione, Scalda il vetro posteriore e schiaccialo per fissarlo. Non sarà impermeabile, ma solitamente la colla residua è più che sufficiente per bloccare il pannello.

    • Assicurati di accendere il tuo telefono e testare la tua riparazione prima di applicare il nuovo adesivo e risigillare il telefono.

    I am installing a new backplate (this is my first repair; I was CERTAIN that I would crack the back glass, and I was NOT wrong) but I’m not sure how tweezers are meant to remove gooey adhesive! I simply used the blue plastic pry tool as a scraper and gently rolled up the goo. Maybe the glue is different because I have a refurbished phone? That may also explain why I had so much trouble with Step 1. Hope that this helps!

    Christopher Yarlott -

  12. NpvMRUlwISOMrGih
    NpvMRUlwISOMrGih
    xEFdupFYZIyOQham
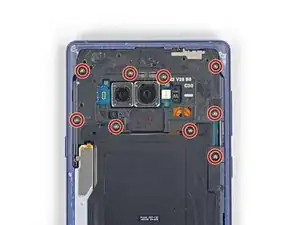
    • Usa un cacciavite a croce Phillips per rimuovere le nove viti da 4 mm che tengono in posizione il frame intermedio.

    There are two more screws on the bottom right corner of the little side frame that the Qi plate is glued to. I took those out as it put less stress on it.

    John Stone -

    It helps to hold the fine tweezers with your non-dominant hand to support the screw heads and ensure they come straight out; you can also gently lift as you unscrew.

    David Gitlitz -

  13. TtRQbpjOgwgKyCeU
    TtRQbpjOgwgKyCeU
    qnfyfoRPVUgOHdxi
    • Inserisci la punta di uno spudger nell'angolo in alto a sinistra della parte superiore del frame intermedio.

    • Fai leva per rimuovere il frame intermedio superiore dal telefono.

    • Il frame intermedio superiore si blocca e blocca con delle clip nelle procedure di inserimento e rimozione.

  14. WPl3OTEYUWaQk4lw
    WPl3OTEYUWaQk4lw
    OtIWY55KKKuAKdUL
    pRScXCbeMtNfmfgF
    • Rimuovi la bobina per la ricarica senza fili dalla batteria partendo dal lato sinistro.

    • L'adesivo è debole, ma se necessario puoi usare un plettro per tagliarlo.

    • Durante il riassemblaggio comincia con il riposizionamento del frame intermedio prima di far aderire nuovamente la bobina per la ricarica senza fili.

    Be careful not to tear it as it comes off - especially the side bits that stick out a bit

    Dean Lee -

  15. MDPfHEnbaBBwN5DS
    MDPfHEnbaBBwN5DS
    3SnhFaqu3LXtjZNv
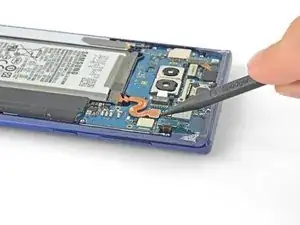
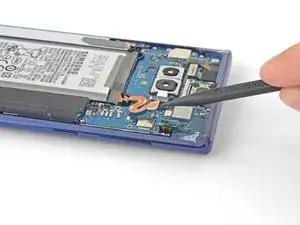
    • Usa la punta di uno spudger per scollegare il cavo a nastro arancione che collega la batteria alla scheda madre.

Conclusione

Per riassemblare il dispositivo, seguire le istruzioni in ordine inverso.

Sam Omiotek

Membro da: 25/02/19

71885 Reputazione

0 commenti