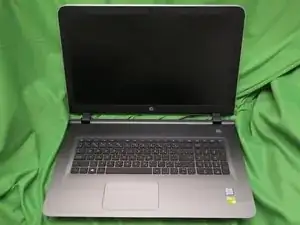
Introduzione

Questa guida può essere usata per molti portatili HP Pavilion dello stesso periodo.

Ci sono alcuni trucchi per aprire questo portatile per accedere alla RAM e al disco rigido.

  1. VAwDH5Mun5X2FVfr
    VAwDH5Mun5X2FVfr
    HSbtfEeaZpjCTLN1
    • Inizia scollegando il cavo di alimentazione, quindi gira a testa in giù ul portatile e rimuovi la batteria.

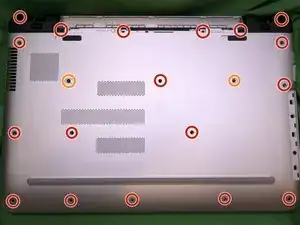
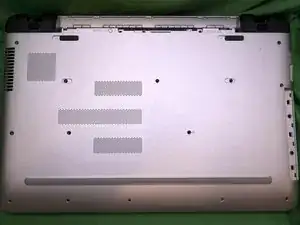
    • Ci sono molte viti visibili sul fondo del portatile. Sono tutte delle stesse dimensioni e lunghezza. Svitale tutte.

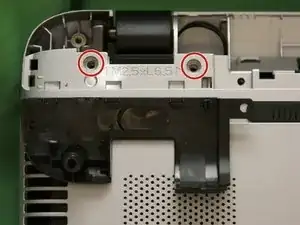
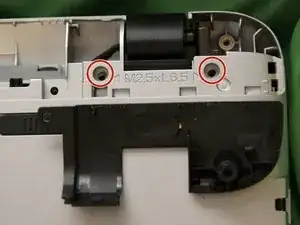
    • Ci sono due viti nascoste sotto gli adesivi argentati indicati dai cerchi gialli. Rimuovi gli adesivi e svita le viti sottostanti.

    For the slightly color blind, they are the two circles on the left and right of the most horizontally middle screw, in the third row of screws from the bottom going up. :)

    sam -

  2. BdKHFmNXnA3mDNfD
    • Rimuovi il lettore CD. Se tutte le viti sono state rimosse, dovrebbe sfilarsi facilmente.

  3. gHOtpZNxAFCAmNuQ
    gHOtpZNxAFCAmNuQ
    Rpvx4gHA2cLkQEcm
    DgXSSdHTBjevMCGG
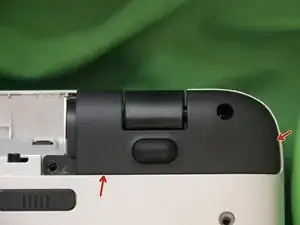
    • Usa un plettro per rilasciare i ganci in plastica nei punti indicati sulle coperture nere vicine alle cerniere.

    • Se fai solo leva sulle coperture si romperà almeno un gancio, ma non sono così importanti.

    • Una volta rimosse le coperture, svita le altre due viti nascoste sotto le coperture.

    • Tutte le viti sono uguali a quelle appena svitate.

    the model I had had screws underneath the rubber feet on those two black pieces. I had to pry off the rubber feet and remove the screws underneath so that I could pry up these two black corner pieces.

    jjinatlanta -

  4. ZBexRLSJYCtX5dKF
    • Gira il portatile a testa in su e aprilo.

    • Usando un plettro, rilascia i ganci di bloccaggio in plastica che tengono fermo la copertura inferiore.

    • Rilascia prima i ganci nelle zone evidenziate in verde, quindi quelli della zona gialla, ed infine quelli delle zone arancione.

    • Chiudi il portatile e giralo a testa in giù.

    • La copertura inferiore dovrebbe essere libera ora. Sollevane la parte anteriore e spingila verso le cerniere.

    • Se la copertura non si muove, assicurati di aver svitato tutte le viti inferiori, incluse le due sotto gli adesivi.

    my model had two screws that became visible after removing the CD drive - they were silver and had a much larger head than the other screws. I had to remove those to be able to lift the keyboard up.

    jjinatlanta -

    klasse, vielen dank!
    nachdem ich mich mit einem video mehrere stunden beschäftigt habe, ohne erfolg, habe ich durch zufall diese beschreibung gefunden.

    einfach, klar und funktionell!!! hat auf anhieb geklappt und ich habe eine ssd eingebaut und die bios batterie getauscht. bei dieser gelegenheit auch gleich den lüfter komplett gesäubert.

    vielen dank für die klasse beschreibung!

    robert kofler -

  5. ibWKYYXkJpCh5mEO
    ibWKYYXkJpCh5mEO
    VRBff1BWHDcArhSE
    I4piA3DIIJ3Aecib
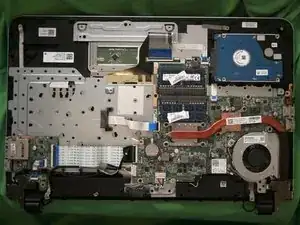
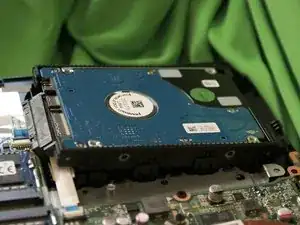
    • Con la copertura inferiore rimossa, il disco rigido e la RAM sono facilmente accessibili.

    • Il disco rigido è tenuto fermo solo dall'attrito.

    • Per rimuovere il disco rigido dal suo alloggio, sollevalo dal bordo vicino ai cavi SATA e di alimentazione.

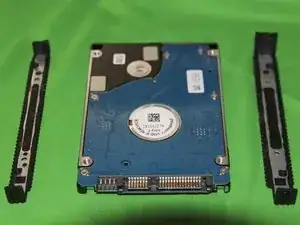
    • Scollega entrambi i cavi. Sono dei fragili cavi a nastro, quindi sii delicato. Non tirarli troppo lontano dalle rispettive prese.

    • Solleva il bordo dei cavi poco di più e fai scorrere leggermente il disco rigido verso la RAM per rilasciare i ganci che tengono ferma l'altra estremità.

    • Il telaio di montaggio può essere semplicemente tirata via dal disco. Anche lui è tenuto fermo solo dall'attrito.

    my model had a ribbon cable that went across the length of the Harddrive requiring its removal to access the harddrive. Removing the cable from the motherboard was a problem - I was unable to successfully unplug it. The cable attached to a small circuit board containing a usb port and microphone connection - I was able to remove two screws holding down that circuit board and then lift it out of the way, enabling me to remove the HDD

    jjinatlanta -

  6. hXja4h3bbP445WPC
    • Durante il rimontaggio, tieni il dispositivo a testa in giù ed infila la copertura inferiore prima nelle cerniere.

    • Non è molto pratico far fare presa ai ganci vicino alle cerniere e al comparto della batteria.

    • Dopo aver chiuso abbastanza l'area vicino alle cerniere per poter premere in posizione i ganci, fai scorrere le dita lungo i lati della tastiera per agganciare i lati e il fronte.

    • Gira il portatile a testa in sue aprilo, quindi fai scorrere le dita lungo il bordo sotto lo schermo e lungo tutto il perimetro del portatile per assicurarti che i ganci si siano fissati.

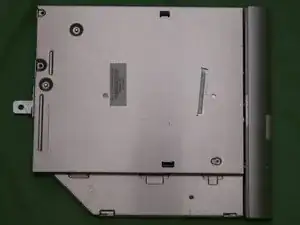
    • Reinstalla il lettore CD.

    • Gira il portatile a testa in giù.

    • Riavvita le viti che erano nascoste sotto le coperture nere vicino alle cerniere.

    • Reinstalla le coperture nere vicino alle cerniere e quindi riavvita tutte le viti. Non dimenticarti gli adesivi argento che nascondevano le due viti.

    Getting the hinges to line up and snap back into place was a BEAR! I finally had to slightly pry up on the plastic above the hinge to get the cover to snap into place. After that everything lined up easily. Hopefully that hint helps some other poor soul! :)

    John Rivest -

Conclusione

Per rimontare il dispositivo, segui le istruzioni in ordine inverso.

rmac

Membro da: 17/11/12

1206 Reputazione

22 commenti

Very good tutorial. The cover is a pain to open but with your input, it worked great.. thanks!

Mario Levesque -

Now, I must ask, how do I replace the keyboard??? Can it be done?

dgolson45 -

I don't have access to one of these right now, the one used for the guide was in for an upgrade, but looking at my photos it looks like there is a metal plate under the mainboard that holds the keyboard in place and it looks like it is held in place by melted plastic.

It that is the case, the official method would be a replacement assembly that includes the keyboard the retaining plate and the cover plate that the keyboard mounts through, moving all the electronic bits over.

The MacGyver method, (if you can get a replacement keyboard alone) would be to remove all the parts that block the keyboard retaining plate, break it loose to remove the dead keyboard and use glue to reattach the retaining plate.

If you have a heat gun (SMC rework station) you may be able to use it to soften the plastic retainers during removal and smash them back down later with a soldering iron but that basically never works.

rmac -

Great tutorial. I got water on my laptop and had to get inside to dry it out. Worked just like you said!! Thanks!

Susan Black -

Worst tutorial ever

Clifford Taylor -

Usually on a troubleshooting forum, the common sense is to EXPLAIN the situation... not just drop your frustration and leave!

Sebastien Bechard -

Thanks! The only problem I had is with the ssd, the cover would not close with both rubber spacers installed, I took one out and used tape, then it snapped back on great!

Alex McKay -

Excelent tutorial. It is compatible with the 17-x121-dx model as well. Thanks.

Martin Gleria -

Exactly what I needed to get the job done. Also, I hadn't thought of using a guitar pick before, but that was perfect for the job. Thanks!

jcorb2795 -

Simply superb. Thank you.

draconis hluot -

Outstanding. Worked as written on Pavilion Notebook 17 g077cl

The only difference was the clips by the hinges - no clips fell out, none present (made no difference).

Regarding the rubber spacers on the HD - When I replaced the HD, I must have put them backwards because I had the same issue as Alex. Once I reversed them, the cover closed fine.

Again, kudos for a well written and photographed guide.

Fix PC 205 -

What type of memory does this model use?

Gary McCoy -

The HP Pavilion - 17 g173ca uses DDR3. Mine has two 8gb modules totaling 16gb

Allan -

Great job! Two differences with my HP: screws were under the two rubber feet near the hinges and two small screws were holding the CD to the top of the case. Those were a pain to access; the CD tray has small access holes. So open the tray and slide it till the holes line up for a very small diameter Philips screwdriver.

Buffalo Scenic Prints -

Thanks so much for providing this excellent tutorial. I successfully upgraded my hard drive to a SSD. I couldn’t have done it without you.

Bill McClenny -

Really struggling to get the case off. The clips under the battery click back into place as soon as you lift the front and there seems to be resistance from the centre of the inside. Any help?

Ryan Merrick -

That resistance from the center usually means a screw has been missed, double check that all of the screws have been removed. If you are working on a different model than the one pictured there could be additional screws hiding somewhere.

rmac -

Great work. Thx for this tutorial.

Doctor Bob -

I got it open in less than an hour. Good tutorial. I was having trouble so I checked and there were those two little stickers hiding two more screws.

Charles Woznak -

Great work. Thanks very much!

Pat. Chandler -

Great help in conquering a fear! Thank you.

Rob Healy -

simple, clair et net. Bravo! et merci beaucoup!

asbouba diallo -