Introduzione
Questa guida può essere utilizzata come prerequisito per le riparazione o le sostituzione sul Controller Elite Series 2.
-
-
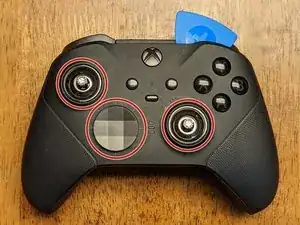
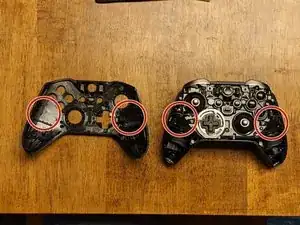
Differisce leggermente rispetto al modello precedente, la placca frontale ha bisogno di essere rimossa prima di ogni altra cosa. Inizia rimuovendo il tappino del joystick e la cover del d-pad.
-
Una volta rimossi, devi iniziare a lavoraci con un attrezzo di apertura(Opening tool) assieme ai plettri intorno alla placca frontale iniziando in alto a sinistra o in alto a destra.
-
Lavora lentamente intorno la placca frontale per allentare le clip, usando principalmente l'attrezzo di apertura in plastica(Opening tool) per evitare ogni tipo di danno alla placca frontale & ai componenti interni.
-
-
-
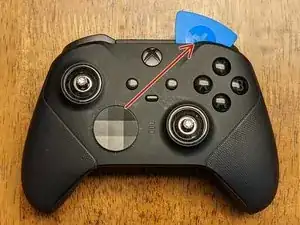
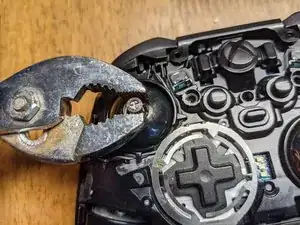
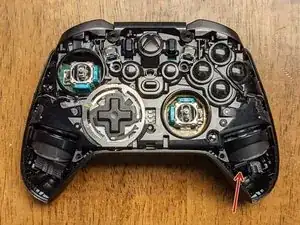
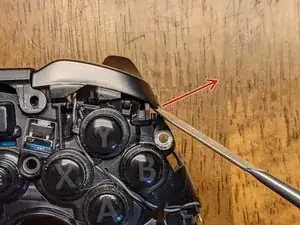
Questa è l'unica parte sulla rimozione della placca frontale nella quale suggerirei di usare lo spudger di metallo perché avrai bisogno di fare maggiore leva per allentare l'adesivo che tiene la placca frontale in posizione.
-
Inserisci lo spudger di metallo nell'area indicata nell'immagine, solamente di quanto ne hai bisogno per far leva verso l'alto nel rimovere la placca frontale. Lavora cautamente e lentamente dato che durante questo passaggio potresti facilmente danneggiare le componenti.
-
L'adesivo può trovarsi in due posti e per questo non sigillare il dispositivo nuovamente insieme per i requisiti IP-67/68, non è necessario sostituirlo.
-
-
-
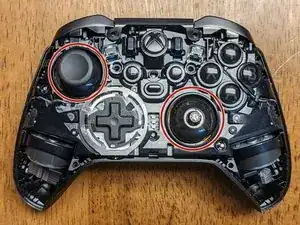
I joystick sono avvitati sull'asta dei potenziometri e avrai bisogno di un po' di convinzione nel rimuoverli. Essi devono essere girati in senso anti-orario per essere rimossi usando uno dei seguenti metodi:
-
Metodo 1: Utilizzanto il tappino del joystick- Prova questo metodo per prima dato che è meno probabile danneggiare il dispositivo. Inserisci uno dei tappini del joystick e prova a girarlo a mano. Se dovessero essere troppo stretti, procedi con il secondo metodo.
-
Metodo 2: Usando le pinze - Usando la minor forza possibile che possa prevenire lo scivolamento della pinza, afferra il joystick vicino alla base, dove il pezzo ha una "superficie piana" alla quale le pinze possono far presa. Una volta che si sono allentate, torna ad utilizzare il metodo 1 e continua la procedura di rimozione.
-
-
-
Rimovi le sei viti T-8 di sicurezza che tengono insieme in fronte e il retro del controller insieme. Nota: uno (evidenziate in verde) è coperto dal un/una pasta/adesivo bianco/a che si sbriciola quando rimossa/o; Questo ti fa sapere se qualcun altro in precedenza ha smontato il tuo dispositivo.
-
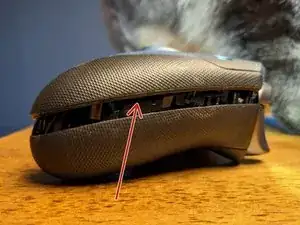
Una volta che le viti sono state rimosse, puoi inserire uno spudger sotto il motore di vibrazione dandogli una piccola leva per separare il fronte dal retro del dispositivo.
-
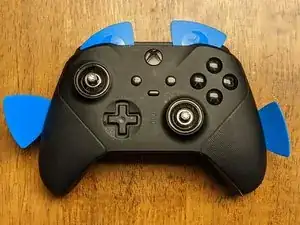
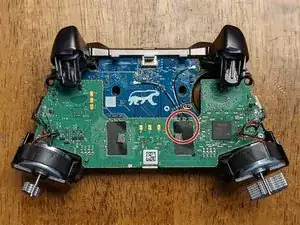
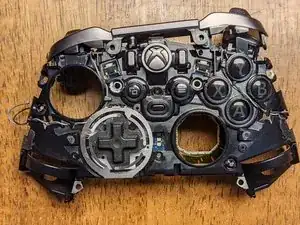
La terza immagine mostra l'assemblaggio frontale rimosso dalle scocca posteriore.
-
-
-
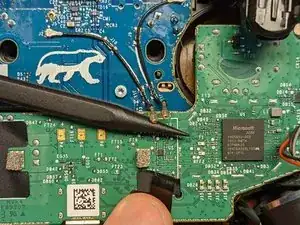
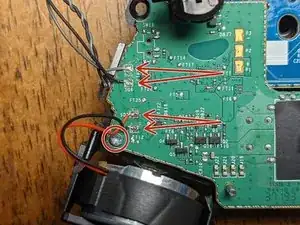
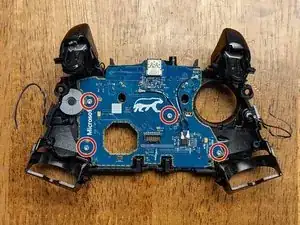
Inizia togliendo il nastro adesivo( delle pinzette potrebbero aiutare) che copre la connessione sulla scheda verde.
-
Mentre tieni il nastro adesivo via, inserisci la punta dello spudger sotto il connettore, facendo pressione verso l'alto con lo spudger da sotto dovrebbe essere sufficiente per rilasciarli dalla scheda.
-
-
-
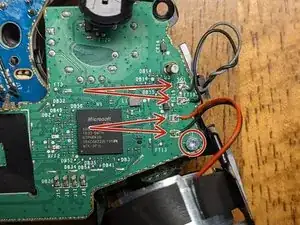
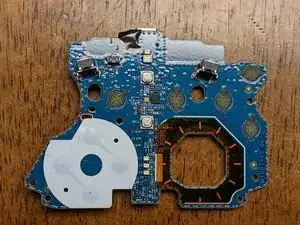
I fili devono essere dissaldati dalla scheda, e saranno sostituiti successivamente nel riassemblaggio.
-
Nota: ogni paio di fili ha il cavo nero saldato nella porzione inferiore; tienilo a mente per il rimontaggio se le immagini di questa guida non saranno vicine.
-
Nota: Potrebbe non essere necessario dissaldarli, dipende da ciò a cui devi accedere nel controller (grazie @bikemerlin per l'idea), però, data la fragilità della saldatura, si consiglia di rimuoverli per evitare danni.
-
Qualche punto di saldatura ha bisogno di una temperatura molto alta per essere dissaldato. Ho impostato la mia saldatrice a 450 C, tuttavia potresti essere in grado di rimuoverla ad una temperatura minore.
-
Rimuovi le due viti T-6 dalla scheda vicine ai motori di vibrazione.
-
-
-
Inizia rimuovendo la scheda madre facendola scivolare lungo i pin (come mostrato nell'immagine). Il lato sinistro deve essere alzato fuori dai pin e la scheda deve ruotata in senso anti-orario ad un angolo leggero prima di farla scivolare lungo la distanza rimanente per farla uscire dal pin destro(più lungo).
-
I pulsanti trigger fletteranno un po', questo ti permetterà di avere un po' di spazio in più per la scheda. Come in qualsiasi altro passaggio in questa guida, fai attenzione e sii paziente per prevenire danni a qualsiasi componente.
-
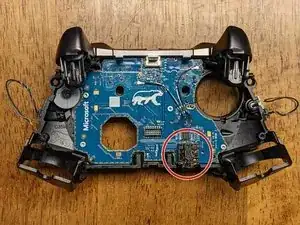
Una volta che la scheda madre è stata rimossa, potresti aver già notato che il jack per le cuffie si è spostato o è caduto. Se non è successo, rimuovilo dalla scheda adesso.
-
-
-
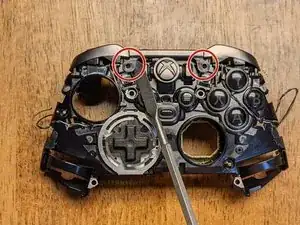
Ci sono due linguette che tengono il fermo per la barra in posizione. Sganciale gentilmente con uno spudger e scivoleranno in alto attraverso la loro stessa tensione. Nota: Il fermo molto probabilmente rimarrà attaccato al assemblaggio del bumper, ma deve essere rimosso prima di procedere al passaggio successivo.
-
Una volta che il fermo è stato rilasciato, usa nuovamente lo spudger per far leva gentilmente sui pulsanti verso l'alto e verso l'esterno( nella direzione delle frecce nell'immagine) che verranno rilasciate da un'altra clip. Fallo su entrambi i lati.
-
-
-
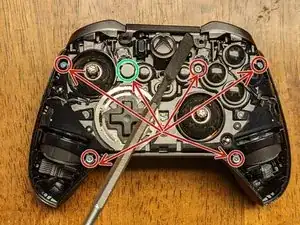
Rimuovi le quattro viti T-6 che tengono la scheda secondaria del controller al telaio. Tieni a mente che questa scheda tiene tutti il pulsanti rimanenti in posizione, quindi fai attenzione a non perderne nessun mentre la rimuovi.
-
Nota: Tutti i pulsanti hanno delle clip che li circondano che prevengono l'installazione degli stessi in una posizione errata; Fai attenzione a non forzarli in un'altra posizione quando riassemblerai il dispositivo.
-
Quando rimonterai , non forzare nulla in posizione questo indica che qualcosa non è stata installata correttamente.
-
Questo è tutto! Spero che questa guida ti abbia aiutato ad accedere ad ogni componente che ha bisogno di una sostituzione.
-


Per rimontare il tuo dispositivo, segui le istruzioni in ordine inverso.

11 commenti
Hi Wayne,
thank you for the guide.
I have an issue with my controller and I can’t find the answer anywhere so here’s hoping maybe you could help me.
In shortest trigger movement setting (hair triggers) I can press LT and the movement is restricted as it should but software doesn’t registered the button as fully pressed. In Xbox Accessories I can see that the controller thinks I’ve pressed the button at around 30%.
I assume this is a hardware issue but I’m not sure which part I should be looking at. I’m a beginner tinkerer :)
Off-hand, I don't know how the controller is doing this unless it's using 3 different potentiometers per trigger. I'd be willing to bet the problem is with software though because I've had the same problem in the past, but never really looked into it. I just checked mine now and it shows the hair-triggers to be working as expected in all positions; I checked these in both the Xbox Accessories app and Windows controller settings. Instead of tearing down the controller as a first step, I'd try checking for updates with everything: Xbox Accessories, Windows, the controller firmware, and the Windows driver for the controller specifically. If any of those have an update, restart your computer (after any single update) and then re-check all of them for updates again. If that doesn't work, let me know and I can try checking into my controller components to see what all compose the trigger assembly since I need to replace a couple of buttons that are wearing out anyway!
I have tried updating firmware of the gamepad but 5.11 and beyond does not really work well on Win10 and Bluetooth (Xbox Elite 2 is recognized as standard Xbox controller and paddles don't work). However, I did verify that I encounter this issue on 4.8 (bluetooth and cable) and 5.13 (cable).
I have reverted the firmware back to 4.8. I have deleted and reinstalled Xbox peripherals drivers as well as uninstalled most Human Interface Devices drivers & restarted my PC. Didn't help.
I took screenshots hoping this would clarify my issue:
https://ibb.co/8jK5bMS - RT is in hair-trigger (shortest movement), RT is registered as fully pressed
https://ibb.co/gTcWgWG - LT is also in hair-trigger, here I'm pressing LT as hard as I can but it's registered as ~35% pressed
https://ibb.co/9wfzDMR - gamepad tester tells me that the button is not pressed fully
It'll be a few days before I can tear my controller down, but just to confirm, your right trigger is working fine and it's just the left trigger not registering the hair-trigger switch?
Yes, RT is working fine. LT works correctly in a sense that I cannot press it fully due to hair trigger lock but the press doesn’t fully register. Are there any sensors there responsible for analyzing strength of the press? The button is analog so maybe there’s something…
It’s worth adding that this has started happening after I gave the controller to 3rd party retail for LB/RB exchange. I cannot establish if they really did change the bumpers or just opened the gamepad and removed these white plastics (but I don’t see the plastics anymore).
Sorry for the late reply! Alright, I just had a chance to break down my controller again and on the back panel where the aforementioned trigger switches are, there are two daughterboards; one for each hair-trigger assembly. I'm not seeing one easily with a quick google search, but if you can find a donor to test it against, you can compare and see if that board is the problem. None of those components require soldering, but you'll need a T3 Torx to remove them. If you have a friend with the same controller, you could try asking them if you could borrow it to test the components (assuming theirs is working correctly!). Alternatively, you could try finding a "parts only" sale on eBay as a donor that might be just as cheap as buying the board, but it might be a gamble as to whether or not it will have good parts.
Regardless, as a first step, I'd just pull the controller apart and see if there is any obvious damage or loose connections; good luck!
Oh, as a side note: those white plastics aren't 100% necessary for the bumpers to function. If I were to guess, I'd say they are probably to prevent excess friction/damage to either the bumpers or switches, but as easy as they are to replace (in general), I wouldn't worry about it.
Is there anything in the guts that identifies what kind of plastic the controller is made of? Like a sticker or something molded into the inside that isn't visible in the photos? I don't see anything listed in the manual but I could have missed it.
Particularly the faceplate; I just want to pop it off to paint it, but I'm having difficulty finding information about what kind of plastic they used.
Edit: I know the center part looks like it has ABS stamped on it, but I'm not sure if the same plastic was used for the front and back pieces as well.
Crimm -
hi wayne, thanks 4 the tuto, greetings from Mexico!
Starting center to sides from top, then center to sides from bottom worked for me.
Robert Cole -